


Author:AXYZ DESIGN
Date:2017-10-27
ANIMA 2 |TIMERIDE COLOGNE, A UNIQUE VR EXPERIENCE
The Experience
by Michael Plängsken | Ground-studios.de GROUND STUDIOS shows an inside look at their CG production of TimeRide VR, where ANIMA was heavily used for crowd animation.
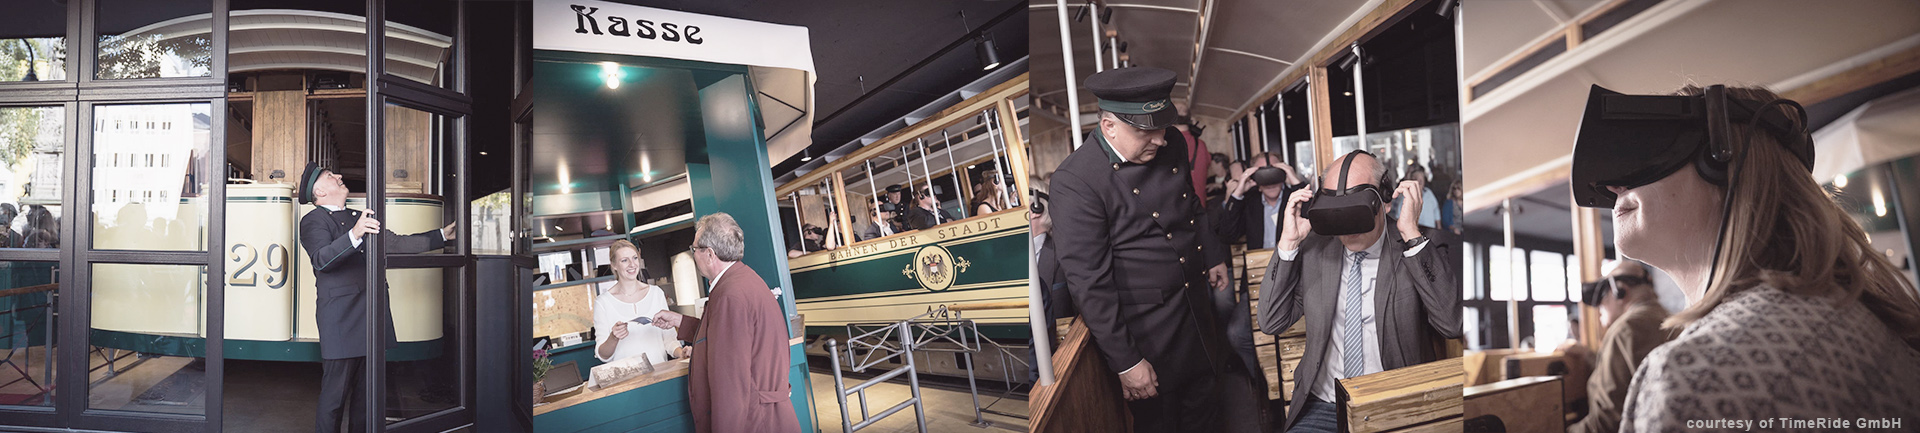
At its newly-opened venue in Cologne, TimeRide VR presents a new attraction for tourists and Cologne citizens including a unique multi-user out-of-home VR experience.
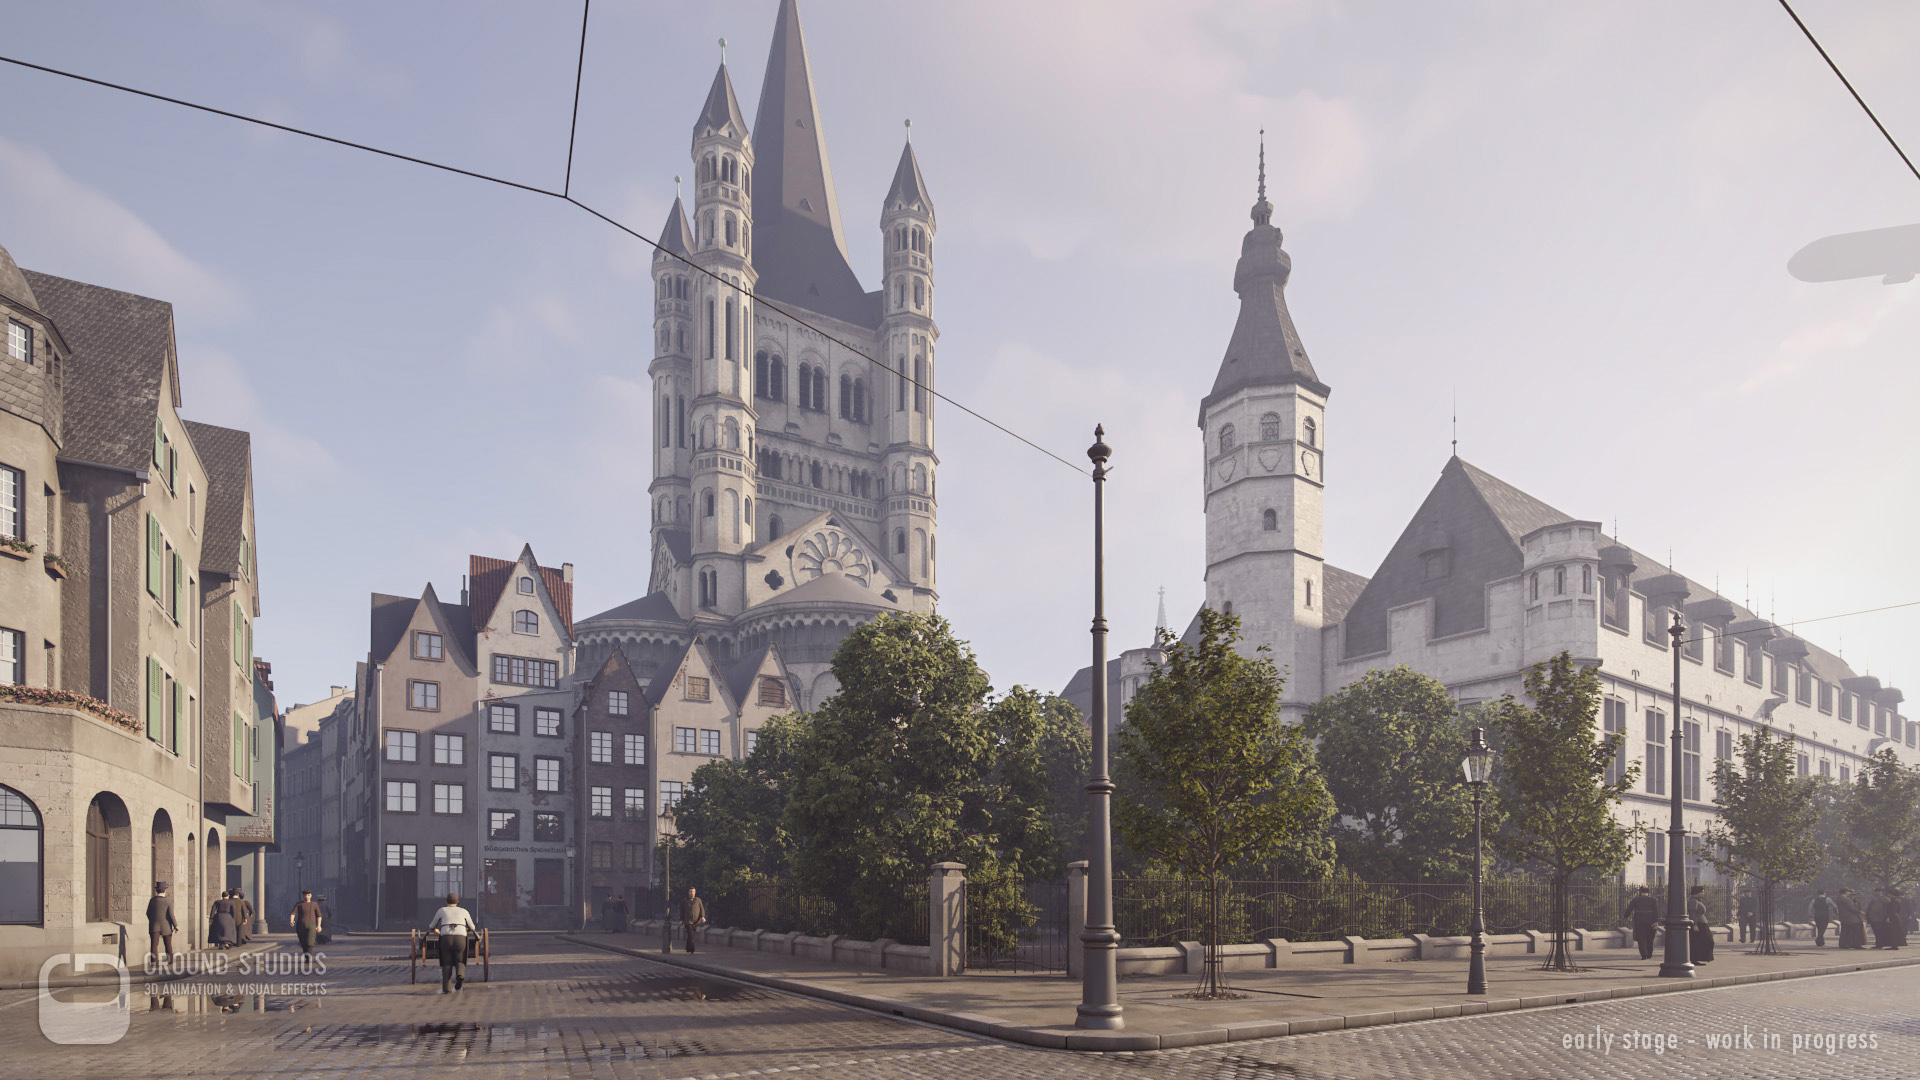
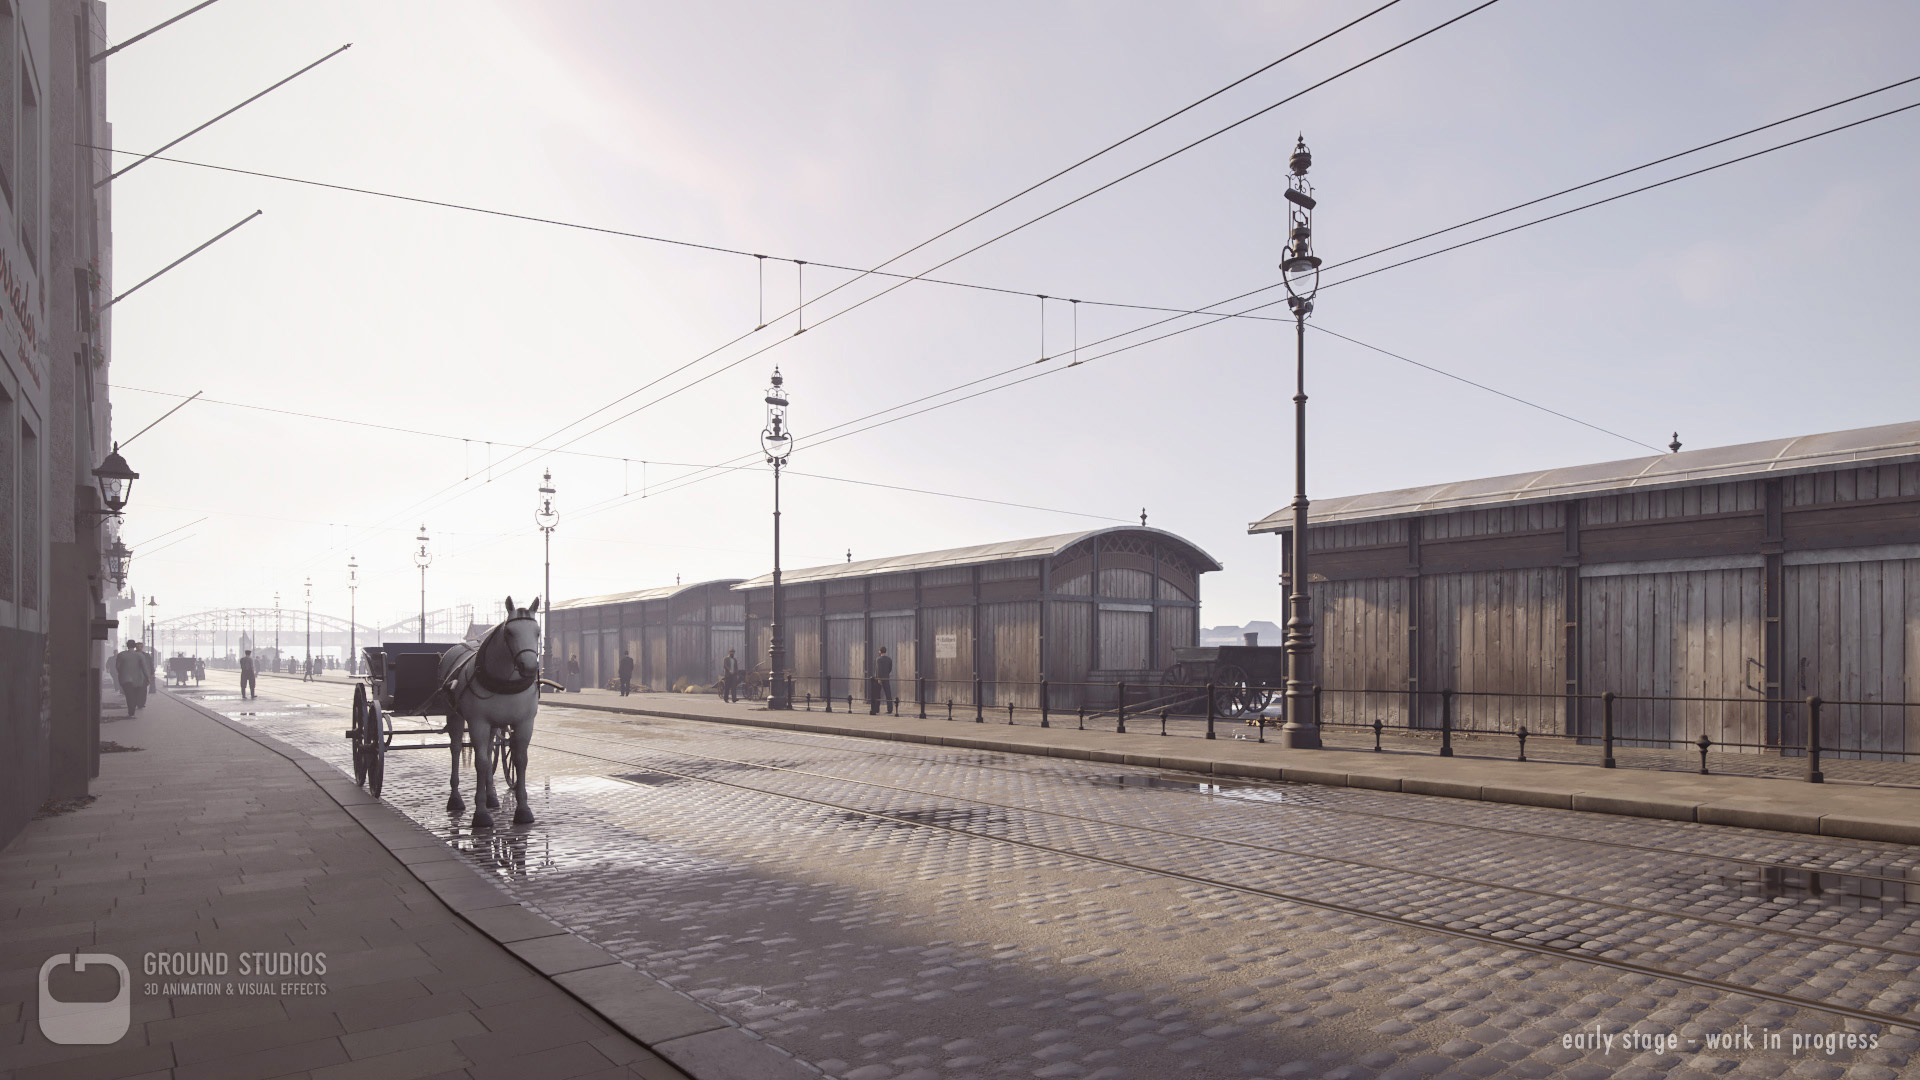
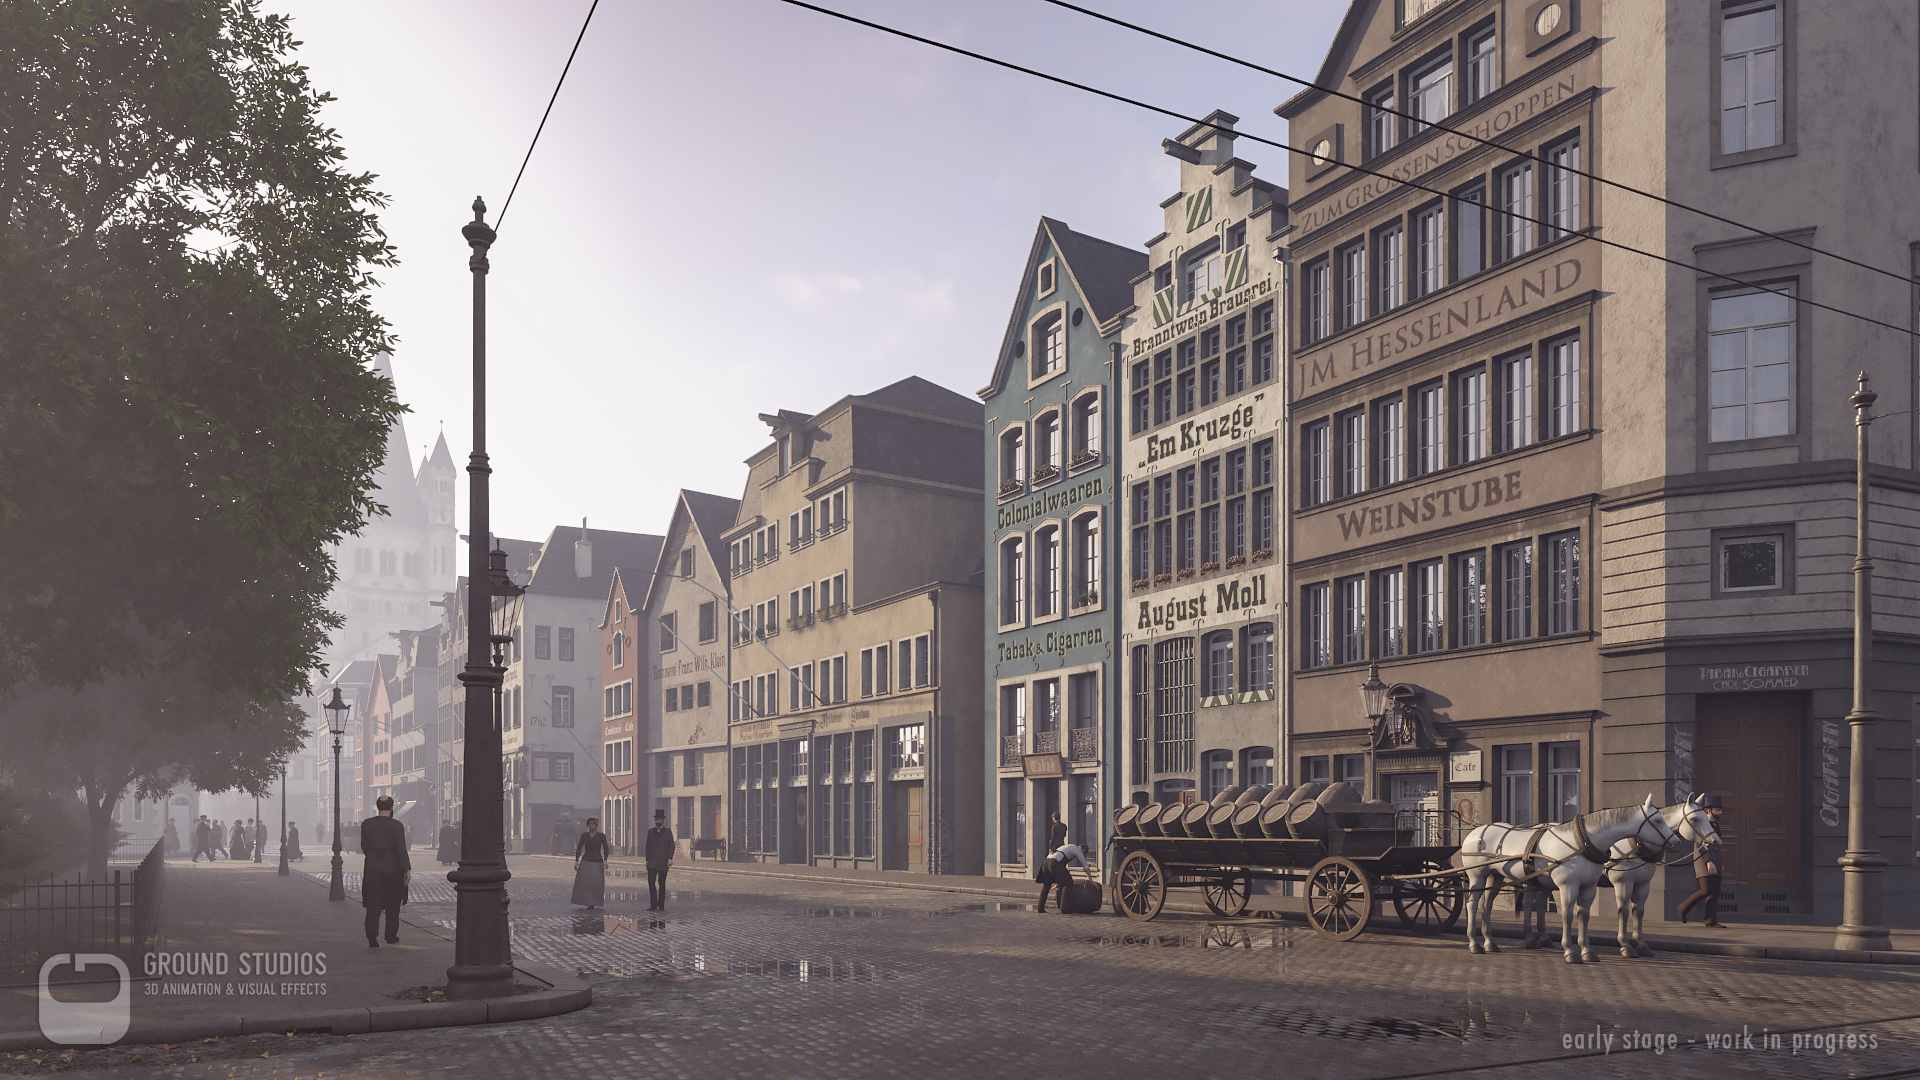
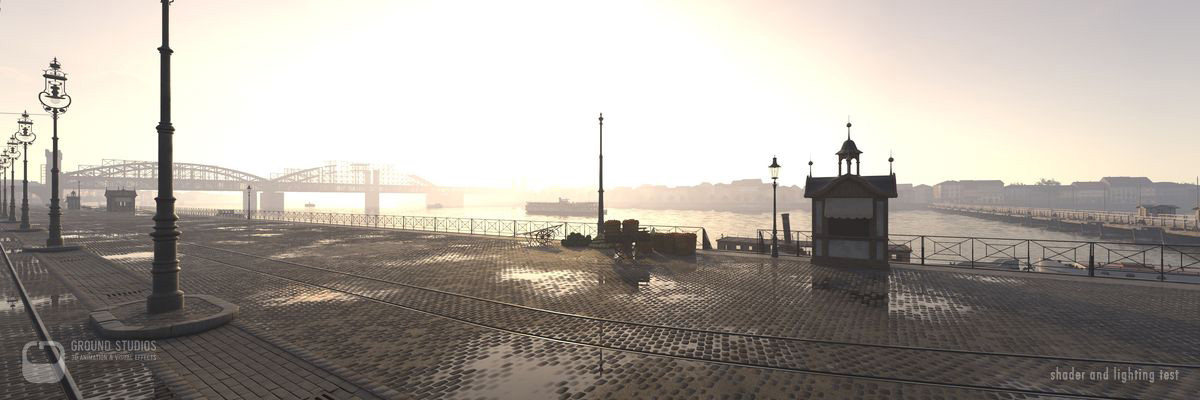
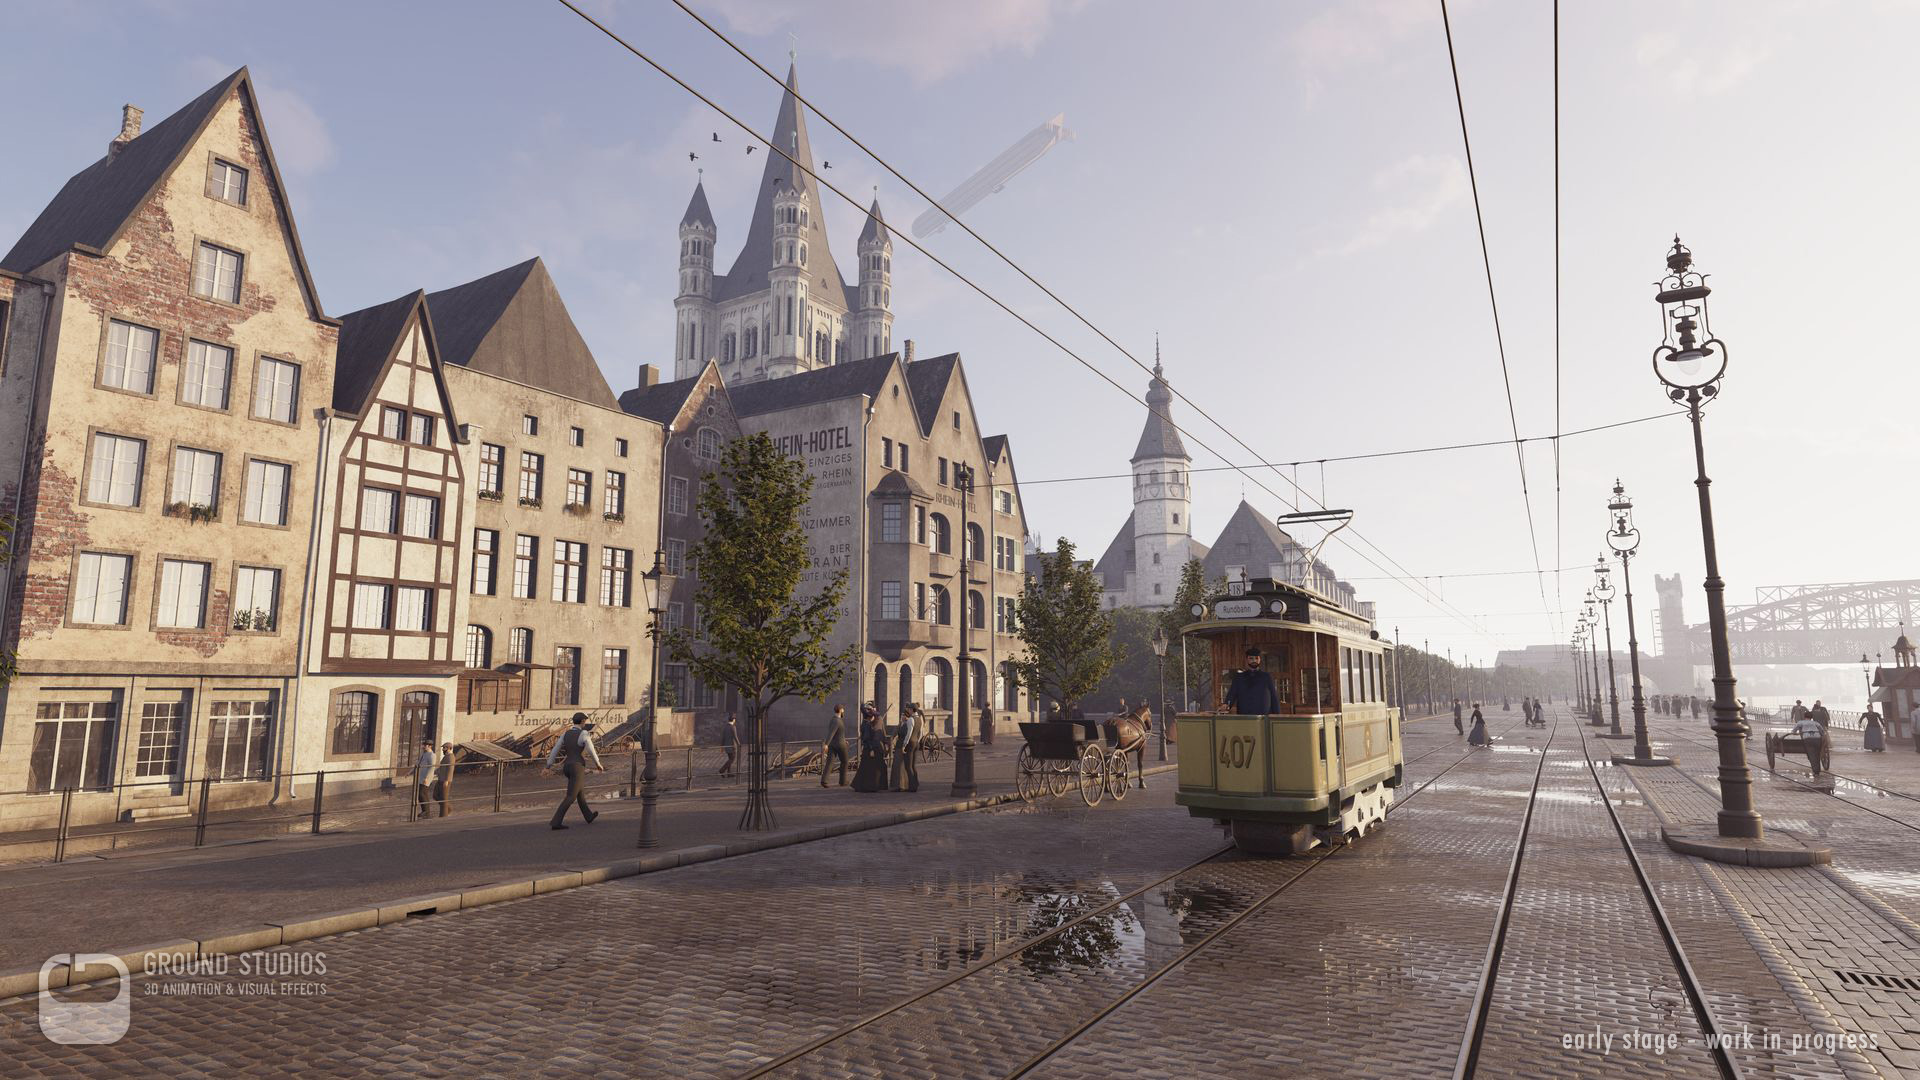
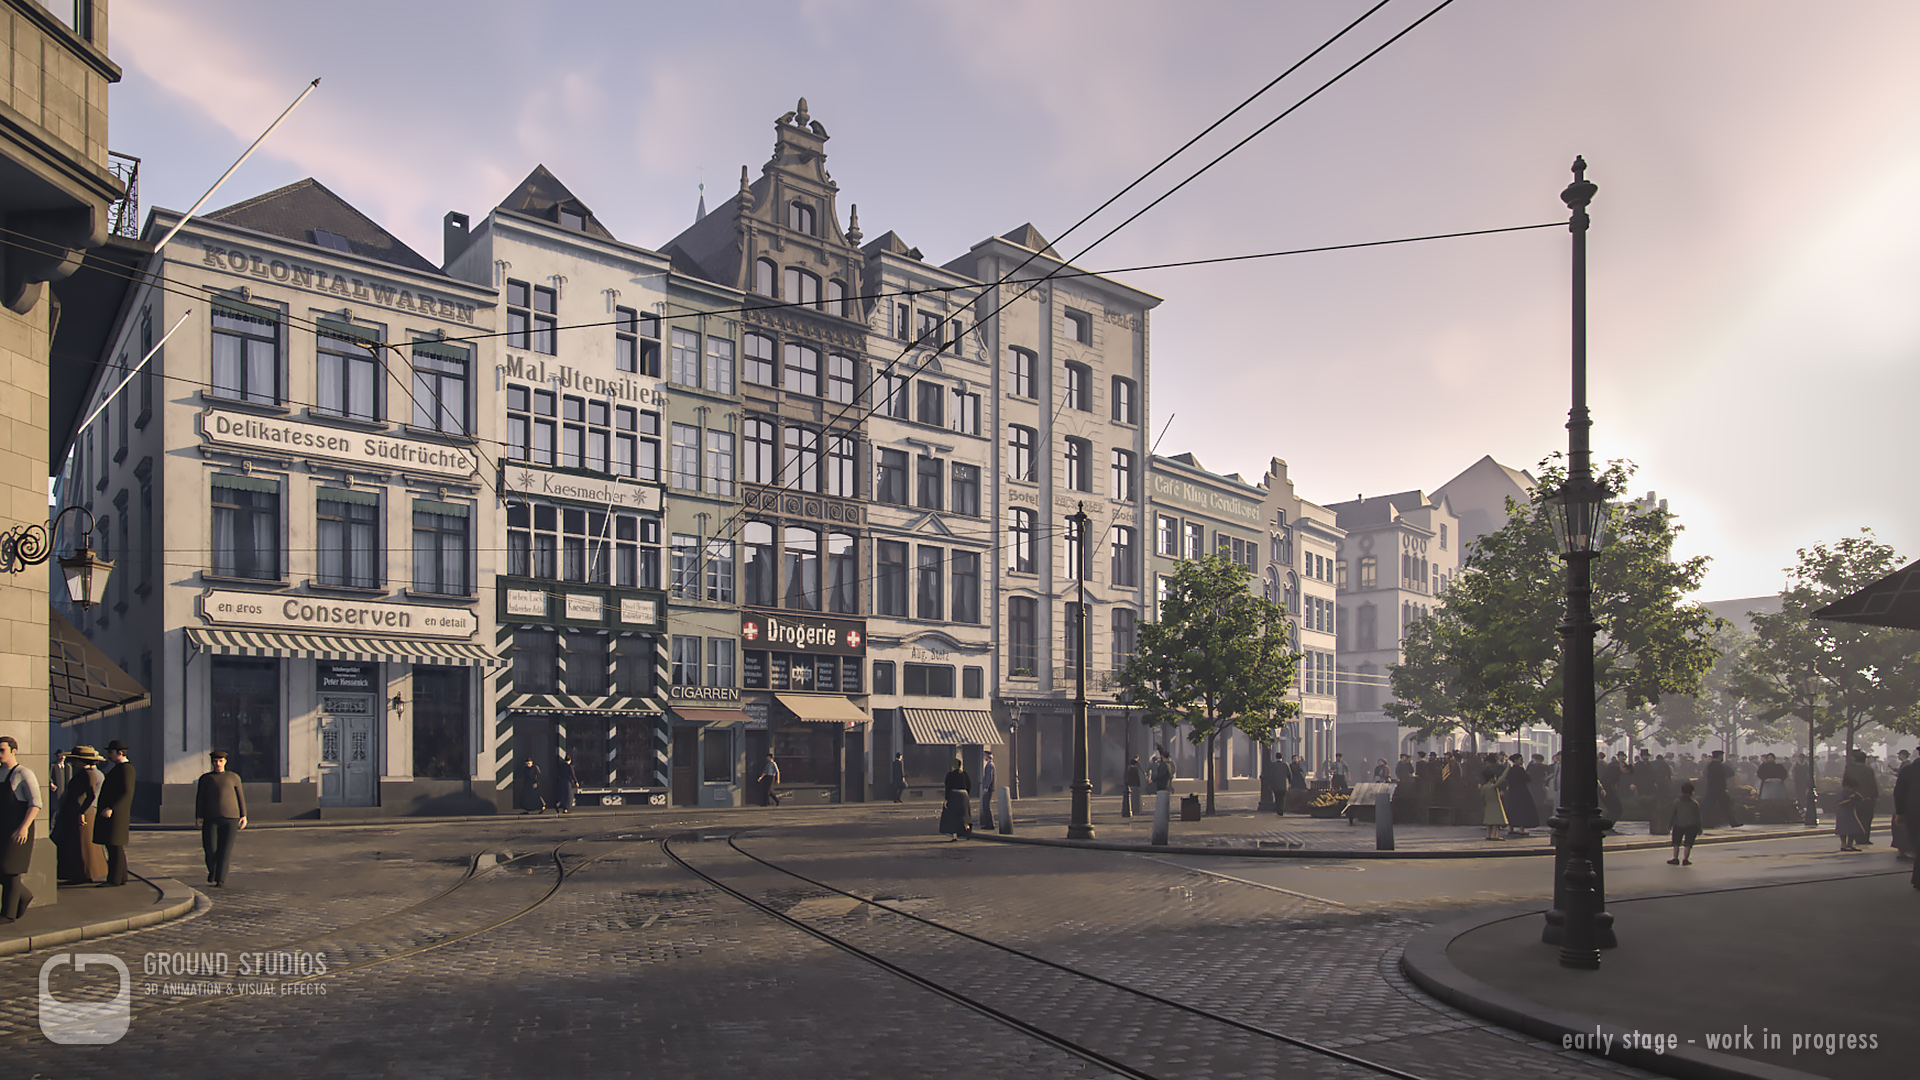
During the approximately 45-minute stay, the visitor is taken on a journey through Cologne’s History. Highlight of the current exhibition is a 15-minute tram ride through the old town of Cologne how it looked at the beginning of the 20th century - before both World Wars.
The visitor sits both virtually and physically in a replica of one of these trams which were inaugurated in Cologne in 1901. Feeling a gentle breeze and smooth vibrations of the tram, the visitor is diving into the historical scene with all senses and can admire not only the stunning architecture but becomes witness of a time period with all its flair.
Product idea, store concept and daily business are developed and conducted by the company TimeRide GmbH.
Technical Concept (hybrid approach)
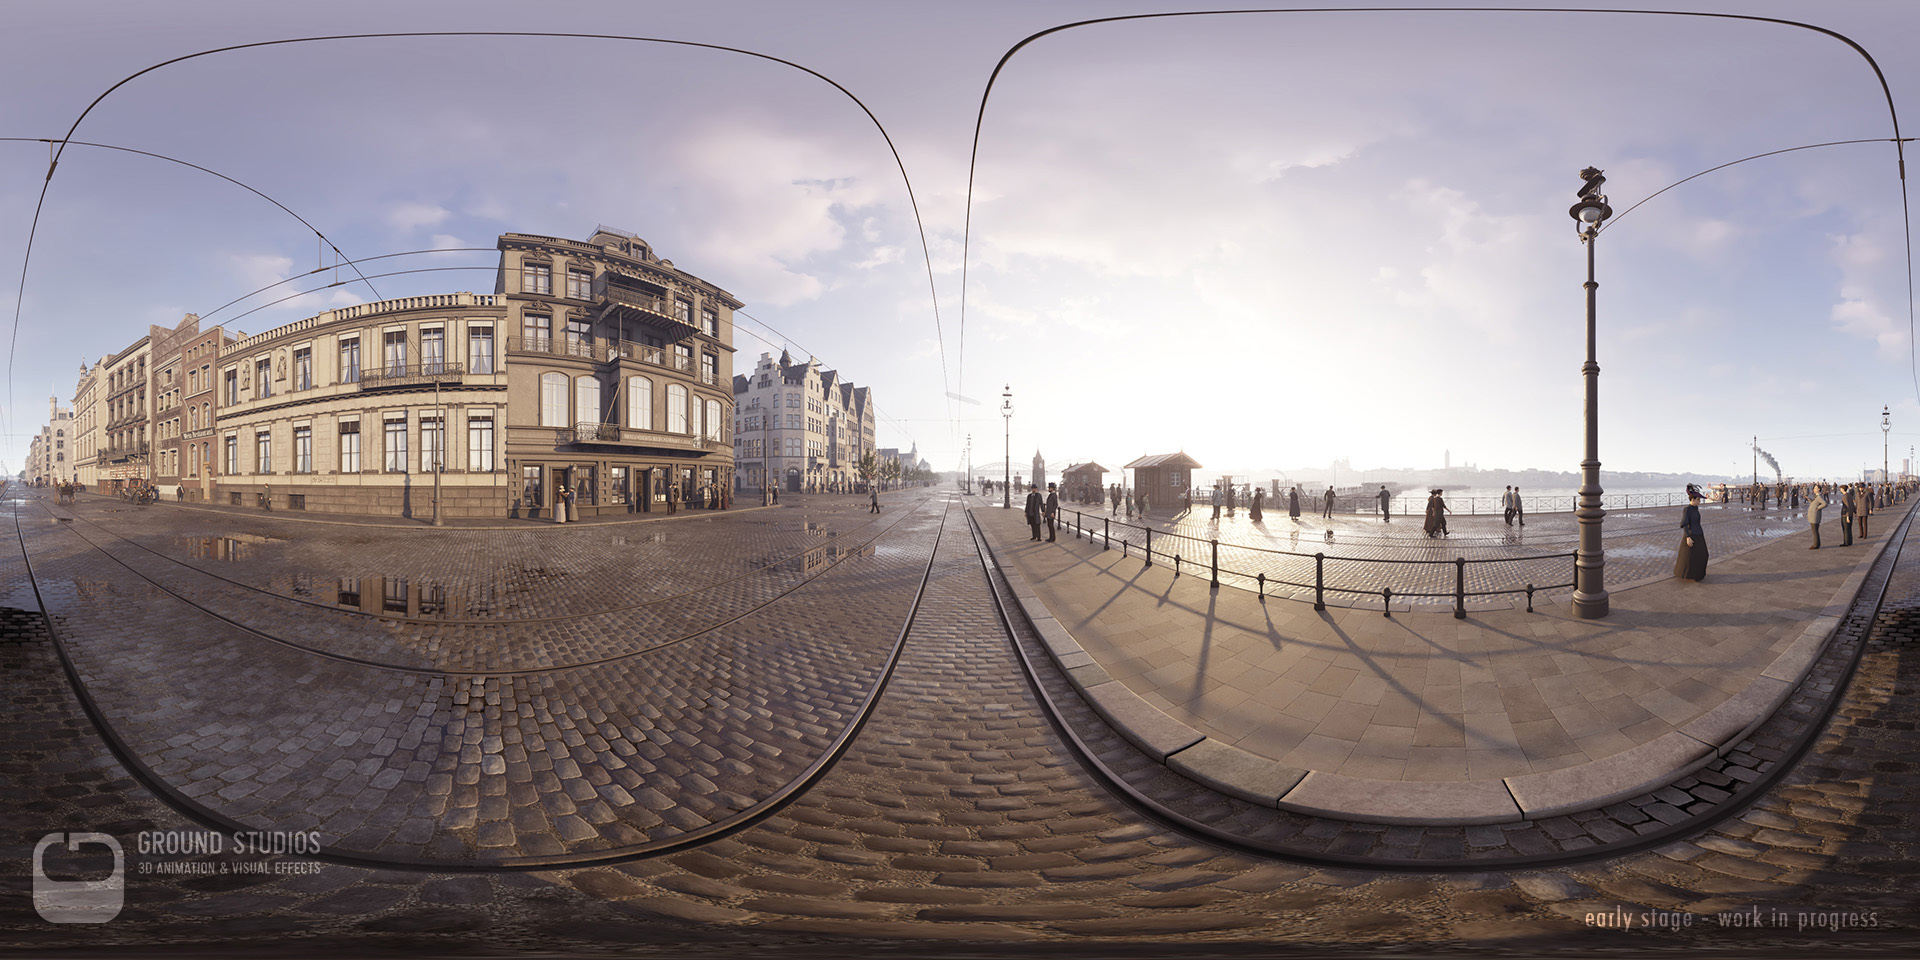
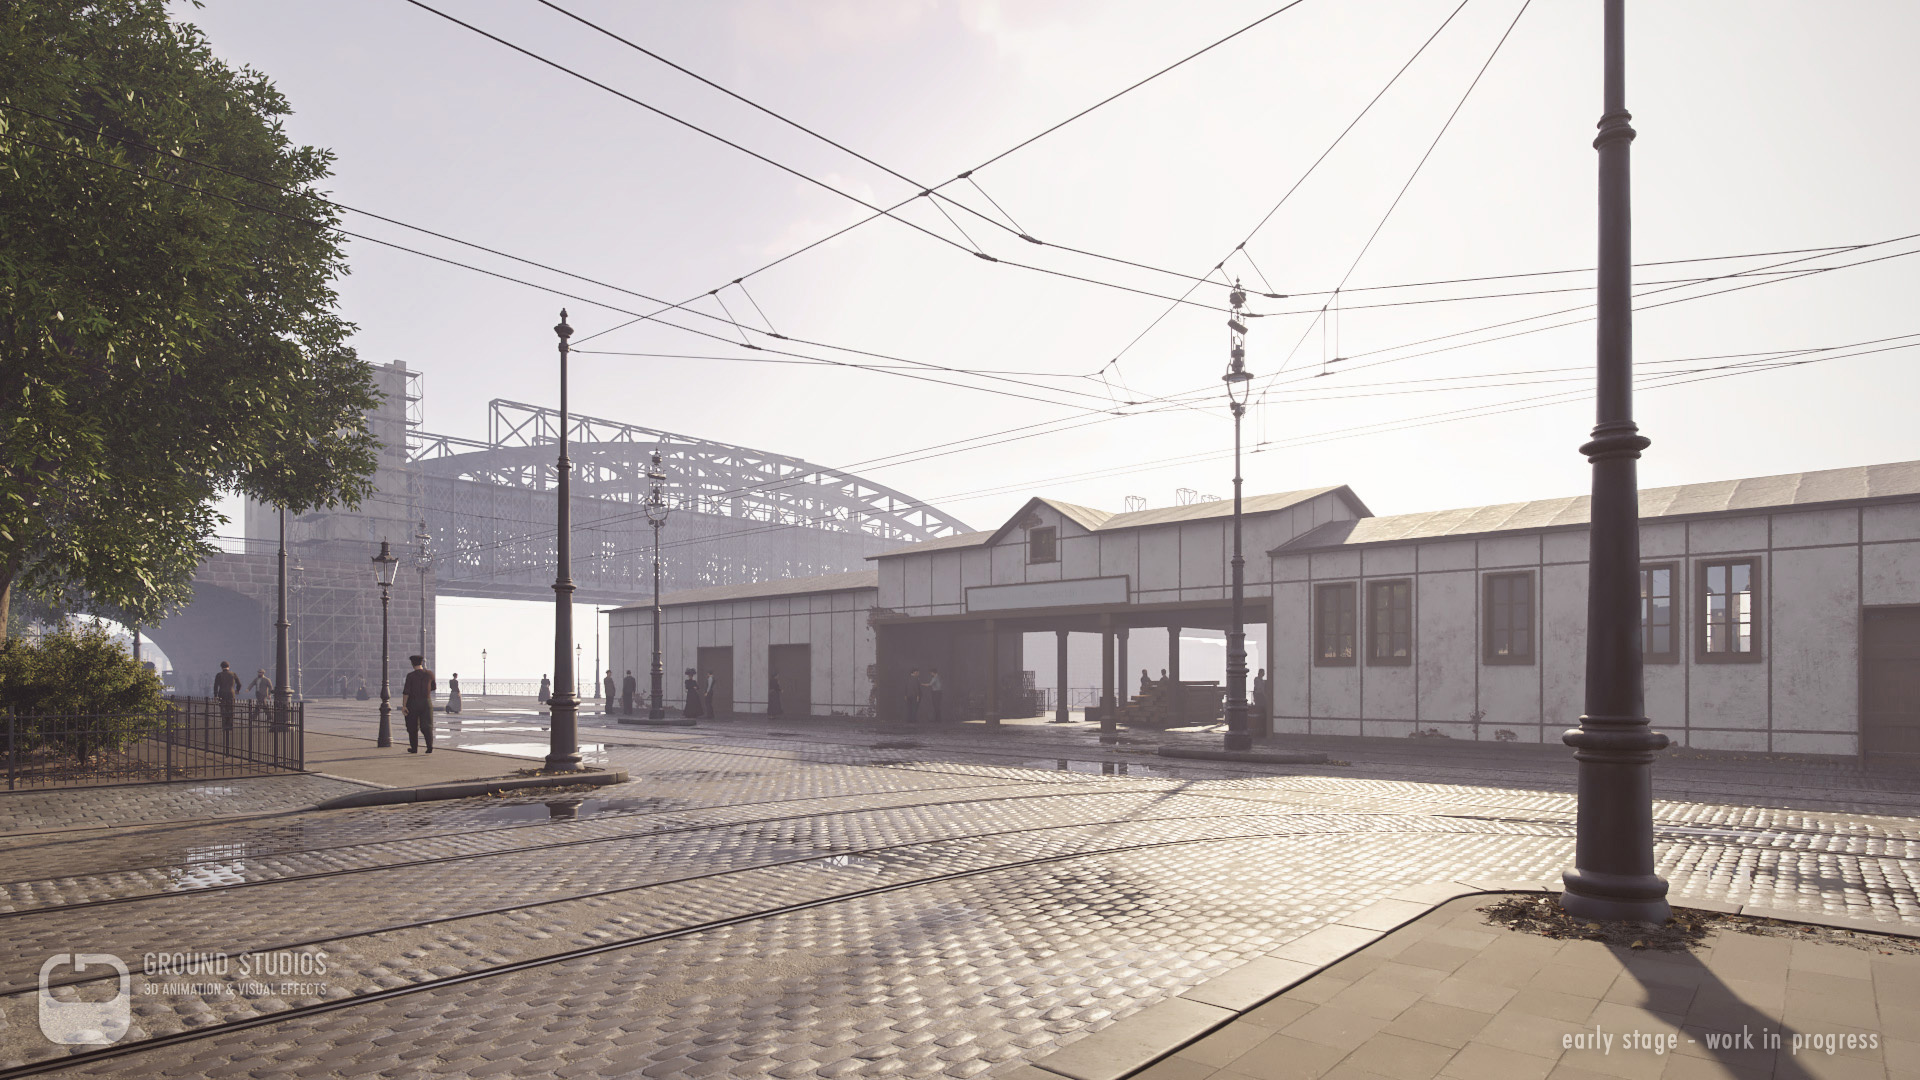
To build and optimize such a big part of a city for a game engine, there is much work required, like LOD creation for all Assets, and proper UV layouts for light baking. We had to avoid this extra amount of work by utilizing a hybrid solution. The most efficient answer was to display a pre-rendered movie on a monosphere around an ingame tram - all put together in Unity. This way, we have parallax for everything in the close-up range and at the same time the environment is a 360° pre-rendered 4096x2048 pixel resolution monoscopic video.
But why not a stereoscopic video? One obvious reason is the doubled render effort. But the main issue is that tilting your head in a stereoscopic video is really unpleasant and often makes people feel sick immediately. Encoding and playing stereoscopic video in an acceptable resolution is also an issue, so we decided to go with the monoscopic solution without any side-effects.
Planning
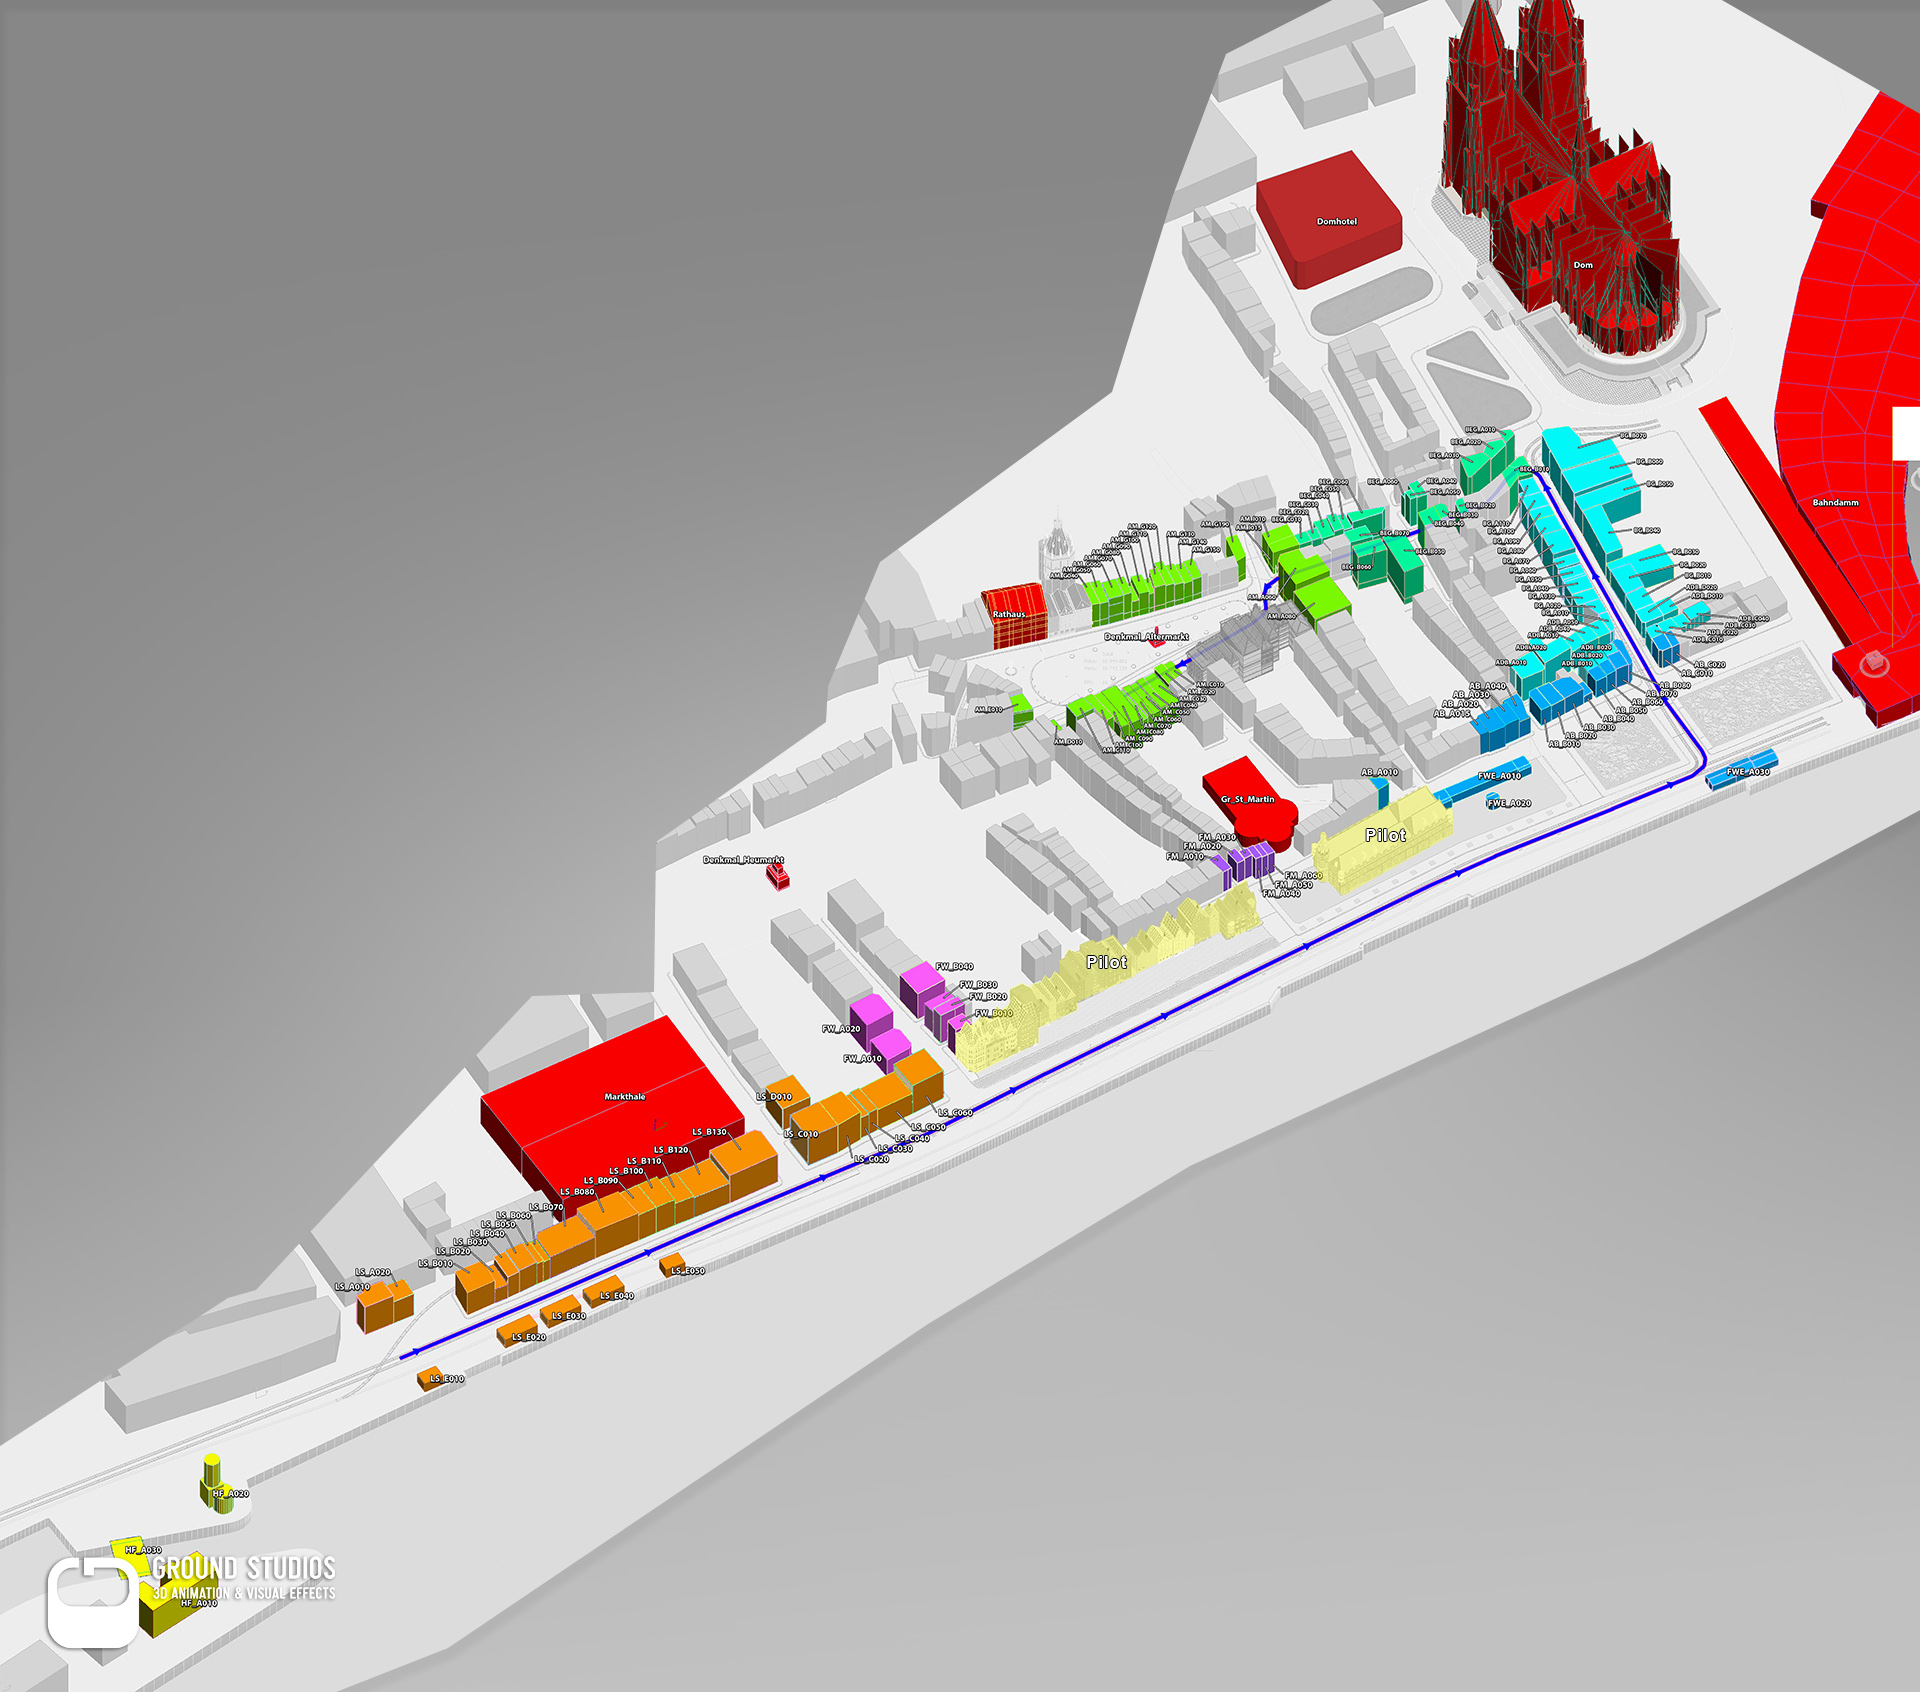
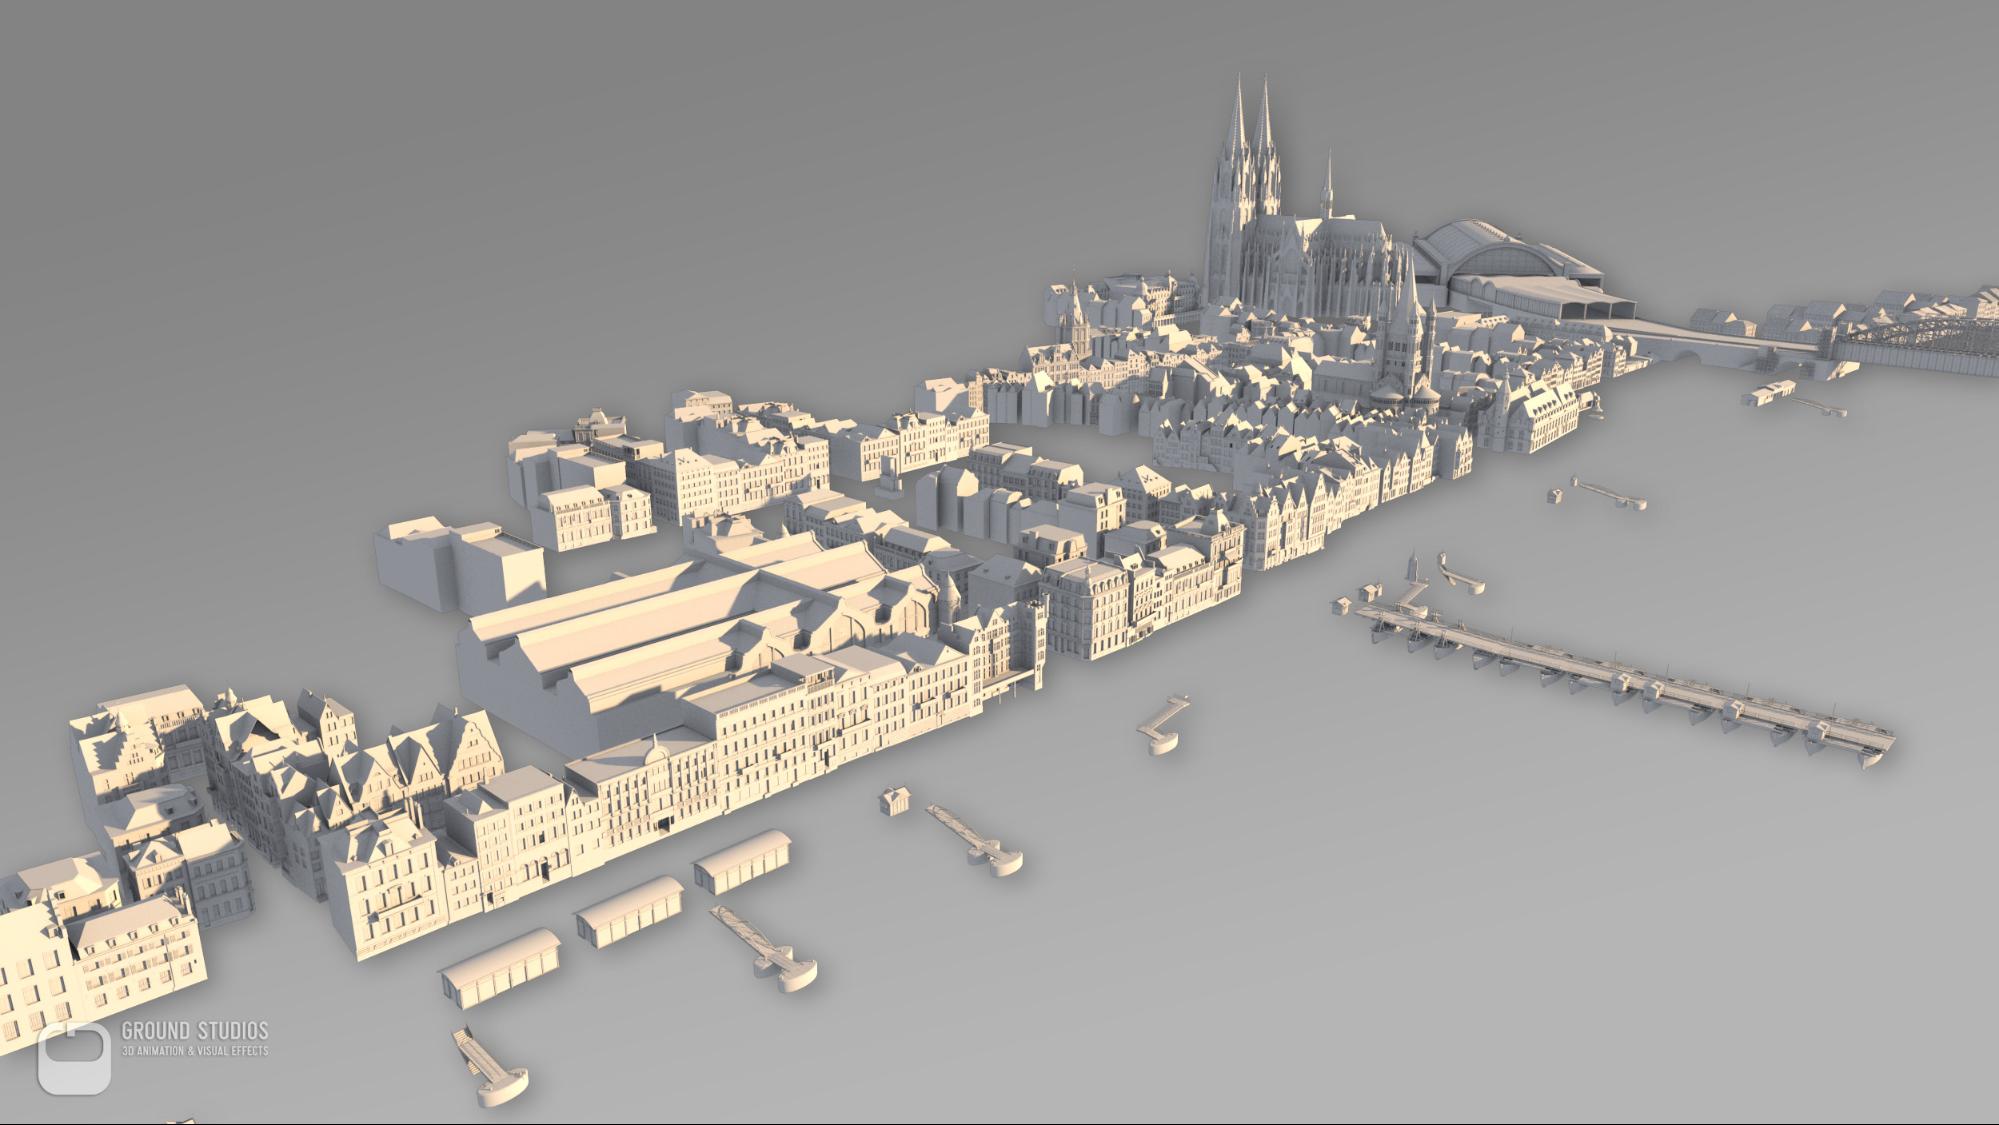
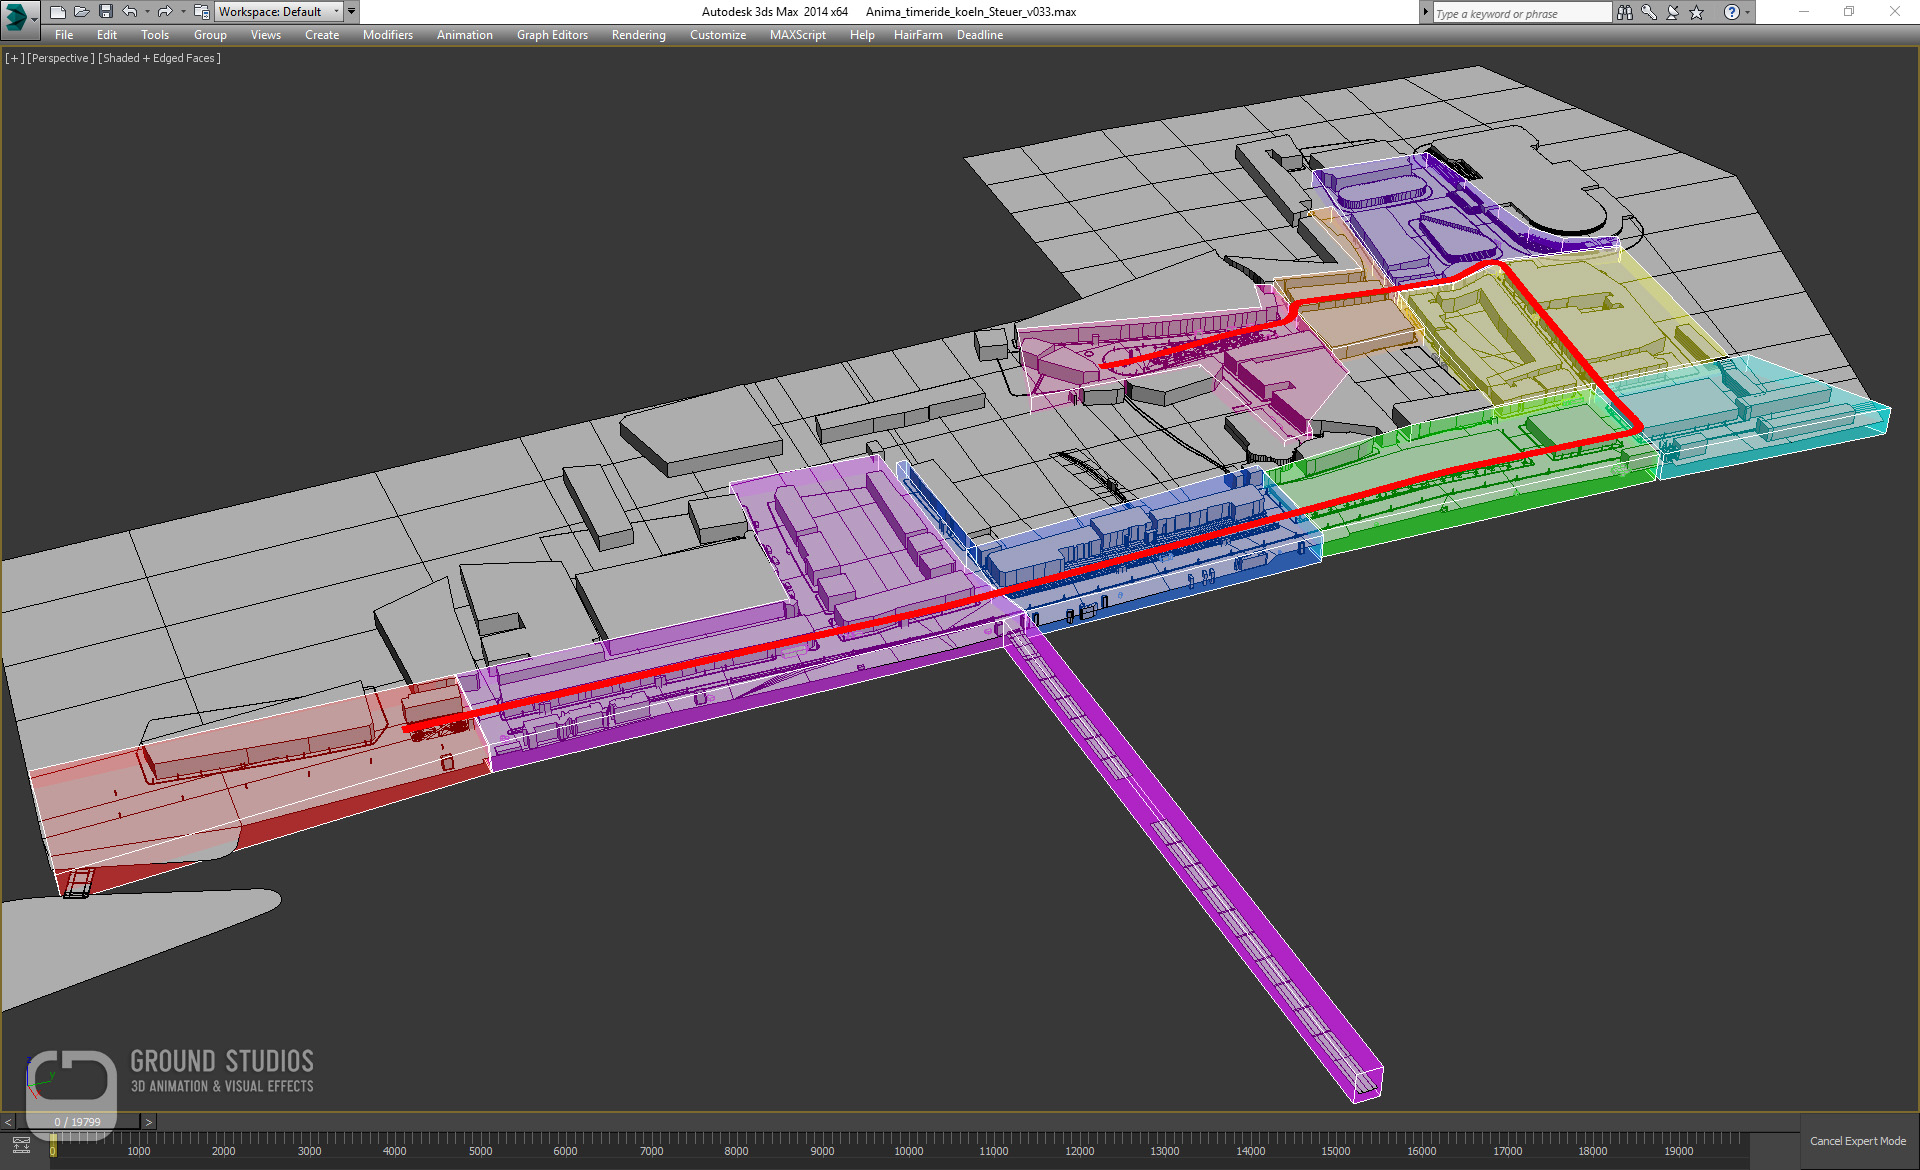
The biggest challenge, the fact that we had only one single shot, no cuts, 360 degrees of sight, for nearly 20.000 frames, put some constraints on us. Changes in the environment layout had to be minimized as much as possible - which made planning and getting it right the first time the top priority.
Today, most of the buildings and even some streets are long gone. Some parts were reconstructed but most were sacrificed in the post war rebuilding times.
Fortunately, Cologne is a very well documented city, with lots of historic photos, paintings, books and postcards as well as very old street and cadastral maps. However, due to lack of reliable information about the exact year in which those documents were originated, a tremendous amount of time went into research and puzzle-work. During the planning phase we had a lot of mismatches which had to be rigorously checked and eliminated.
Most dimensions of buildings in photos were estimated in relation to the size of pedestrians and were aligned to the information we were able to extract from the maps.
All this data resulted in a rough 1:1 model with the final environment layout and bounding boxes for all required buildings. This was the essential foundation for further plannings, scheduling the house modelling, shading, asset creations as well as for special animations and events.
Tool Development
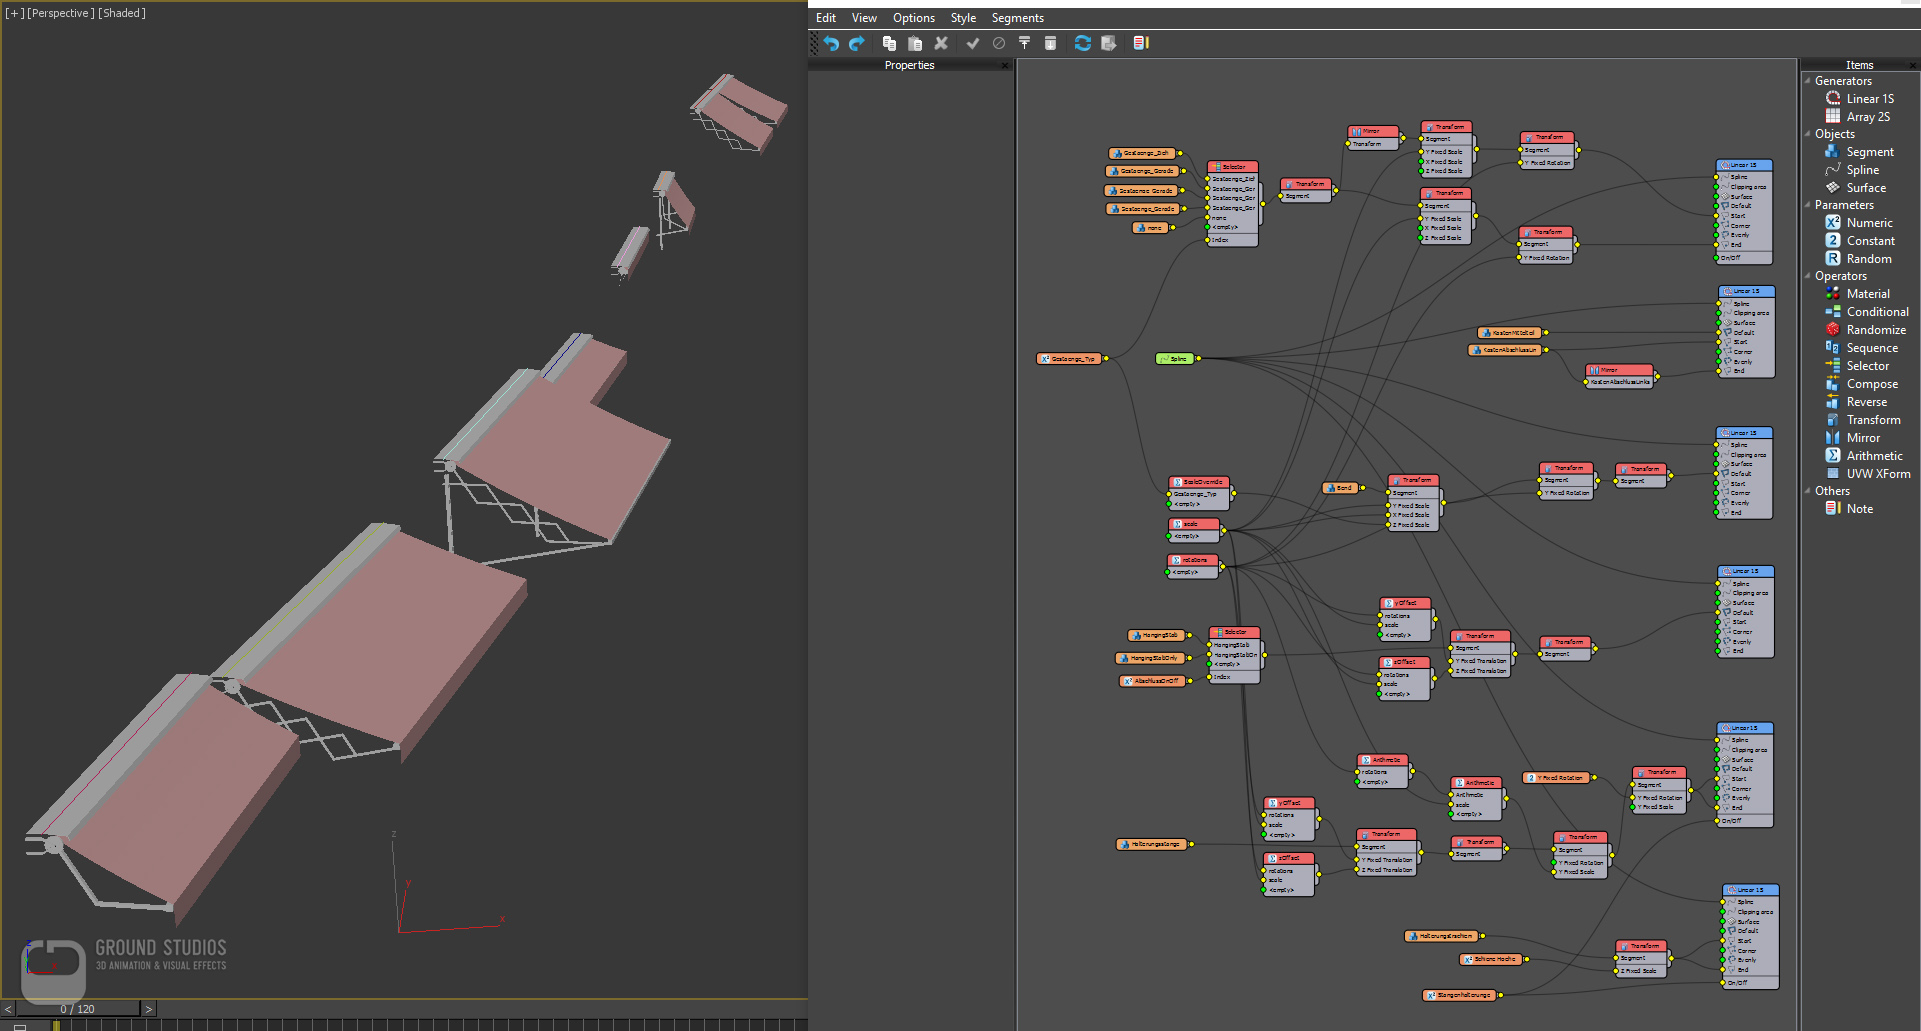
Facing the challenges of creating and managing thousands of assets and buildings, we wanted to automate as much of the process as possible. At the same time we had to avoid the typical pitfalls, procedural techniques can create, like repetitive patterns and obvious instancing of buildings or assets. Ensuring a consistent look and quality of our assets was essential, so we developed a series of tools with each of them doing one thing exceptionally well.
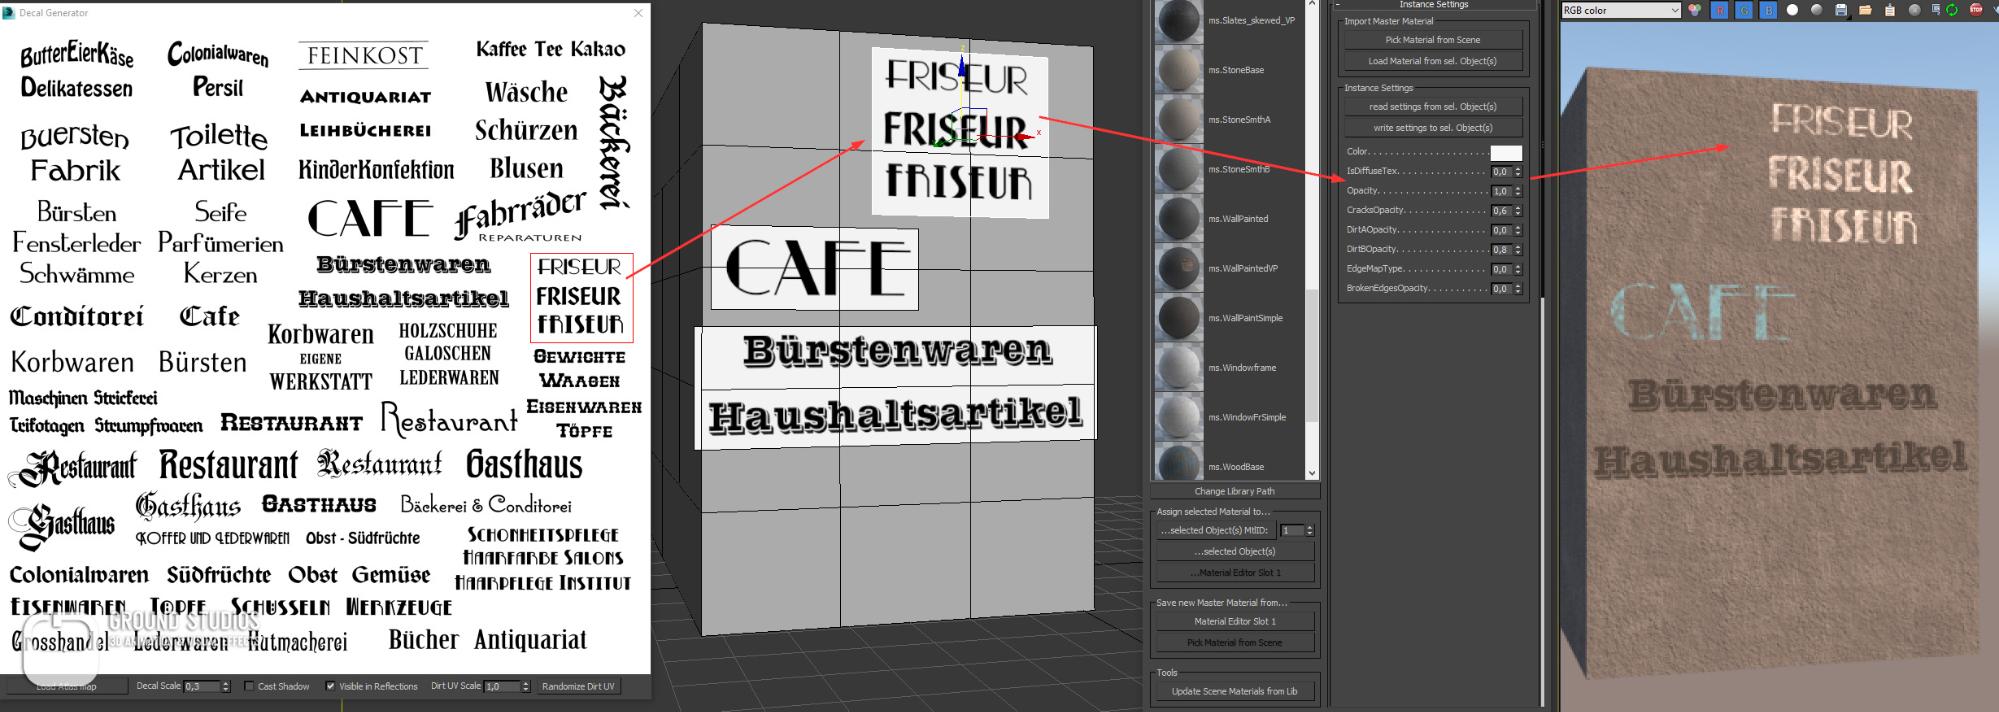
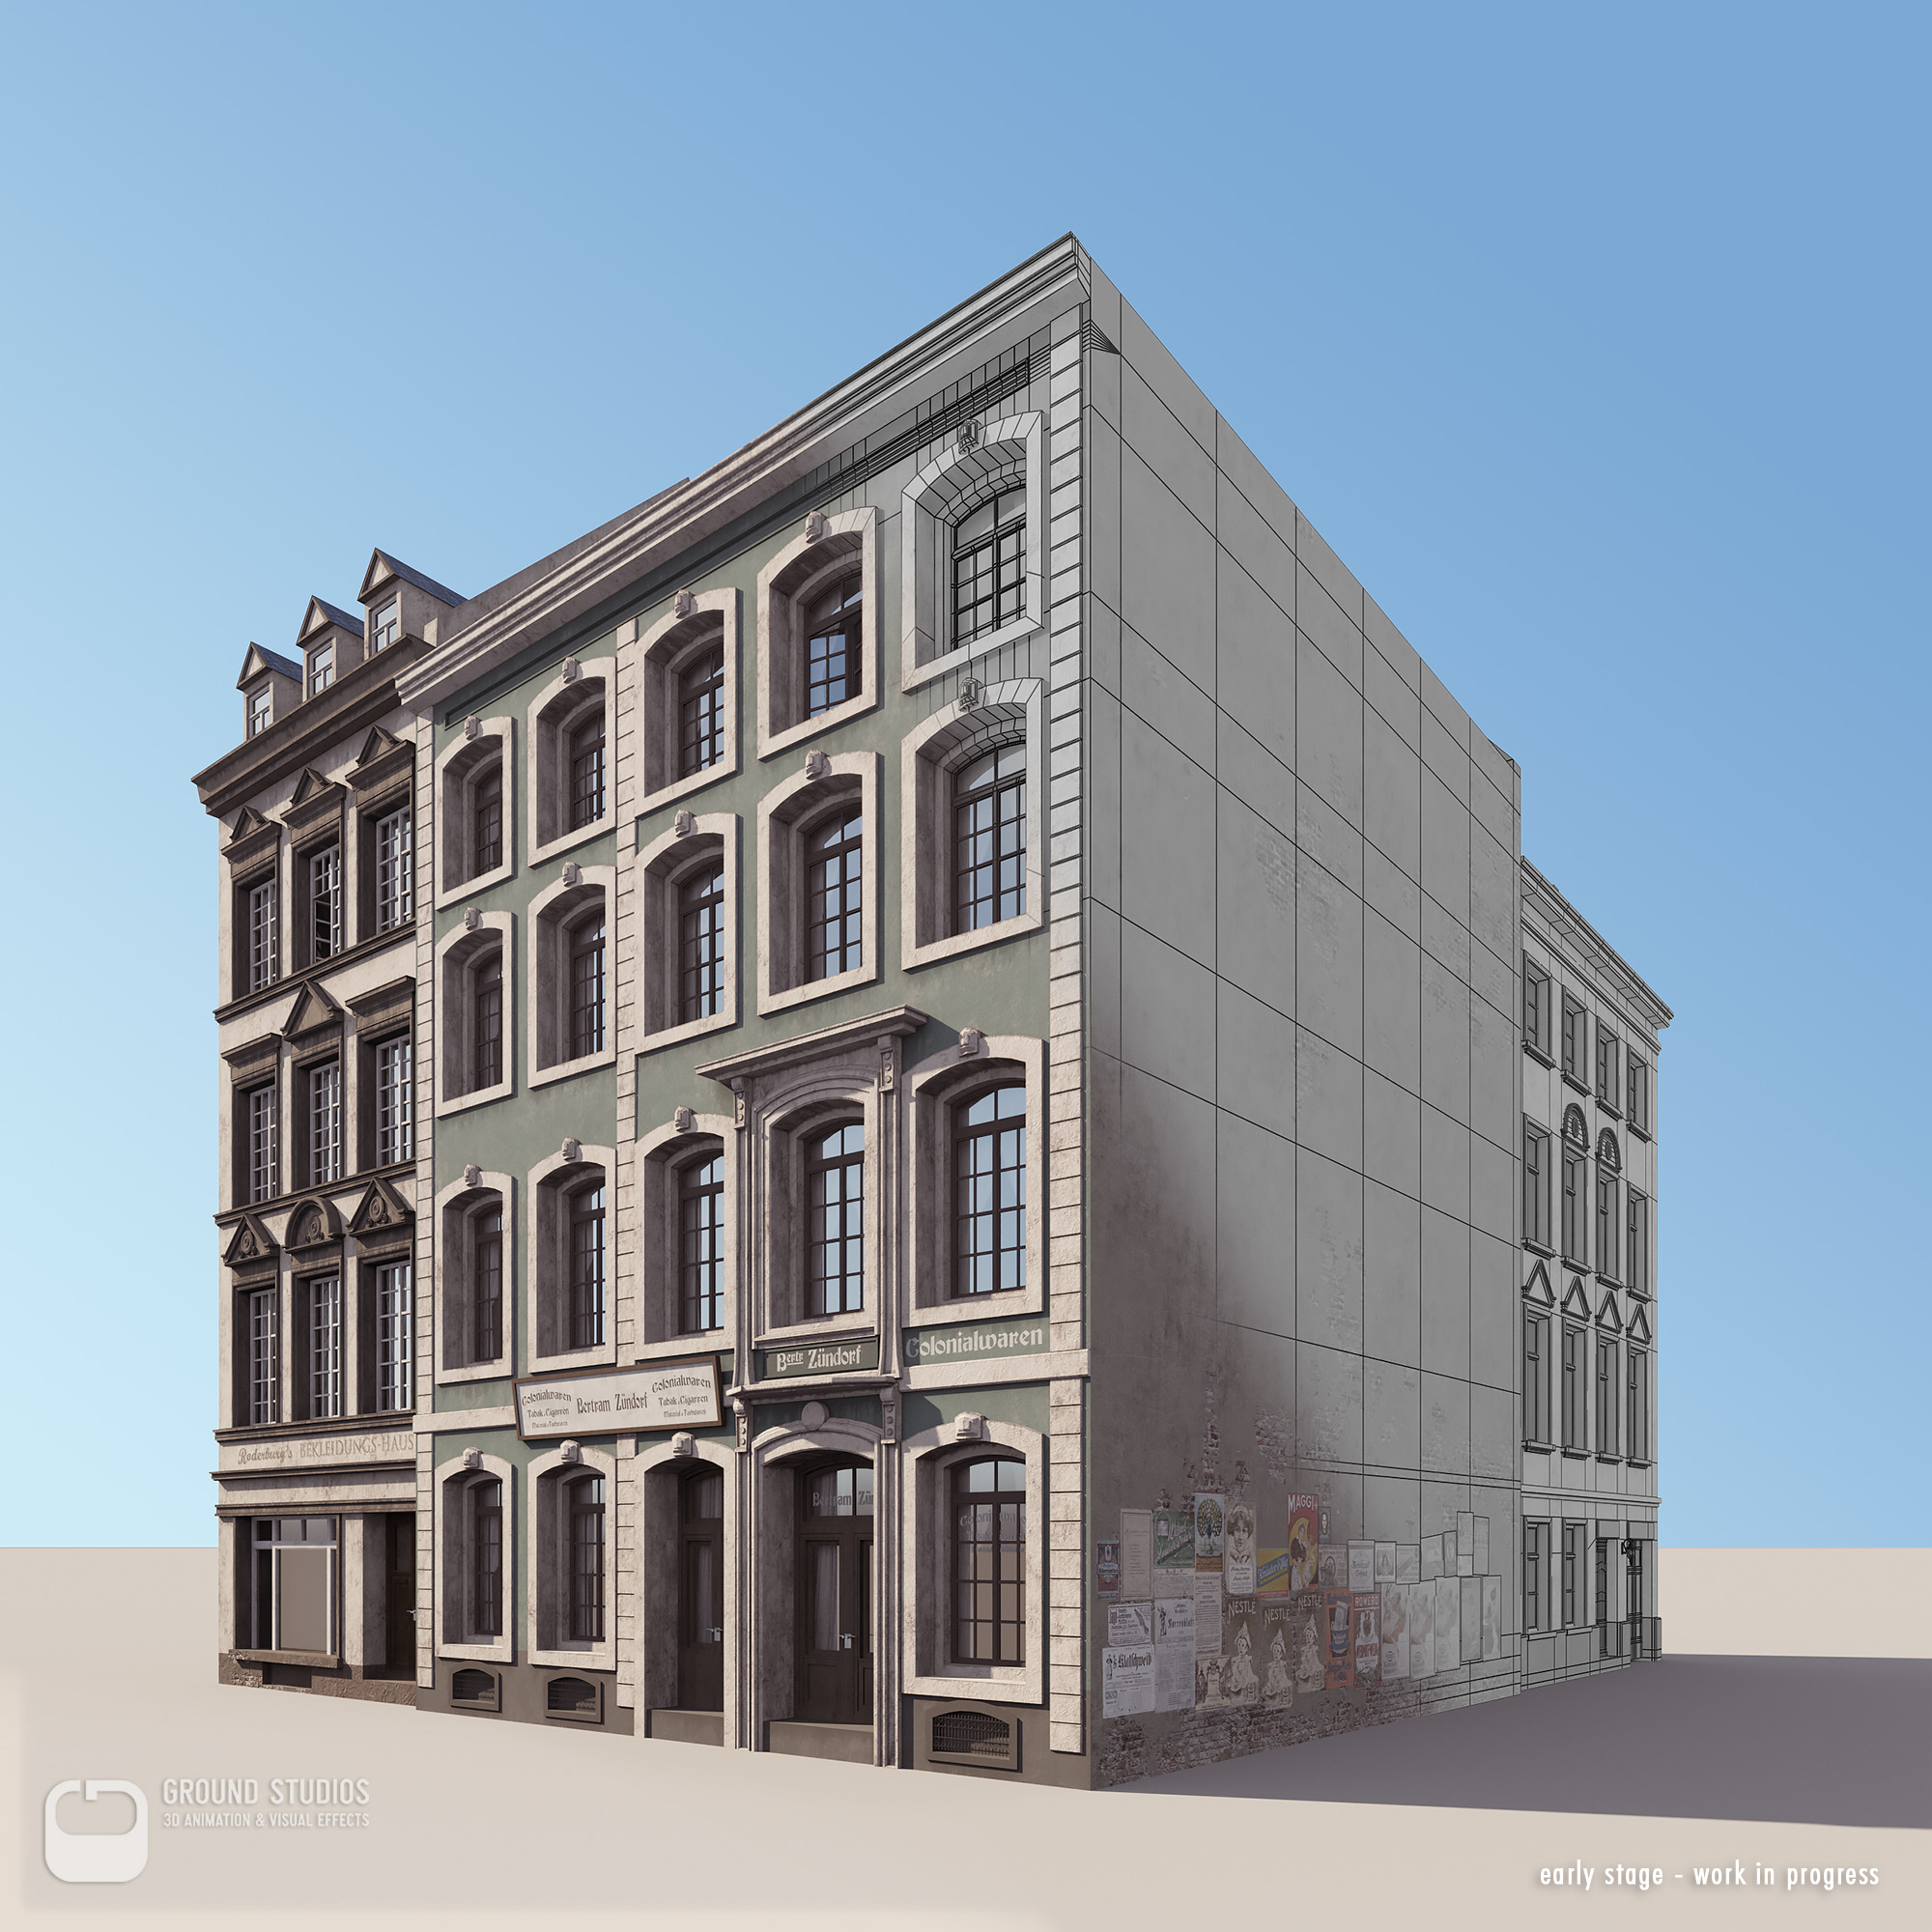
With regard to house modelling we were building the basic individual shapes by hand and added a lot of the details by using these in-house tool sets. For example, windows and curtains were added just by selecting some polygons on the building and choosing one of the accurately prepared presets. This window generator, has proven to be an invaluable tool and saved us a tremendous amount of time in the long run. Placing dozens of windows and curtains for hundreds of buildings by hand is not just a daunting task but also an error source and time consuming - especially in old style buildings where sizes and ratios rarely follow rules or norms.
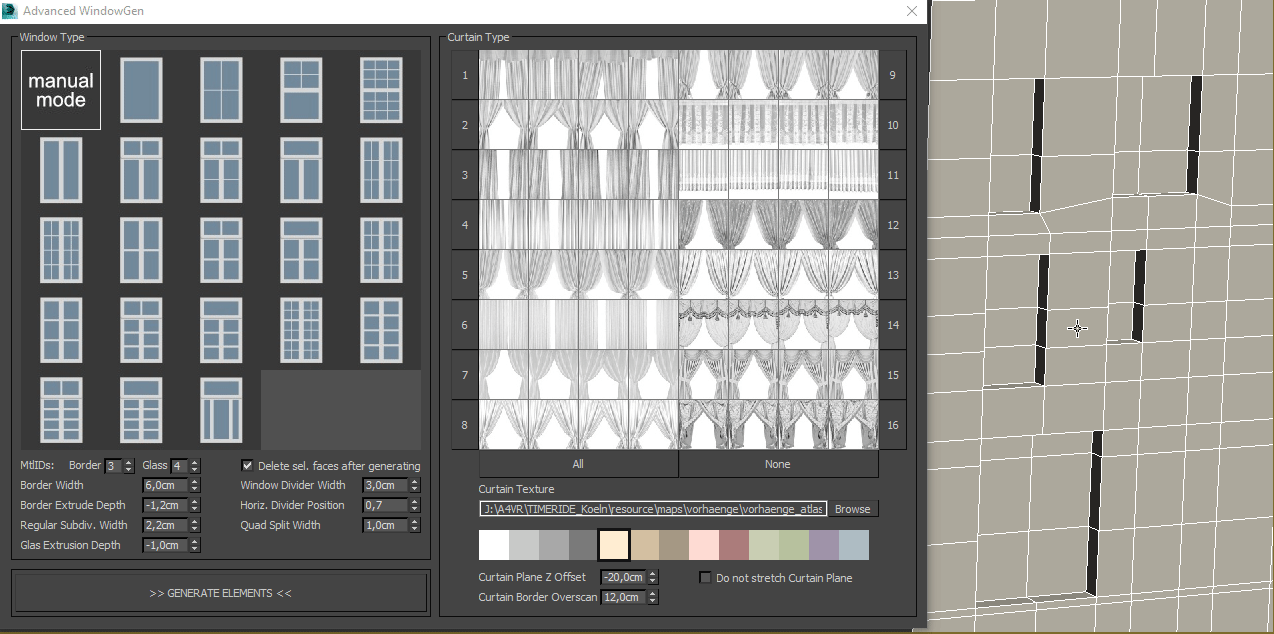
Border widths are absolute and subdivision placements are relative to the face selection and thus unique for each window - difficult for humans but simple for a script. You can, of course, also experiment, change parameters and try out every preset in just a few seconds, which would be hard to do manually. Unwrapping was completely automated and decals for lettering or posters on buildings were added by just dragging a selection on a bitmap and clicking in the 3d scene to place them.
Ideally, anything that does not require an artistic decision should be automated - freeing up time and avoiding boring repetitive tasks.
Modelling
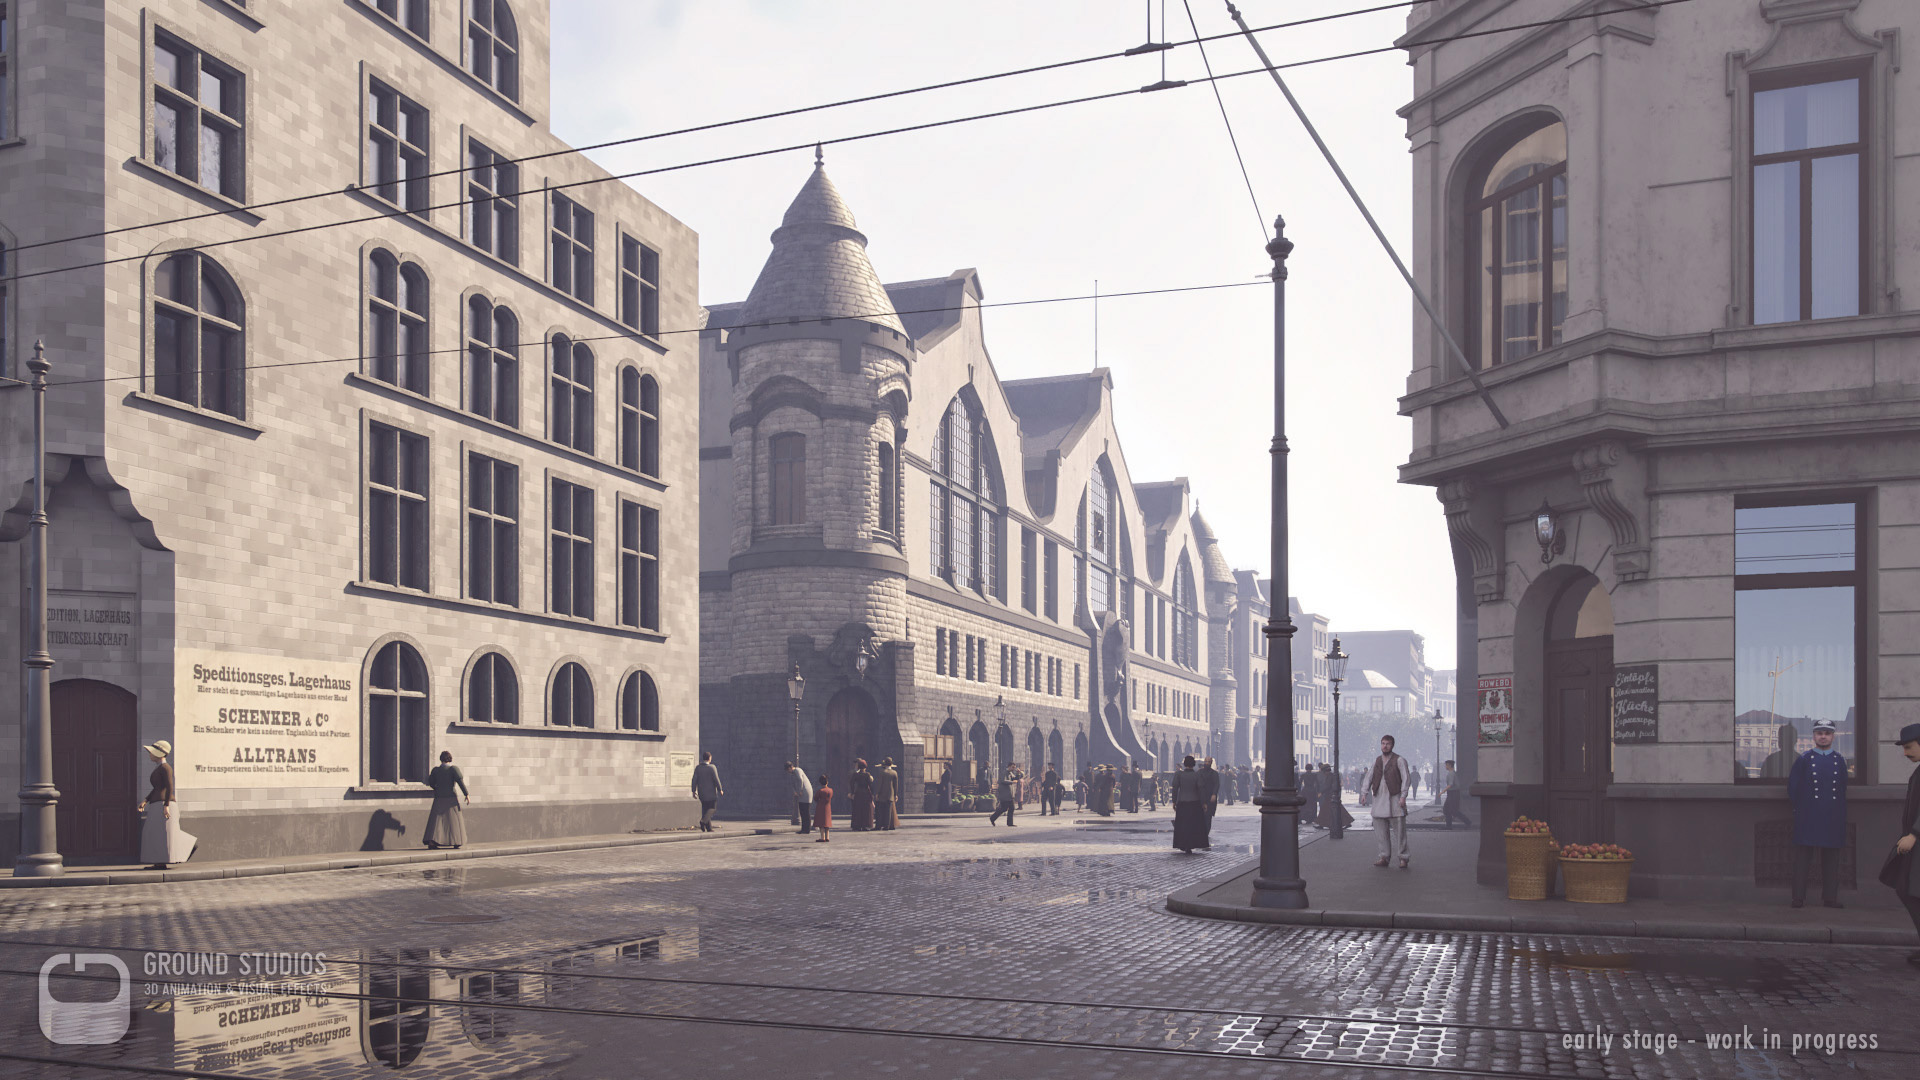
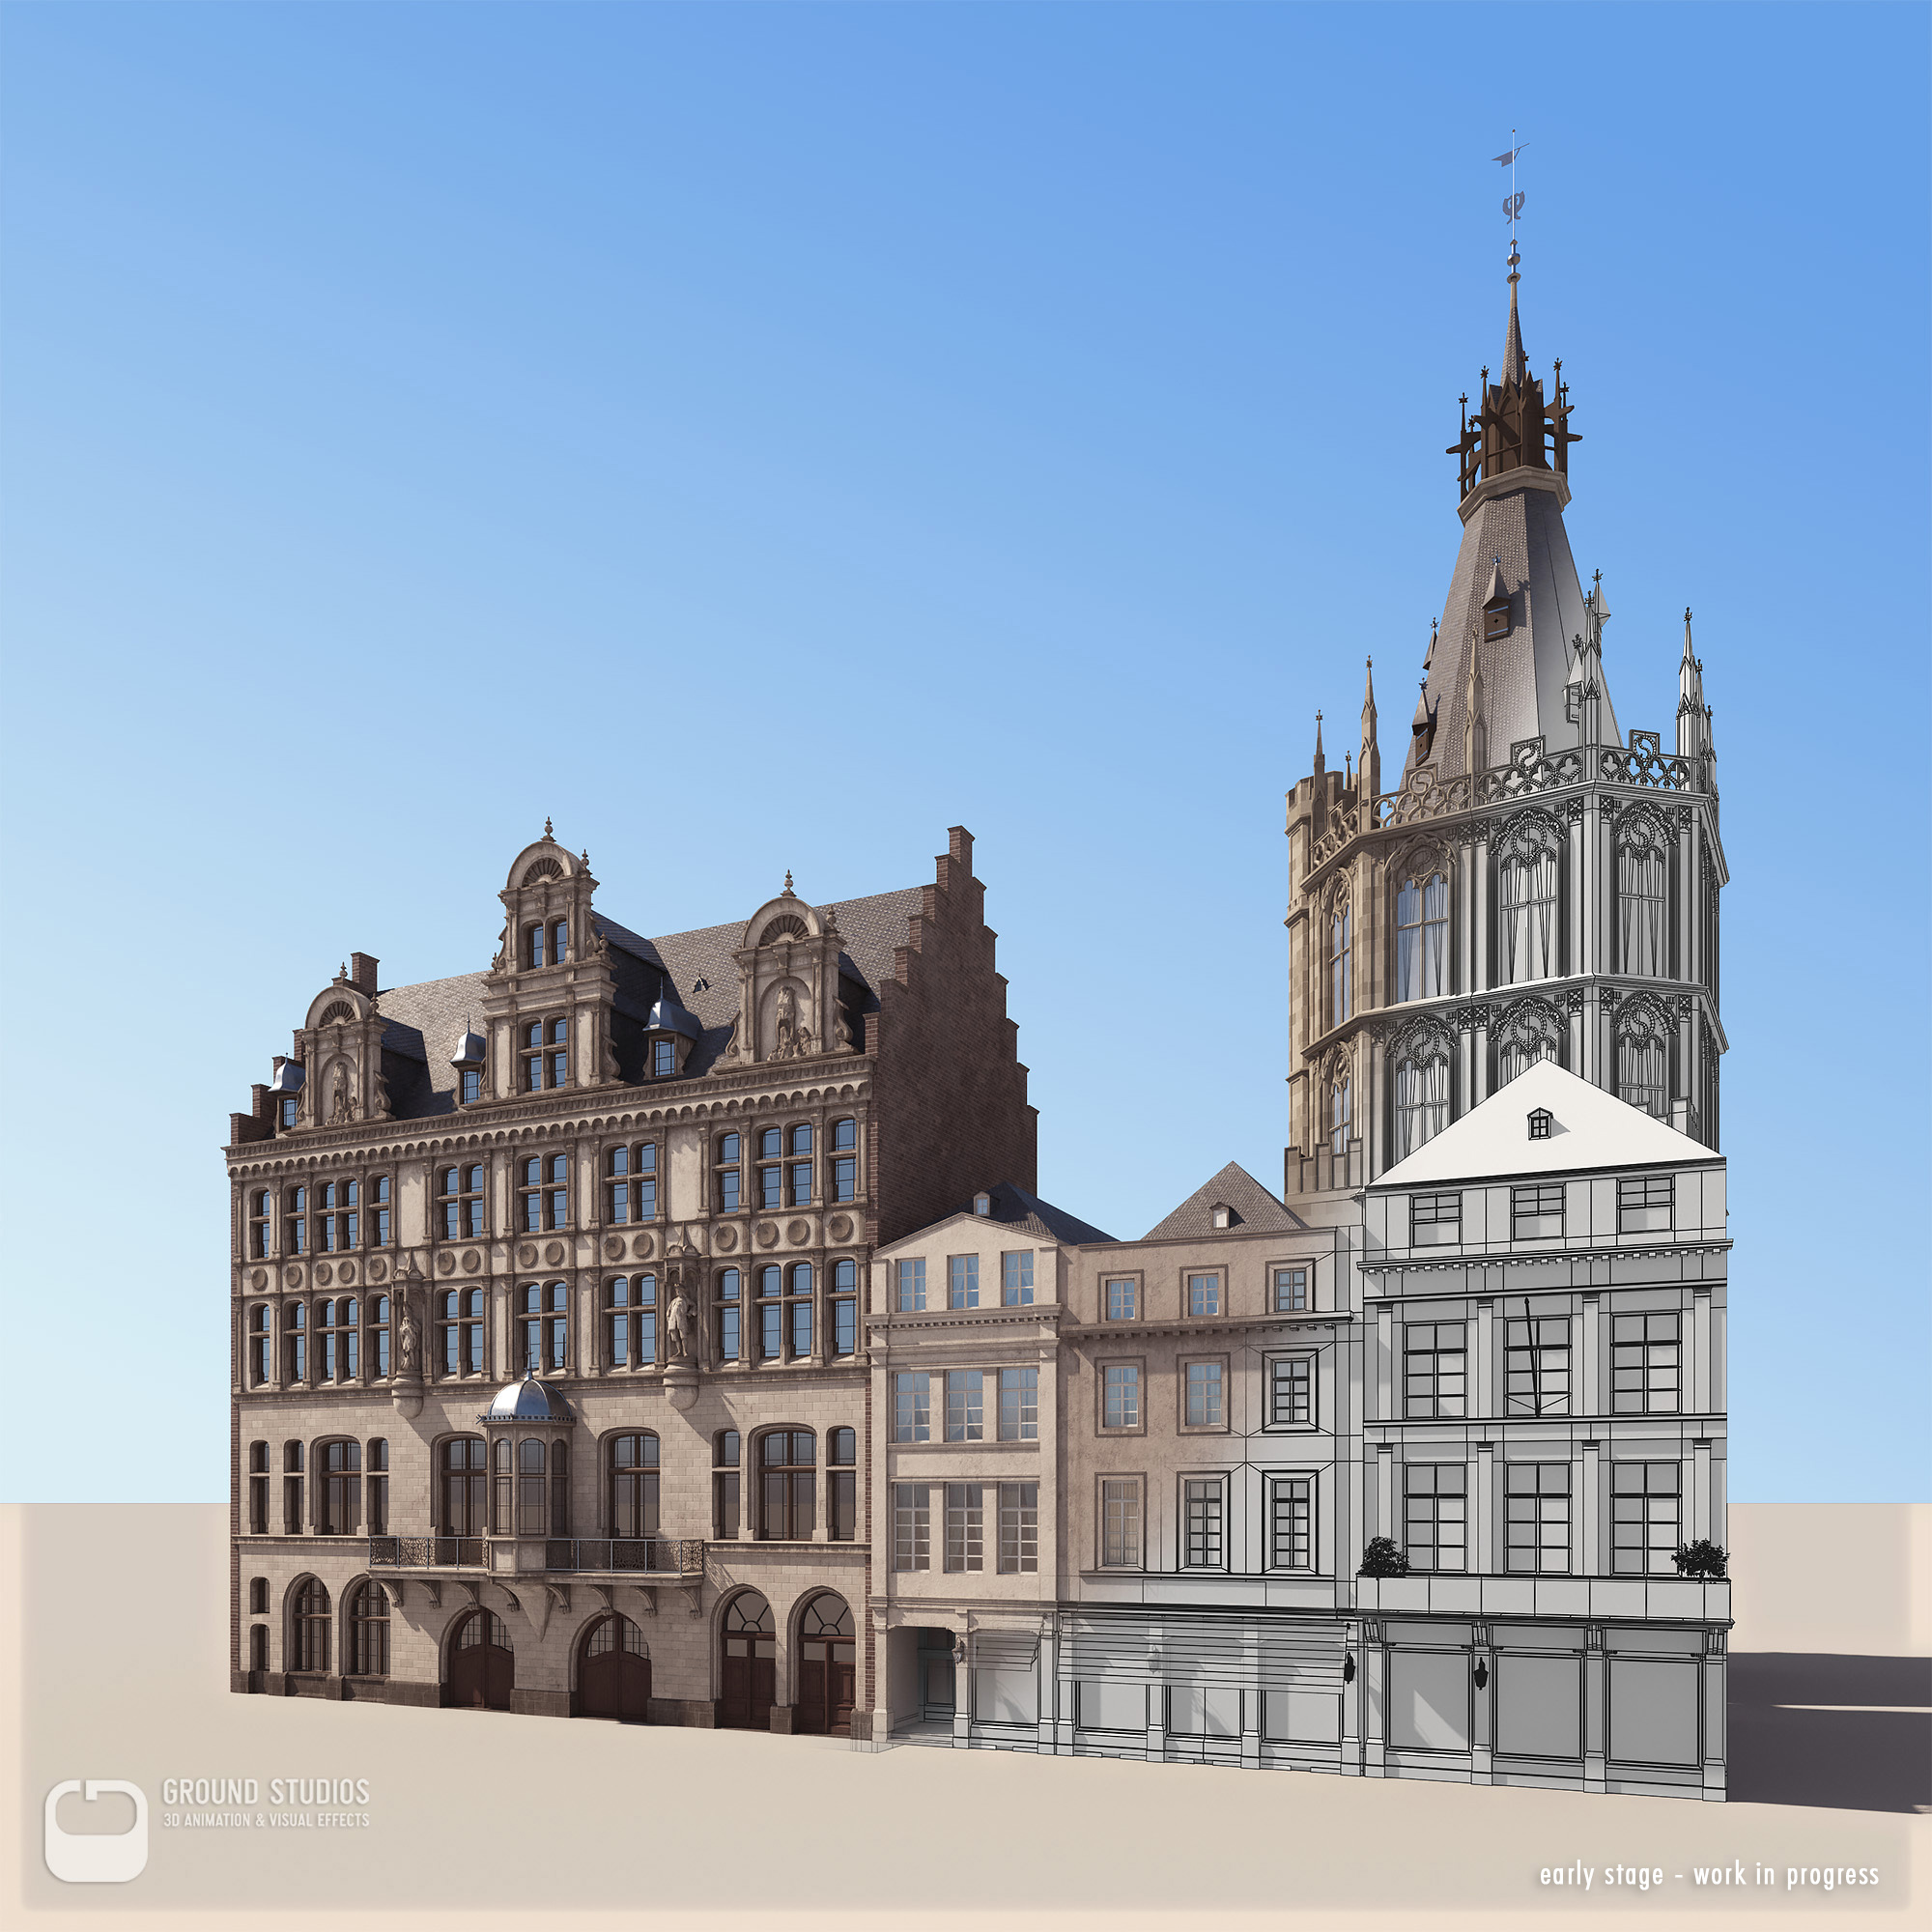
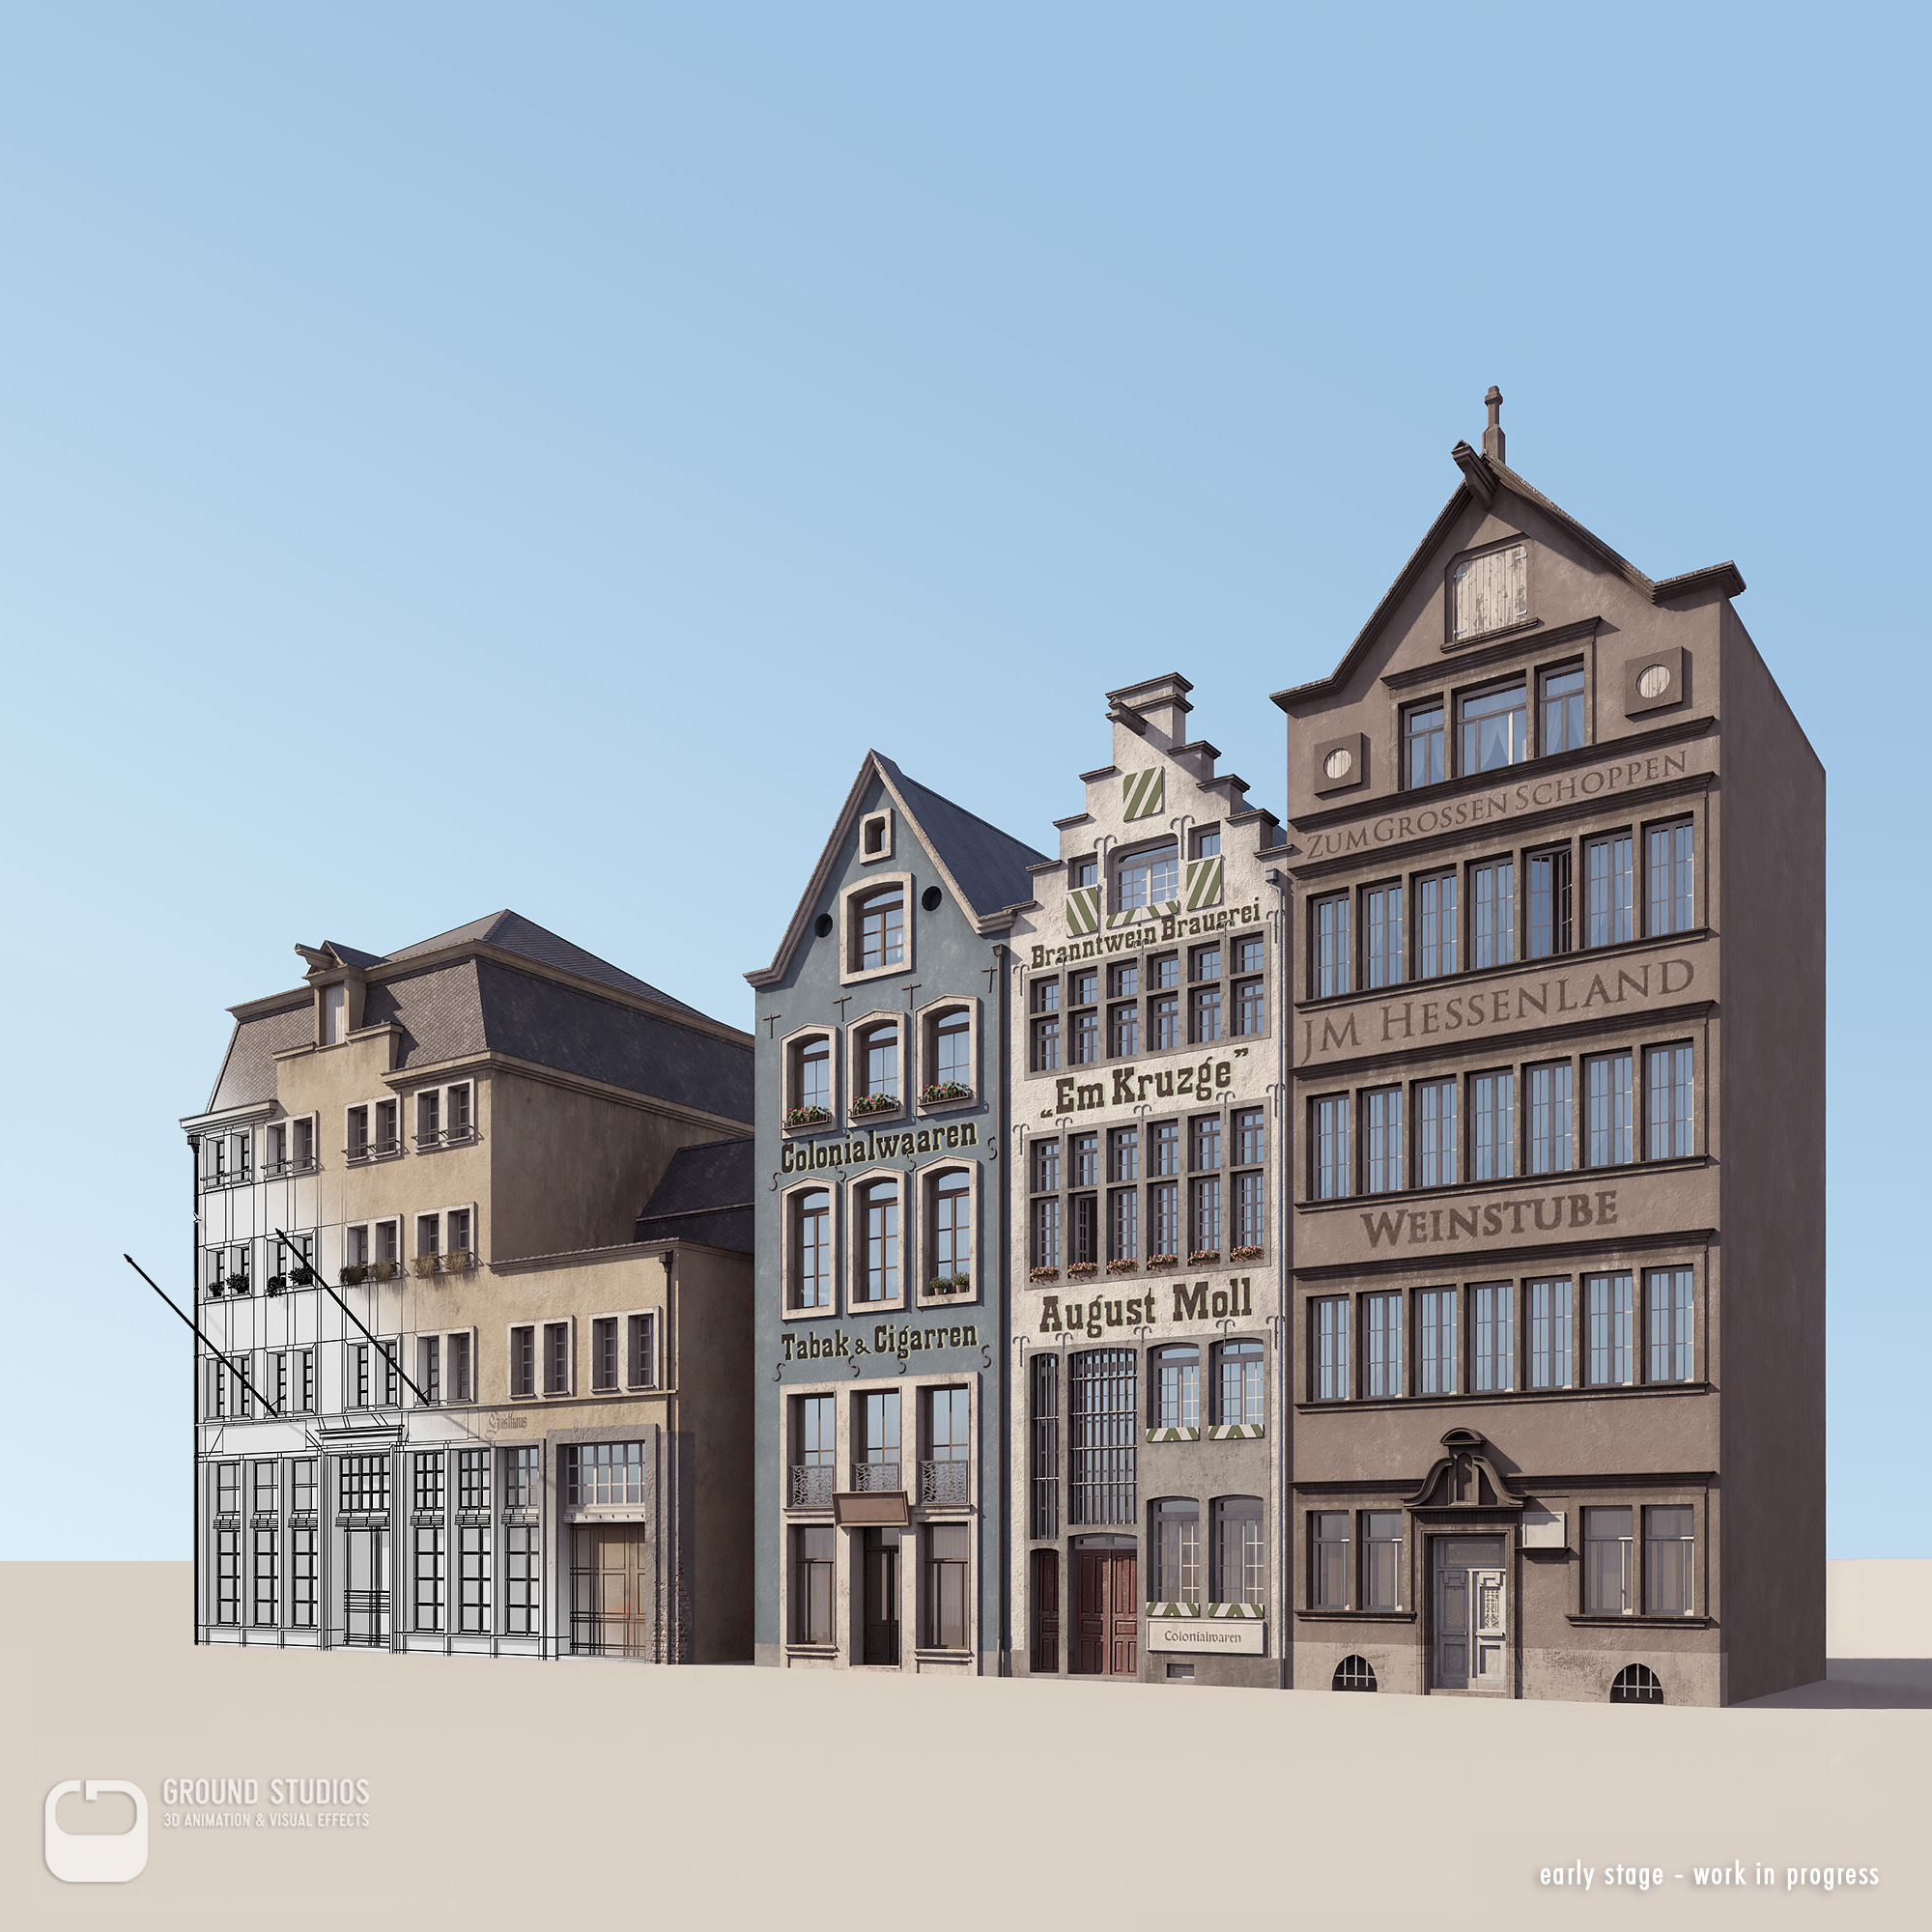
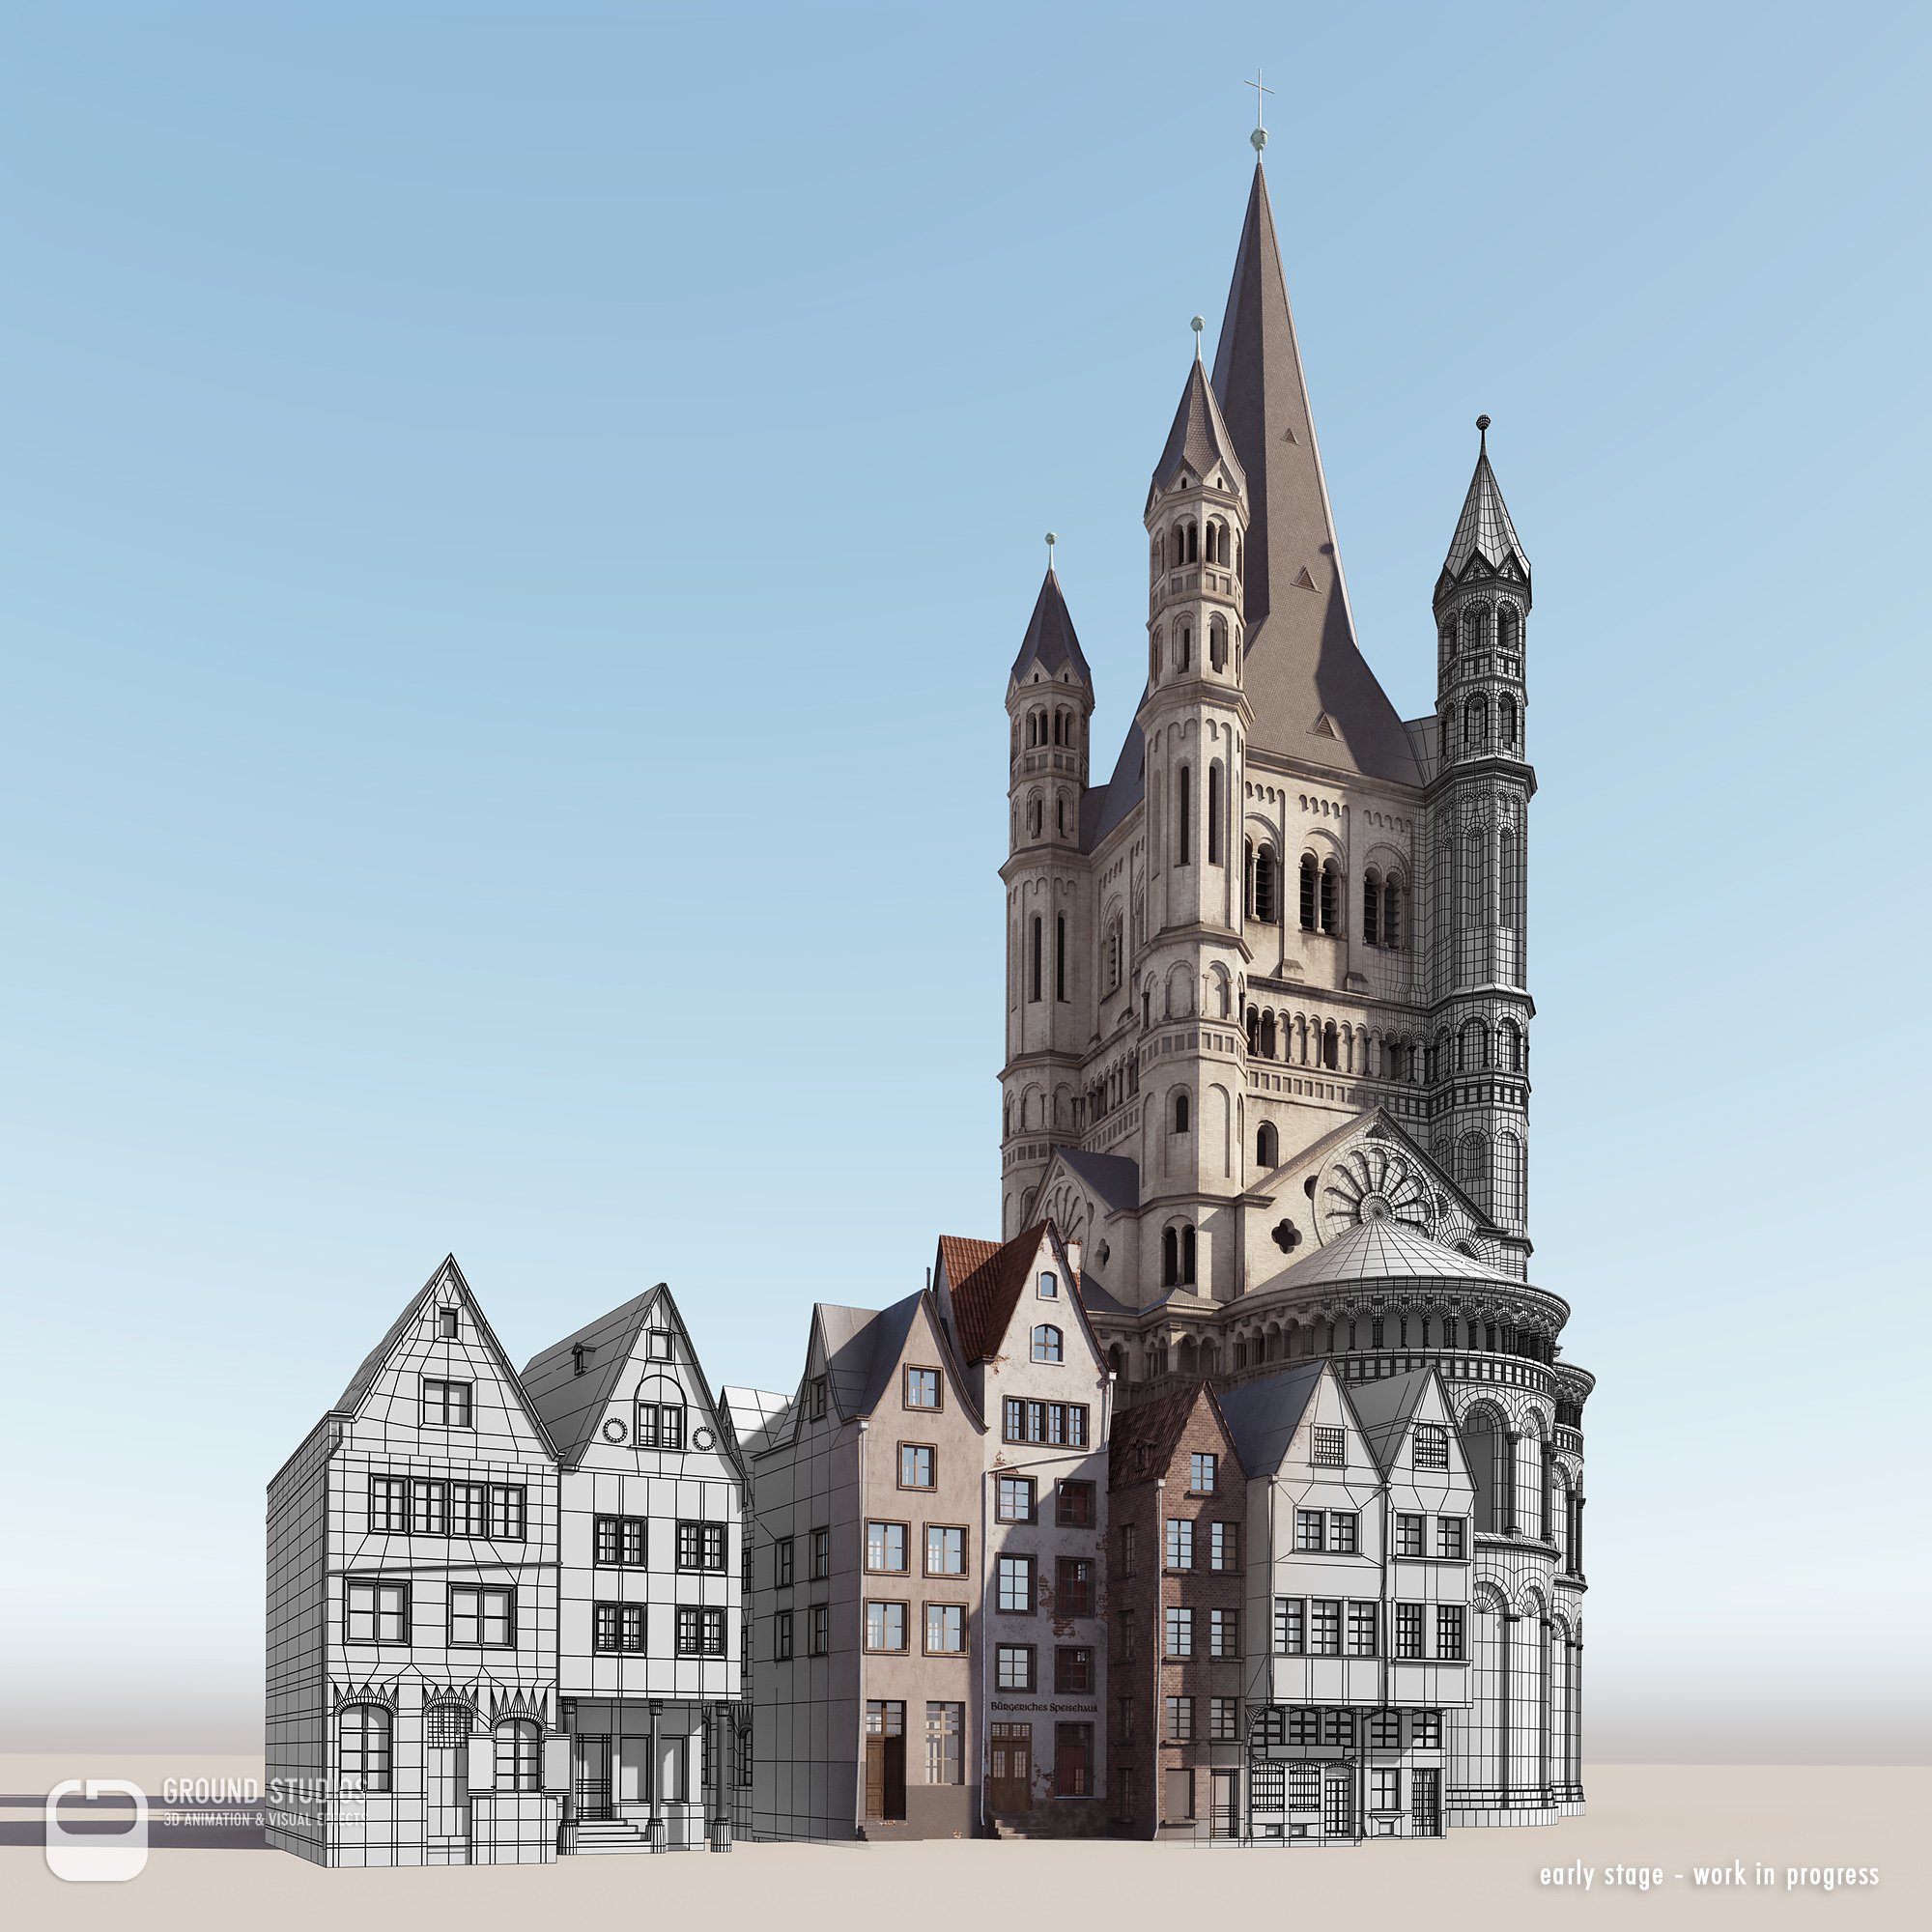
After inspecting all historical photos and maps, we started to plan the modelling for more than 150 high-detailed buildings throughout our environment.
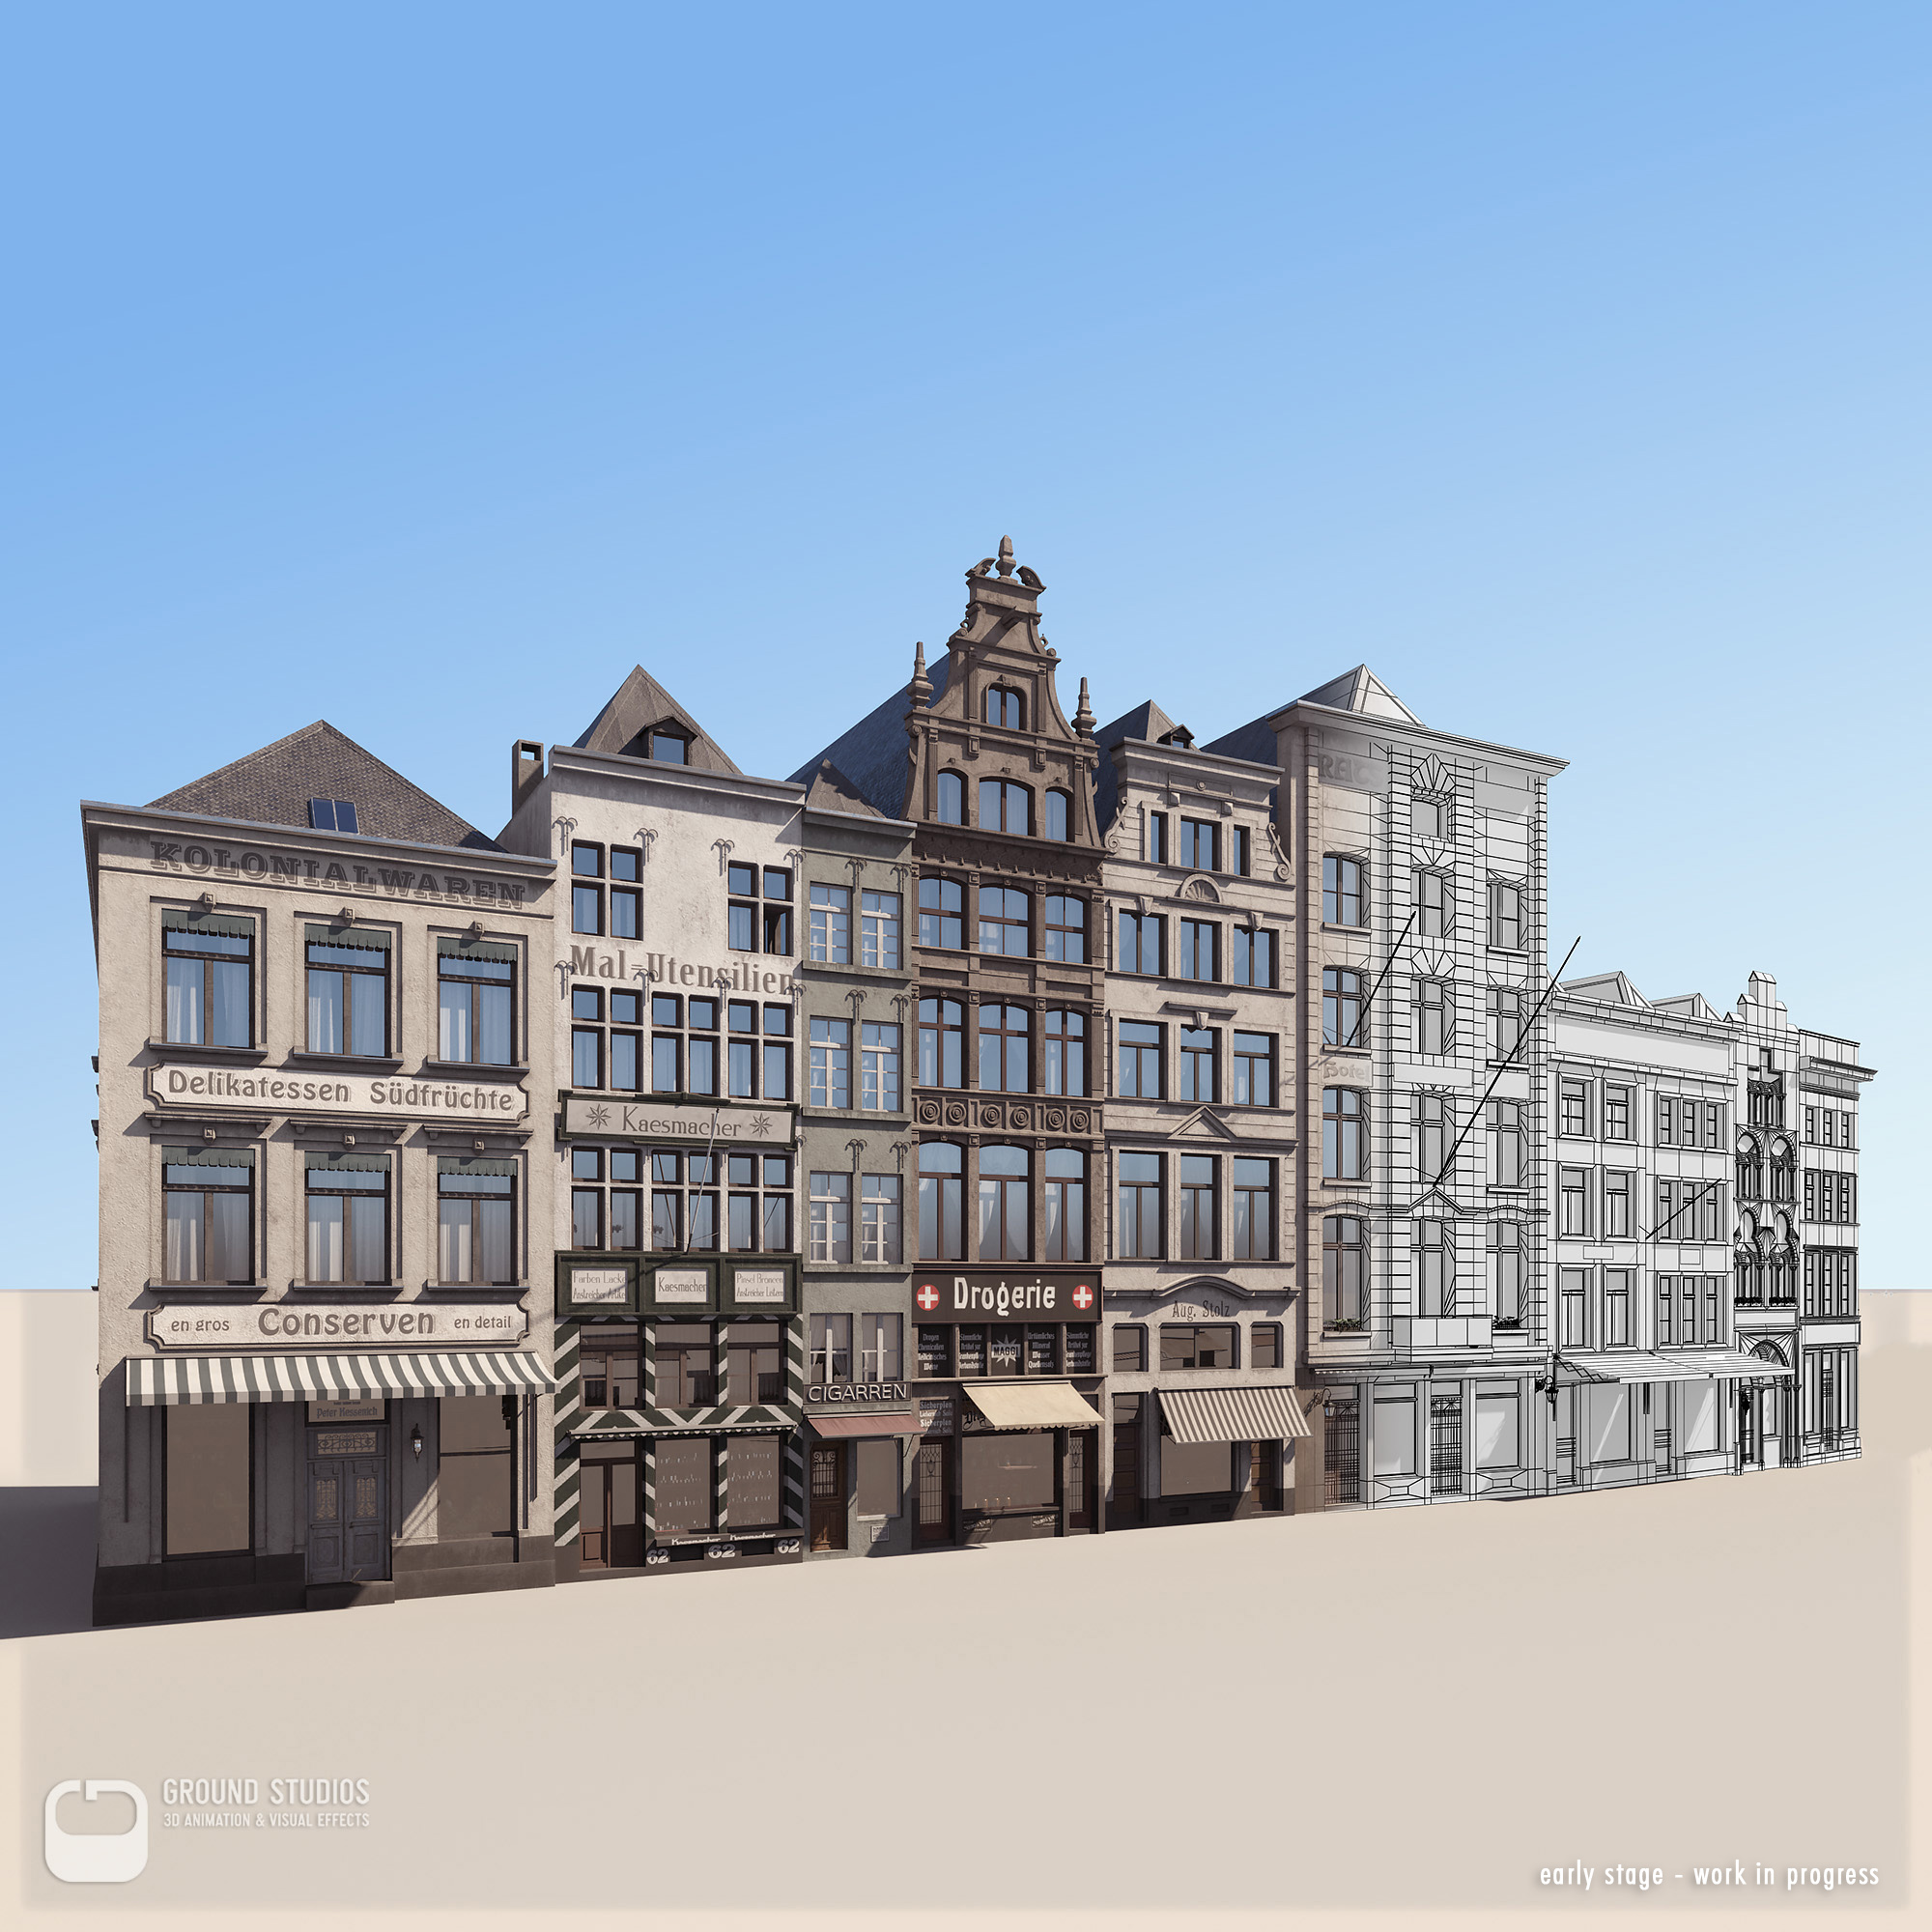
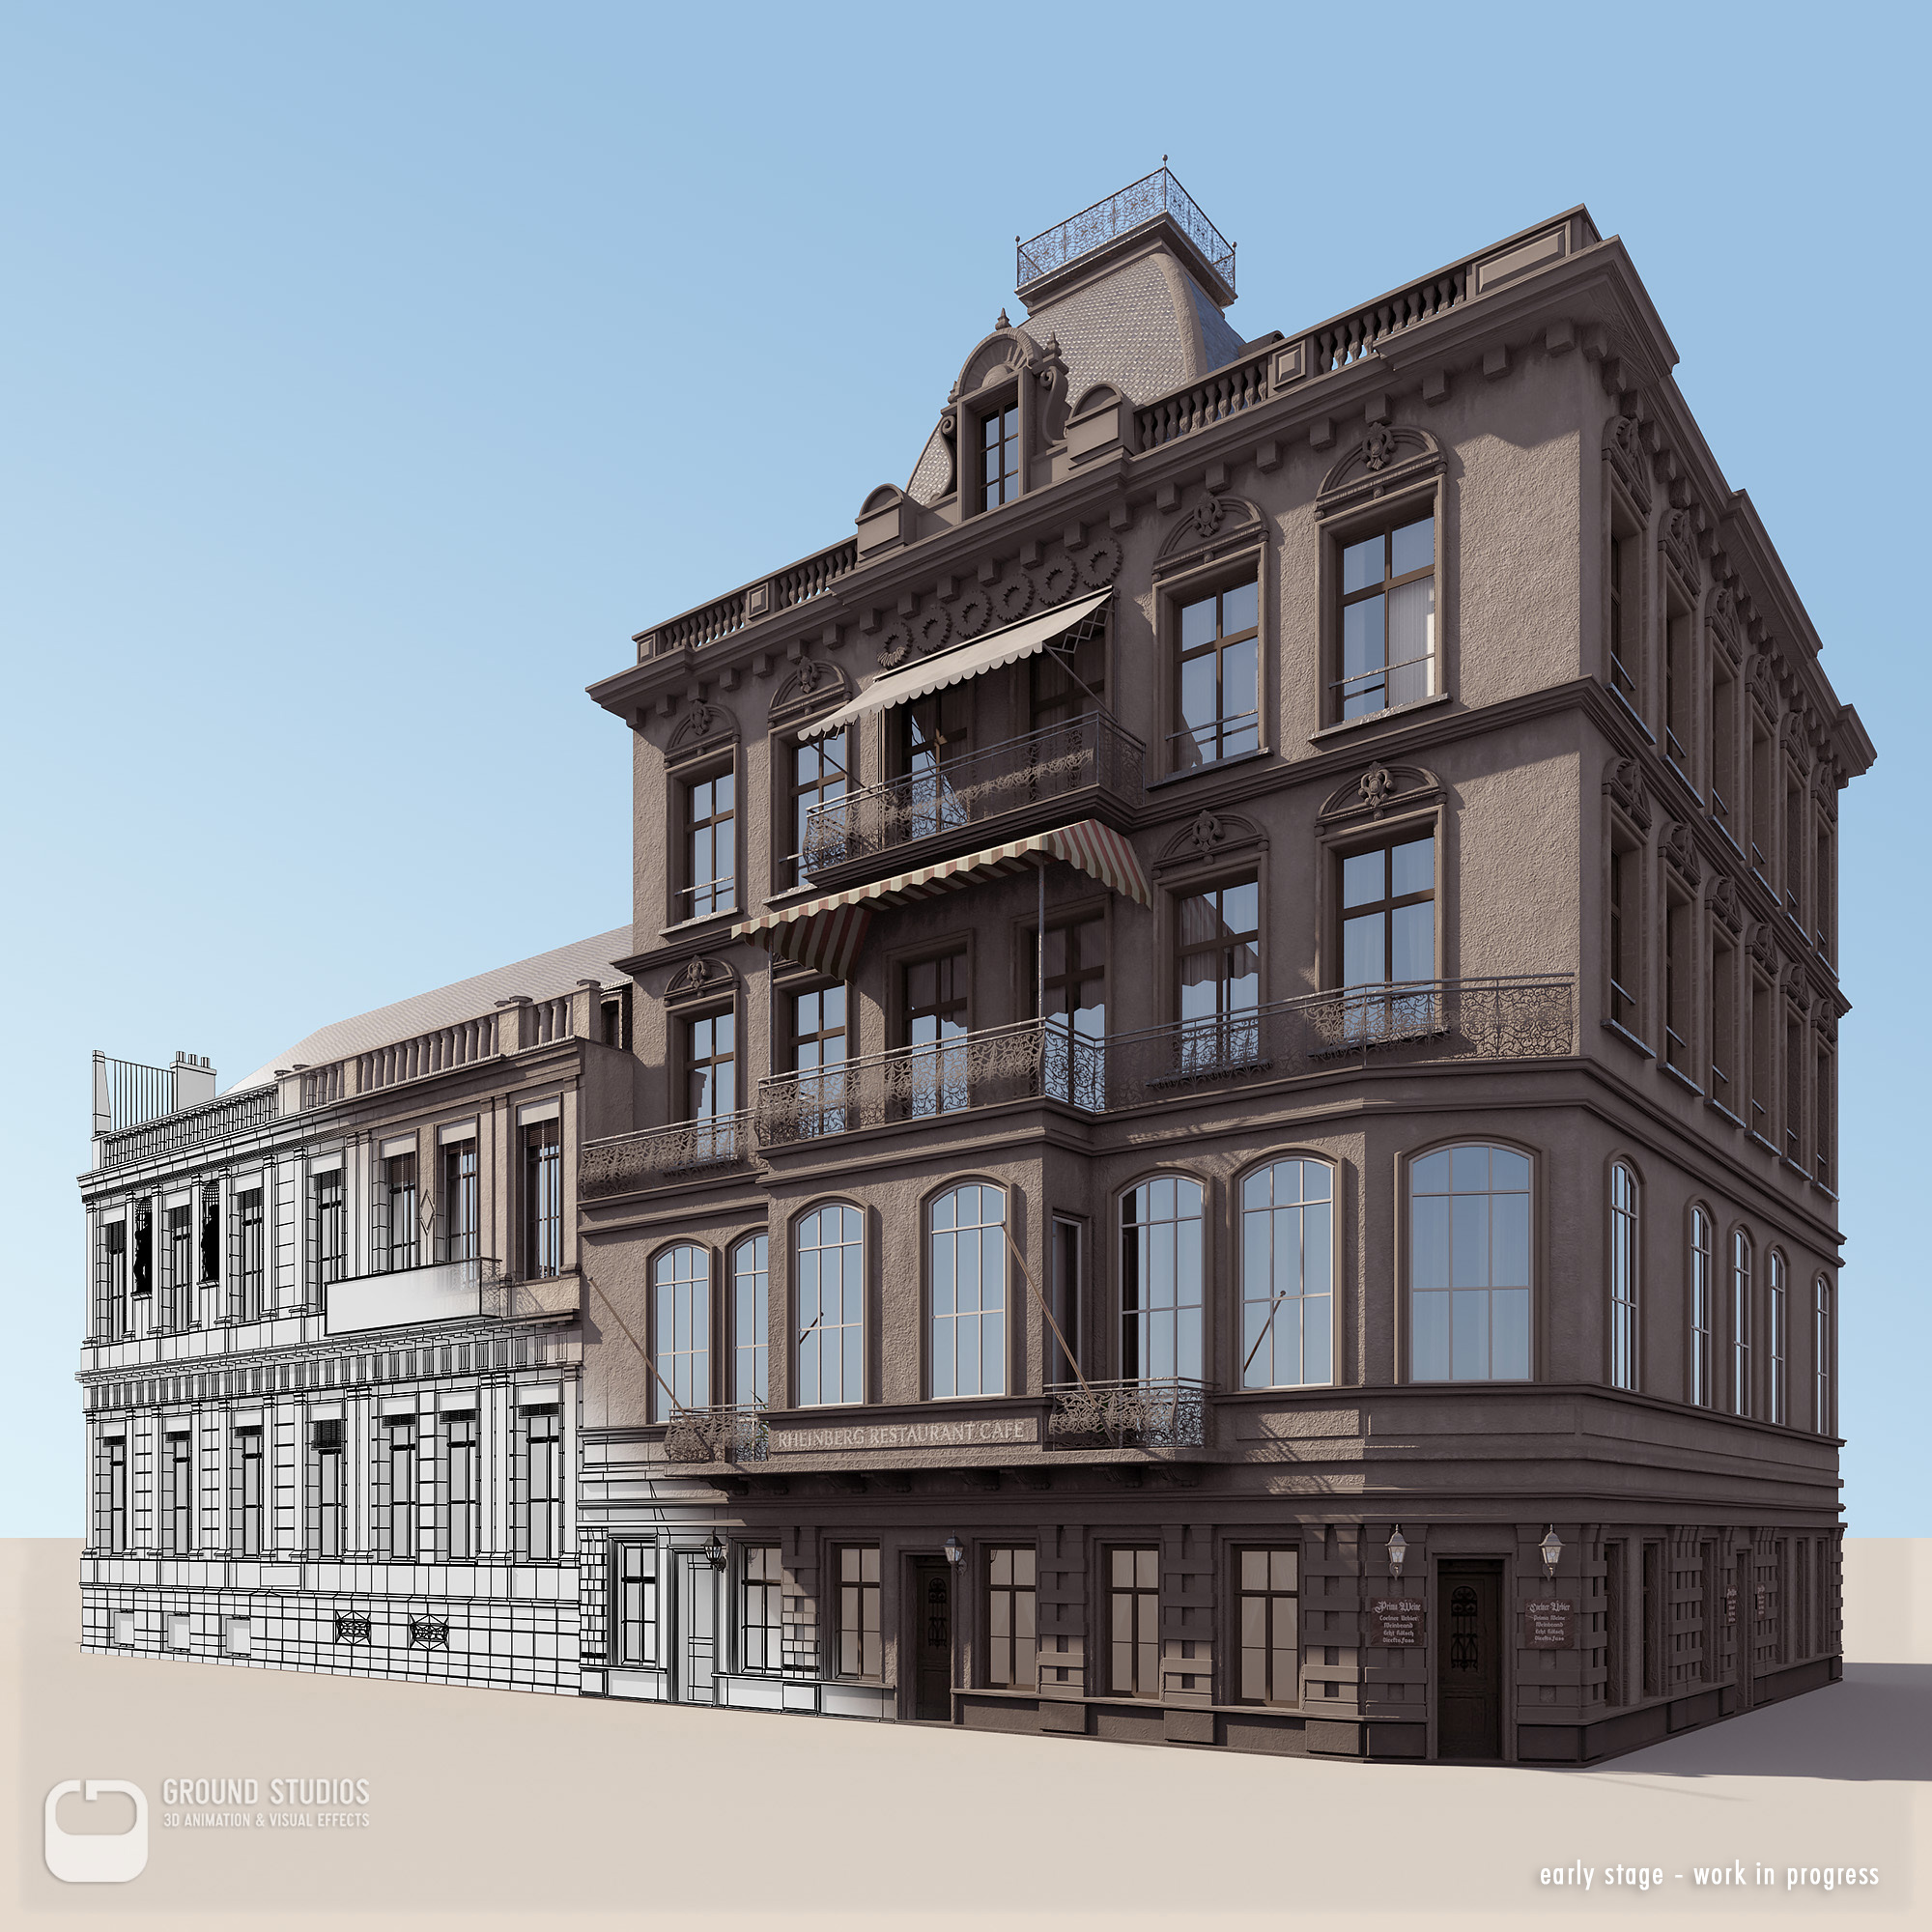
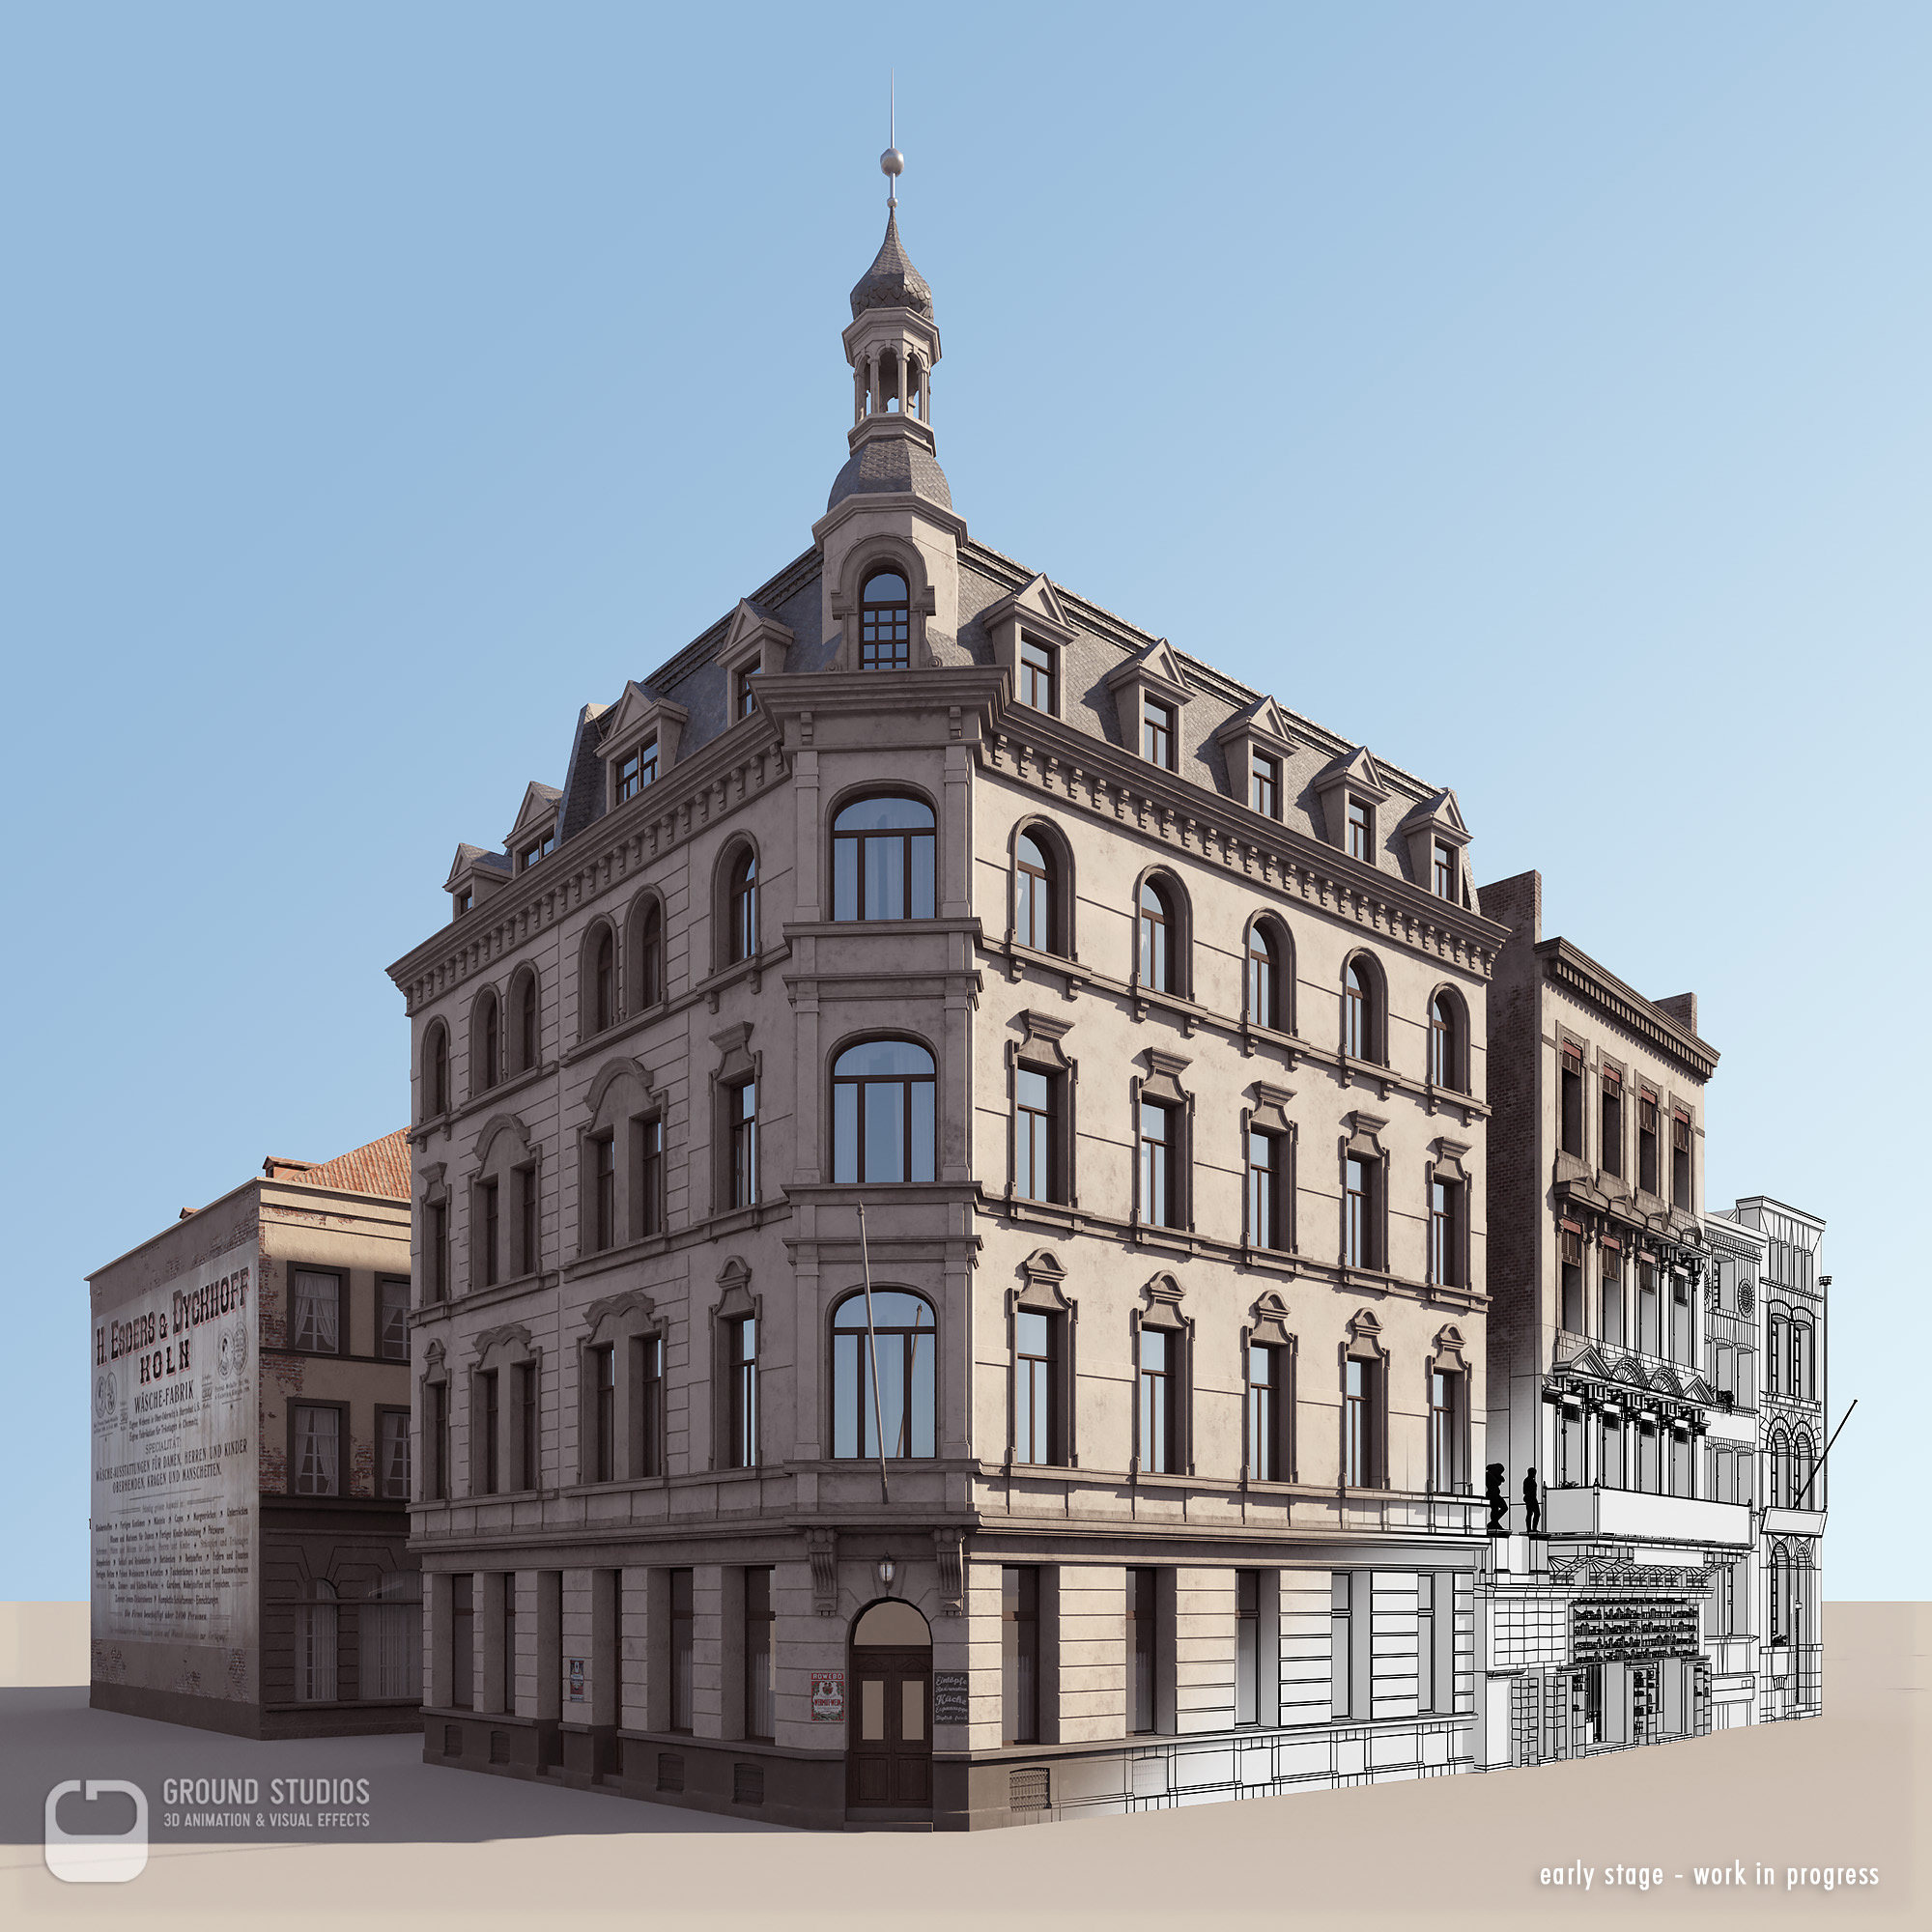
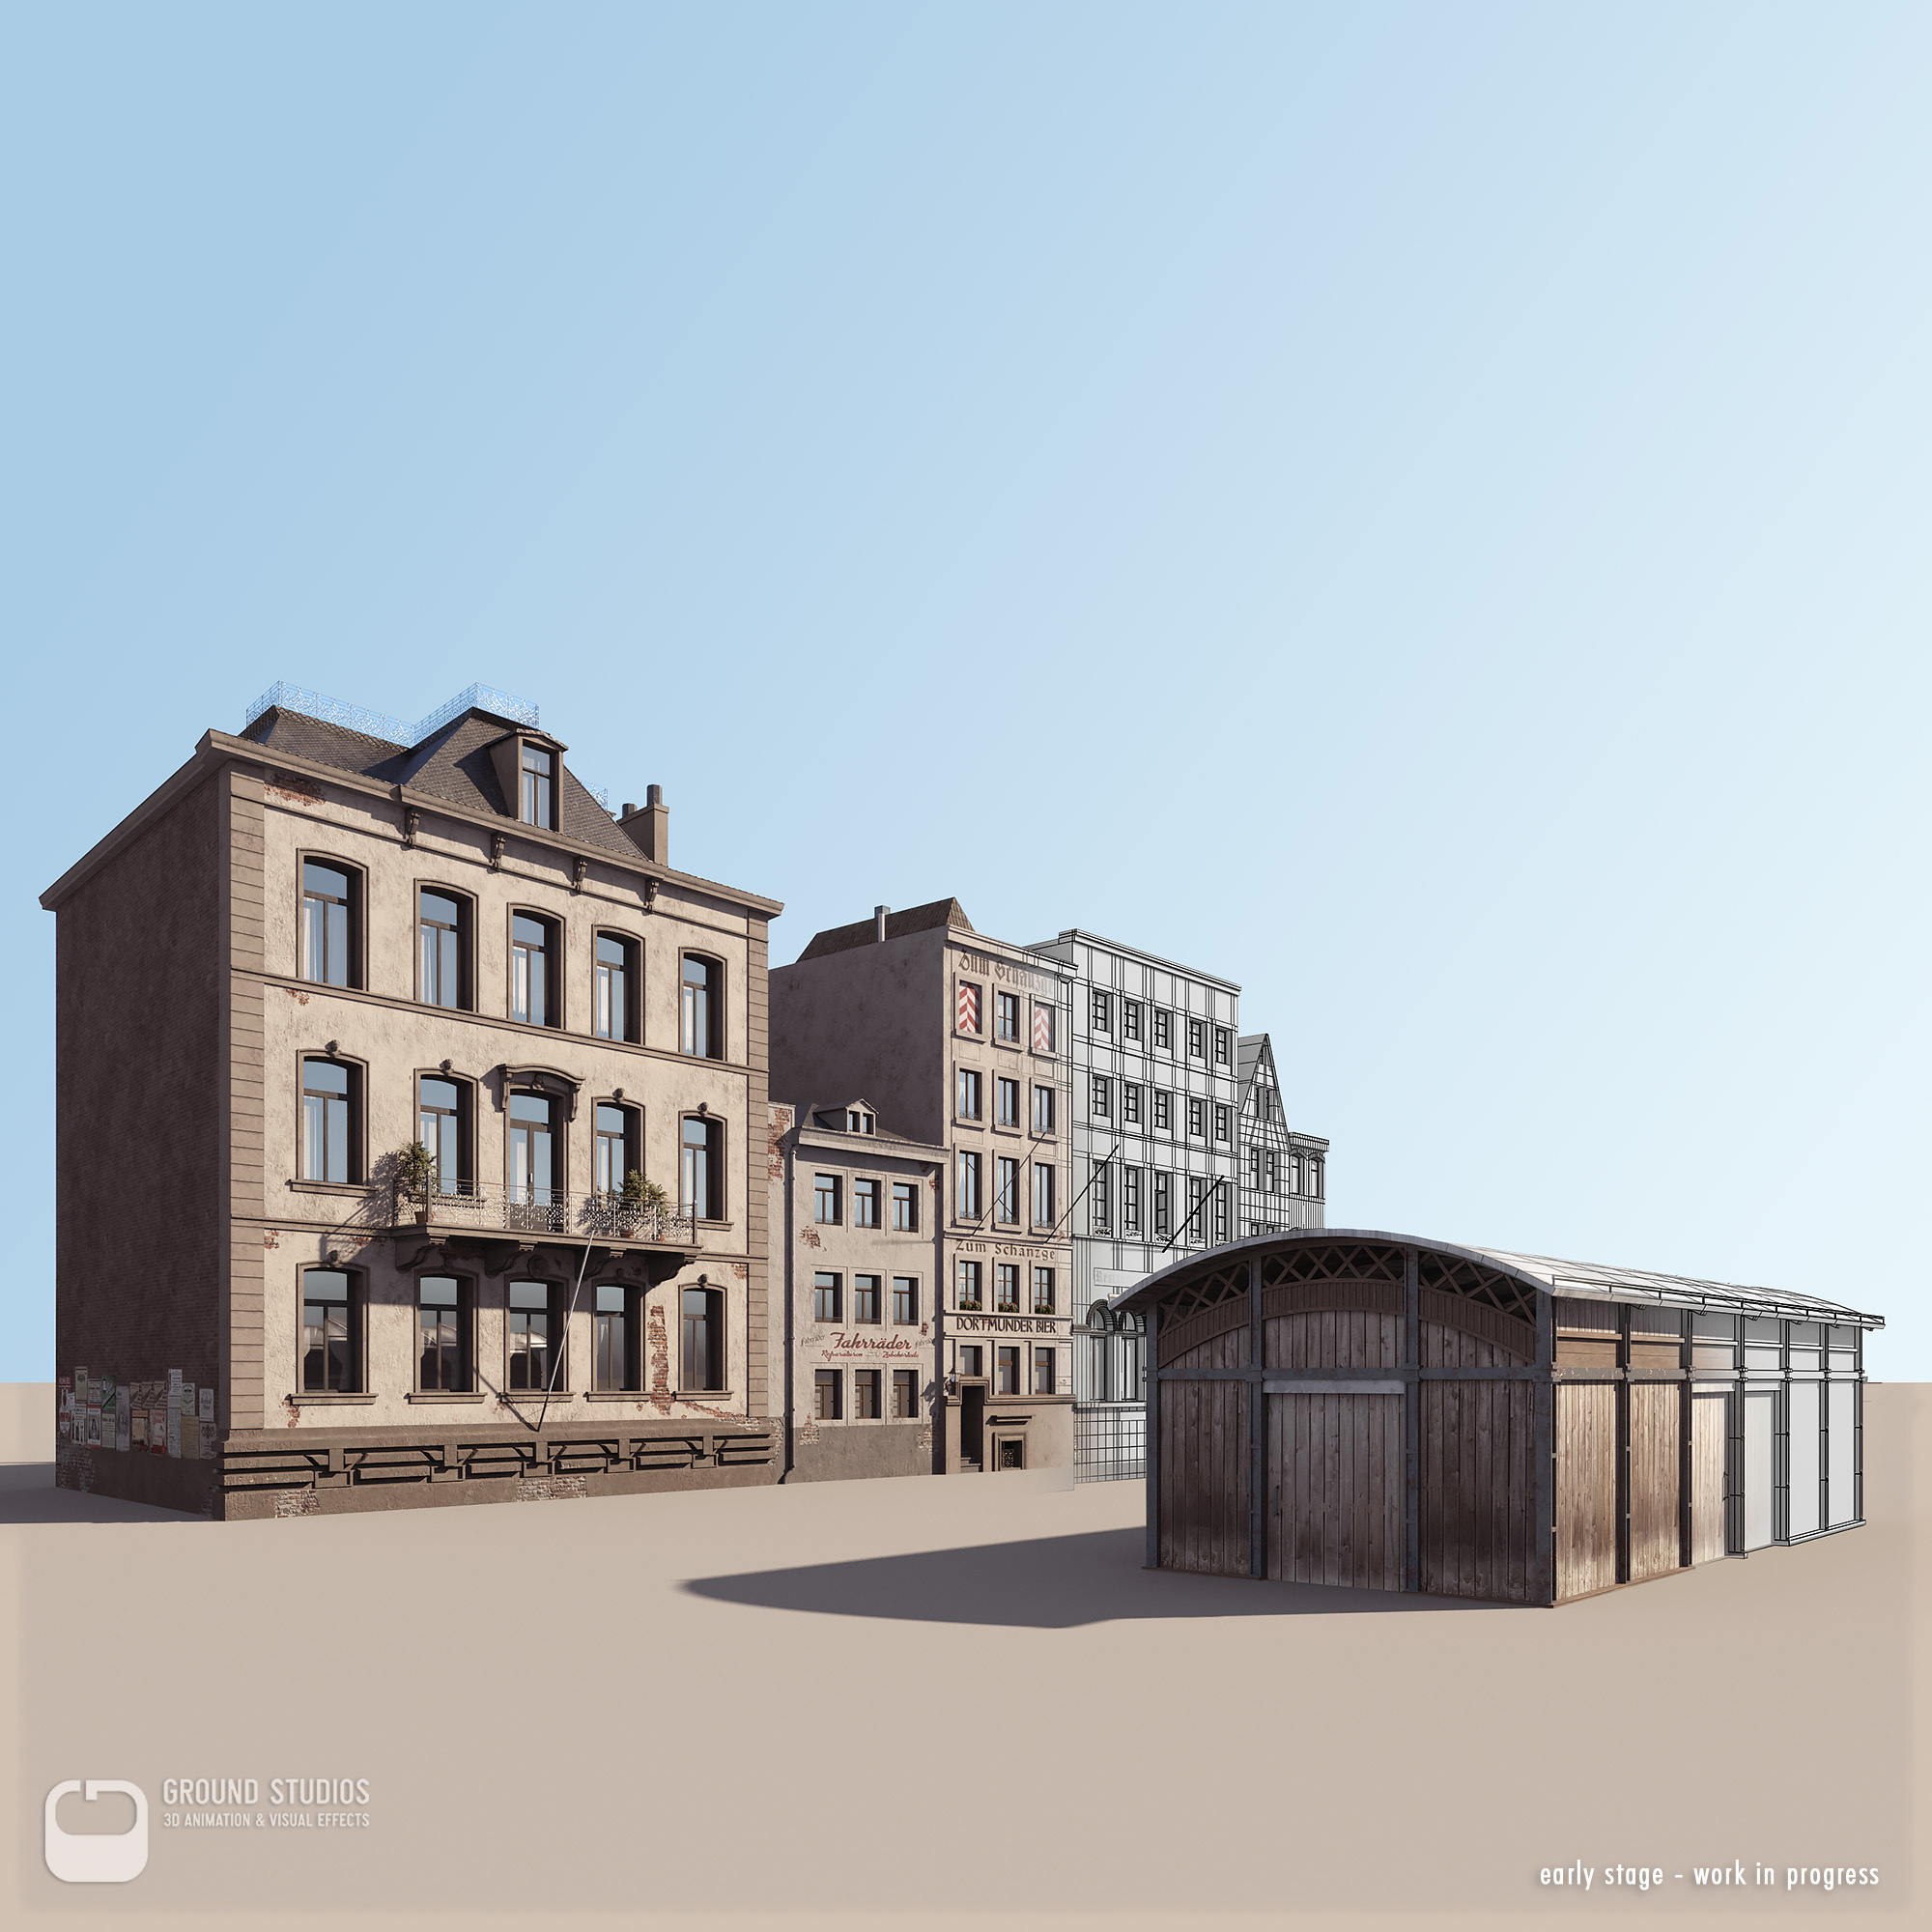
The difficulty of modelling these buildings was highly dependent on the quality and quantity of the available photos. In some cases only the sheer amount of low res or blurry photos helped to identify architectural details or to decipher lettering.
After finishing all the important buildings, we proceeded to complement the rest of the architectural environment, resulting in more than 600 accurately modeled buildings.
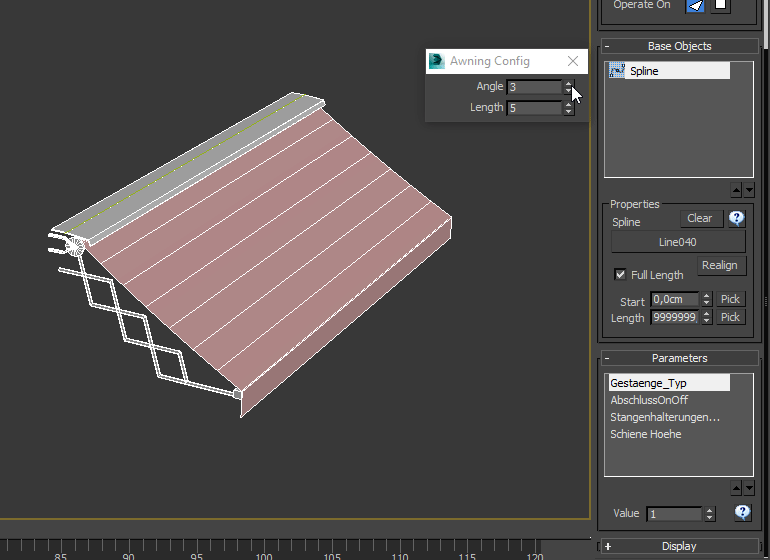
Details like lanterns, awnings, lettering and posters were added. Especially for awnings, Railclone proved to be a great help.
We created an awning system with different inbuilt styles and configurations. Length and tilt angle were controlled via material IDs on the spline itself. Ones for the length and tens for the angle. This way it was very easy to place and randomize hundreds of them in a very short time, without being obligated to touch the Railclone settings.
Texturing/Shading (shading system)
Usually, each object that is different to the next gets its own material/shader. The typical workflow is to copy a shader from building A to building B and change some settings to make it look different.
Unfortunately this means you have a completely independent new material. Depending on the complexity, you need plenty of time to dig into the shader tree, find that particular spinner you want to change and repeat that over and over again for each copy.
Our shading system is based on master shaders, where the values that need to be adjustable are stored in custom object properties instead of the material itself. Those values can be accessed using special texture map types. This way we built a series of master shaders where every parameter a user may want to change is set up as a VrayUserColor or VrayUserScalar map.
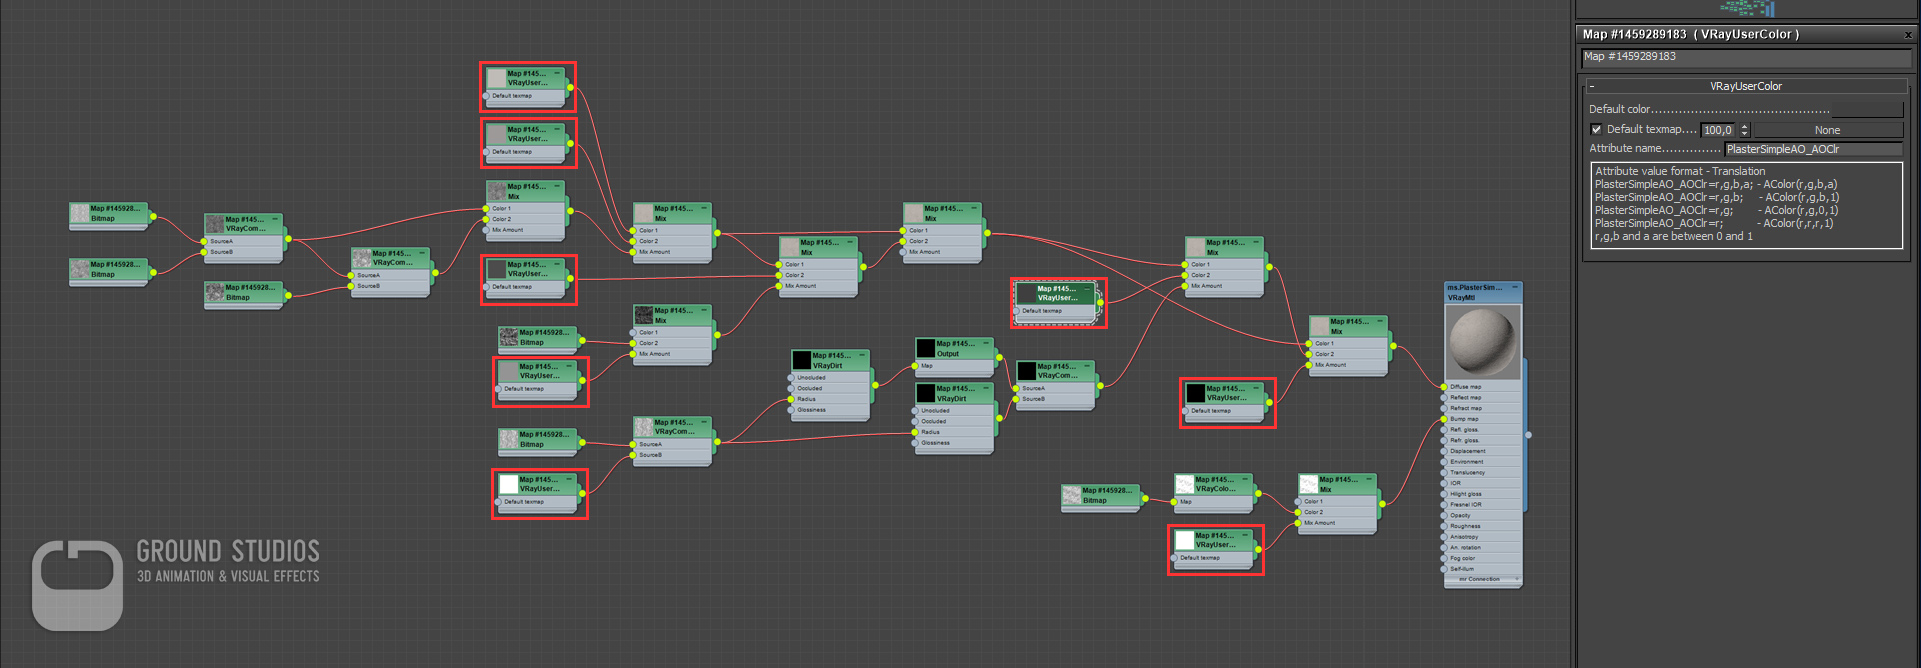
Additionally, we made heavy use of Vertex Paint to blend between brick and plaster or automatic and directed dirt. This means you can assign those shaders to any number of objects and modify colors or other properties of your materials by just changing a bunch of settings on your object itself. So if you want to change the color or amount of dirt on one house you only need to change a property on that specific object - you do not modify the shader itself. The advantages are enormous. For example, you can easily make hundreds of variations of one shader without the need of duplicating the shader for every single modification. A huge benefit regarding flexibility and speed while shading. On top the aspired consistency regarding looks and appearance of the assets was assured.
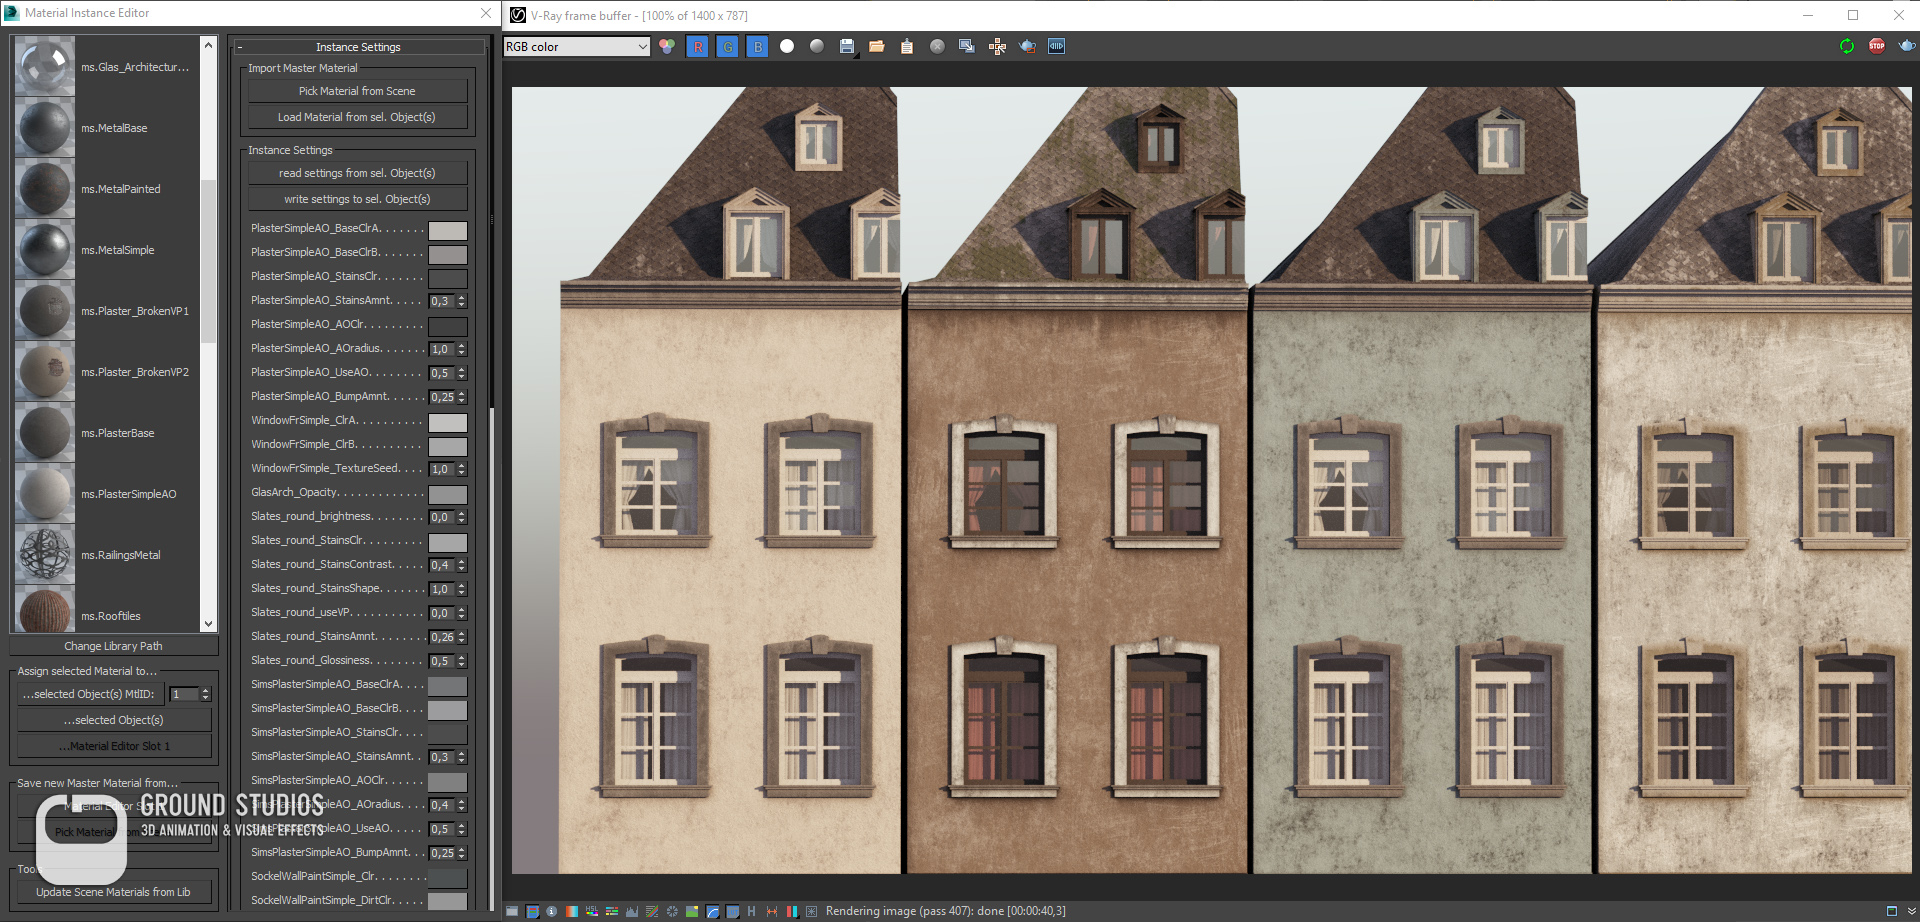
We built small tools in maxscript to help us manage our master shaders and make it easy for artists to assign them and change the user properties. Using this approach we were able to texture and shade our buildings in just a few minutes each and still have plenty of variation and control.
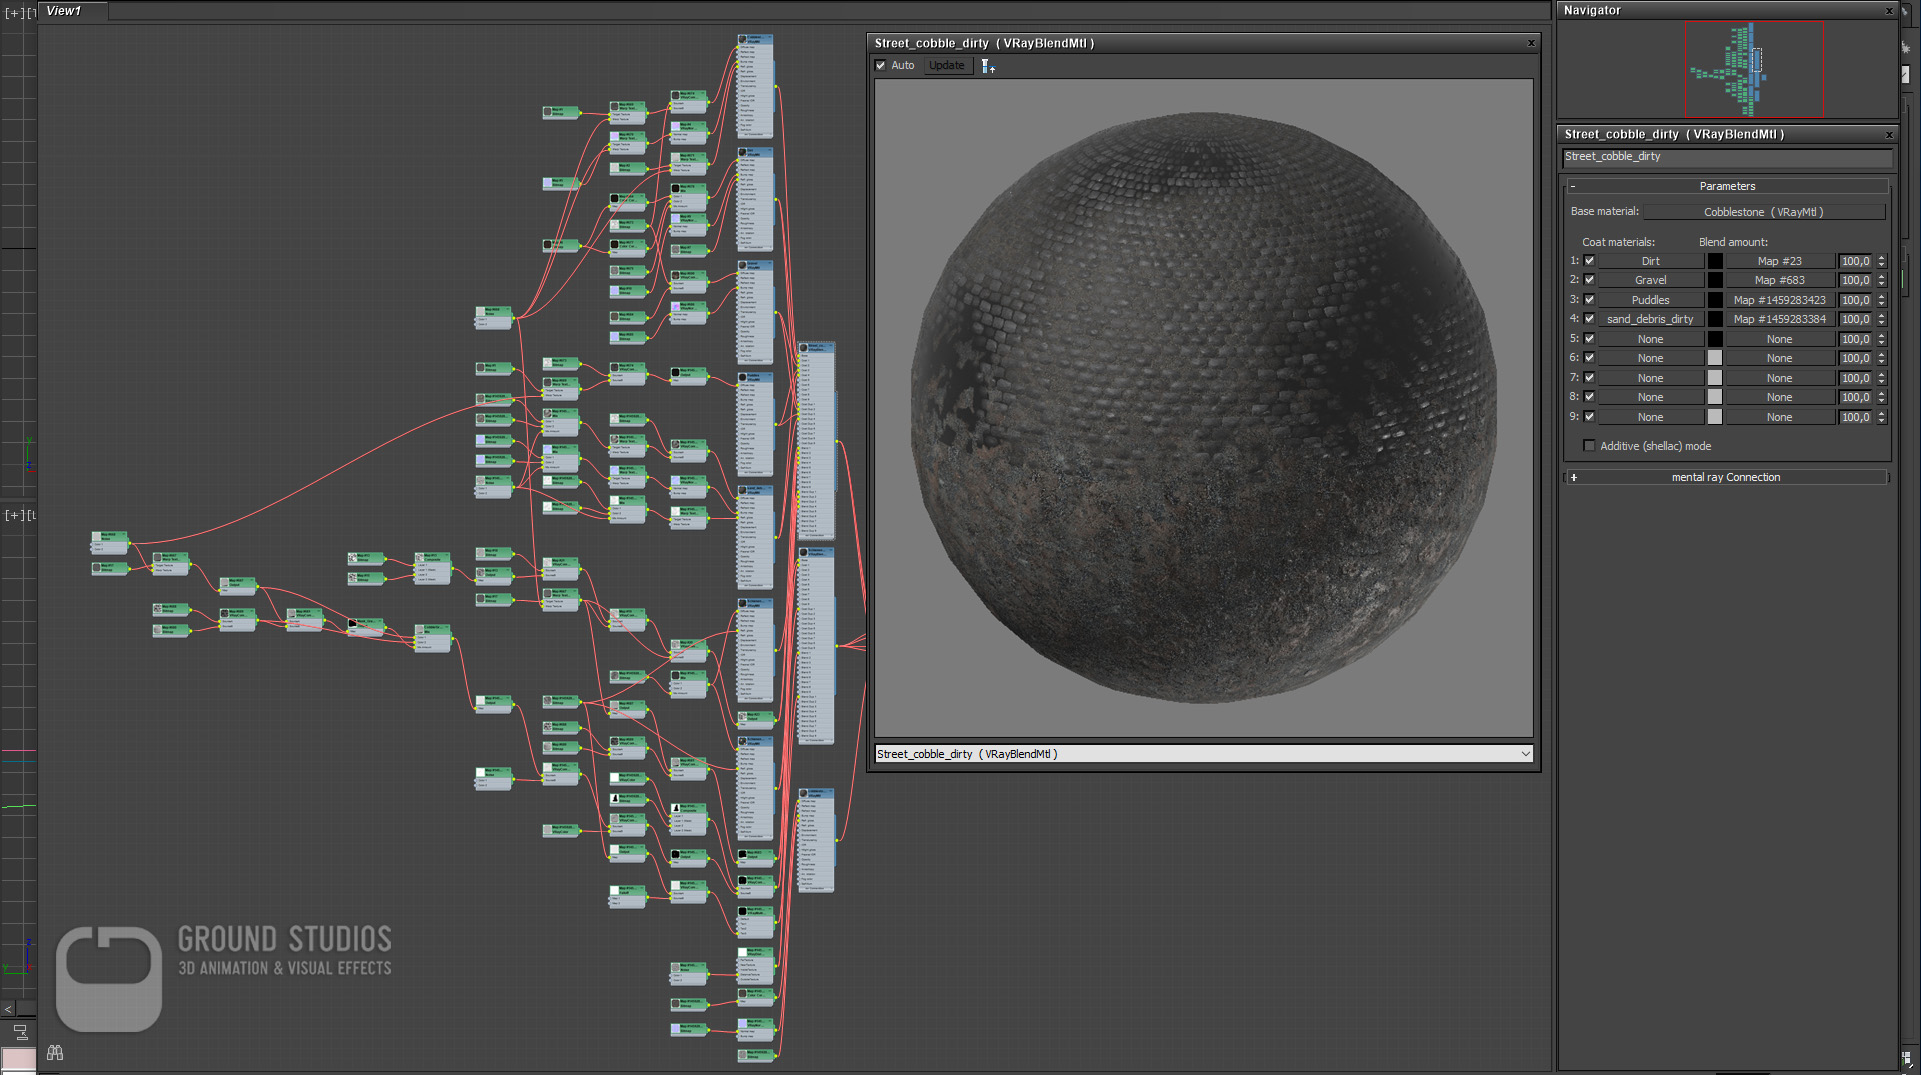
Another typical challenge of creating large exterior spaces is non-repeating ground textures. Sometimes you can get away with clever camera or asset placement and sometimes you can just use multitexture or other plugins to randomize tile textures on large spaces. However, in our case we needed a ground shader that looks convincing and interesting while driving on it at a low speed over more than a kilometer length. Since half of the ride is going straight on, you would notice repetitions as a pattern instantly. First we created our cobblestone textures procedurally in substance designer, exporting diffuse, normals, roughness and height channels and then built our base shaders in max.

To avoid the previously mentioned pattern repetitions we used a plugin called "Warp Texture" which can be found on www.maxplugins.de.
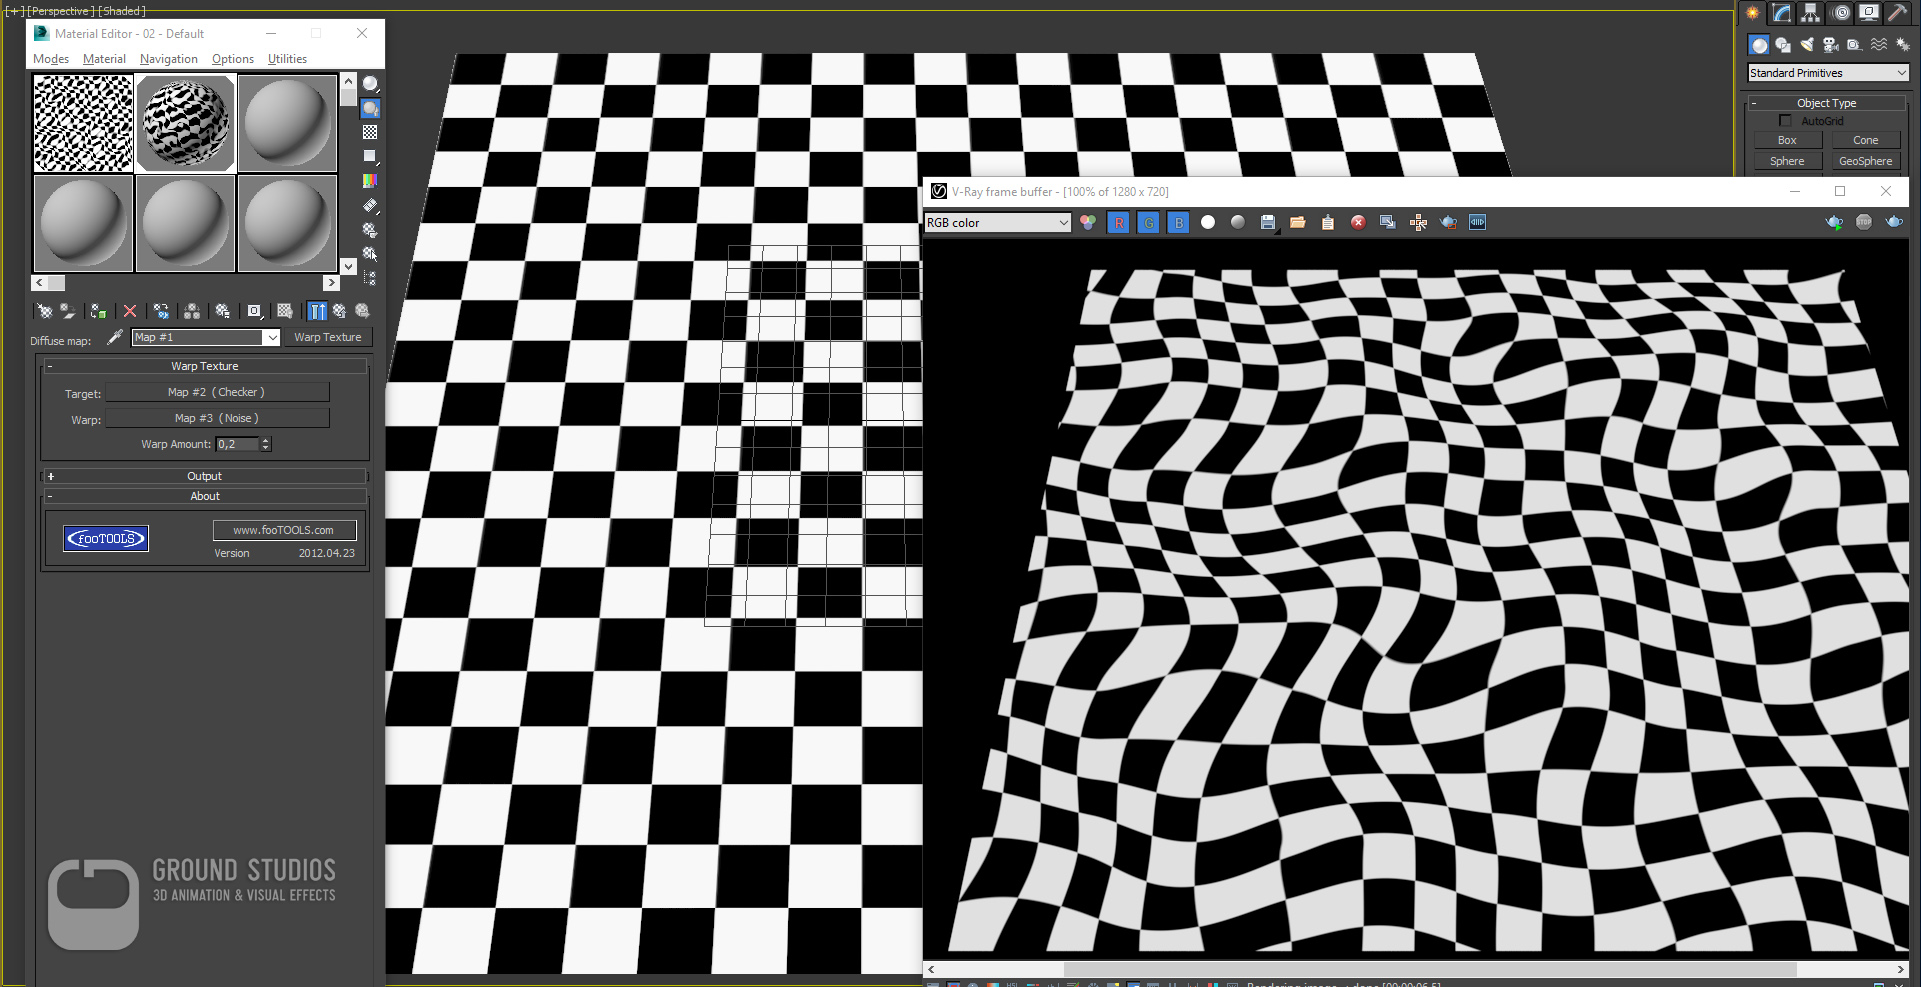
Combined with a worldspace noise you can slightly distort your base textures and largely eliminate repetitions. Adding to that, we blended several dirt, sand and water shaders on top. Each using different worldspace noises and most importantly taking the height map of the cobblestone into account.
That way you can create natural looking puddles and dirt deposits along the way. Unfortunately, the warp texture is not stable when using displacement and tends to crash 3ds max, so we had to rely on normal maps alone.
Rendering / Lighting
Rendering almost 20.000 frames in 4k resolution requires some planning and a close look at optimizations. Apart from the high financial costs, we were also using custom plugin versions and scripts which made the use of a commercial render farm impossible. Cloud rendering, like setting up our own Amazon or Google cloud render farm was considered but proved to be inefficient due to the high amount of data we would have to upload and update each time we needed to render just a couple of test frames. So we decided to upgrade our in-house render farm and render everything locally.
We did several things to bring down render times as much as possible. First of all, optimizing texture resolution is always a good idea. It can help bring rendering startup times down and made it possible for us to spend a bigger fraction of our available RAM for crowd people and other animated objects. As previously mentioned, we used a custom shader system using master materials. These materials were built keeping render time and texture count in mind, so the memory footprint of all buildings was very low due to it's more procedural nature. We also avoided using complex maps like composite or color correction which can affect the render times negatively. A lot can be done with Mix, VrayCompTex and Output maps which are all very fast to process and basically don't affect render times at all.
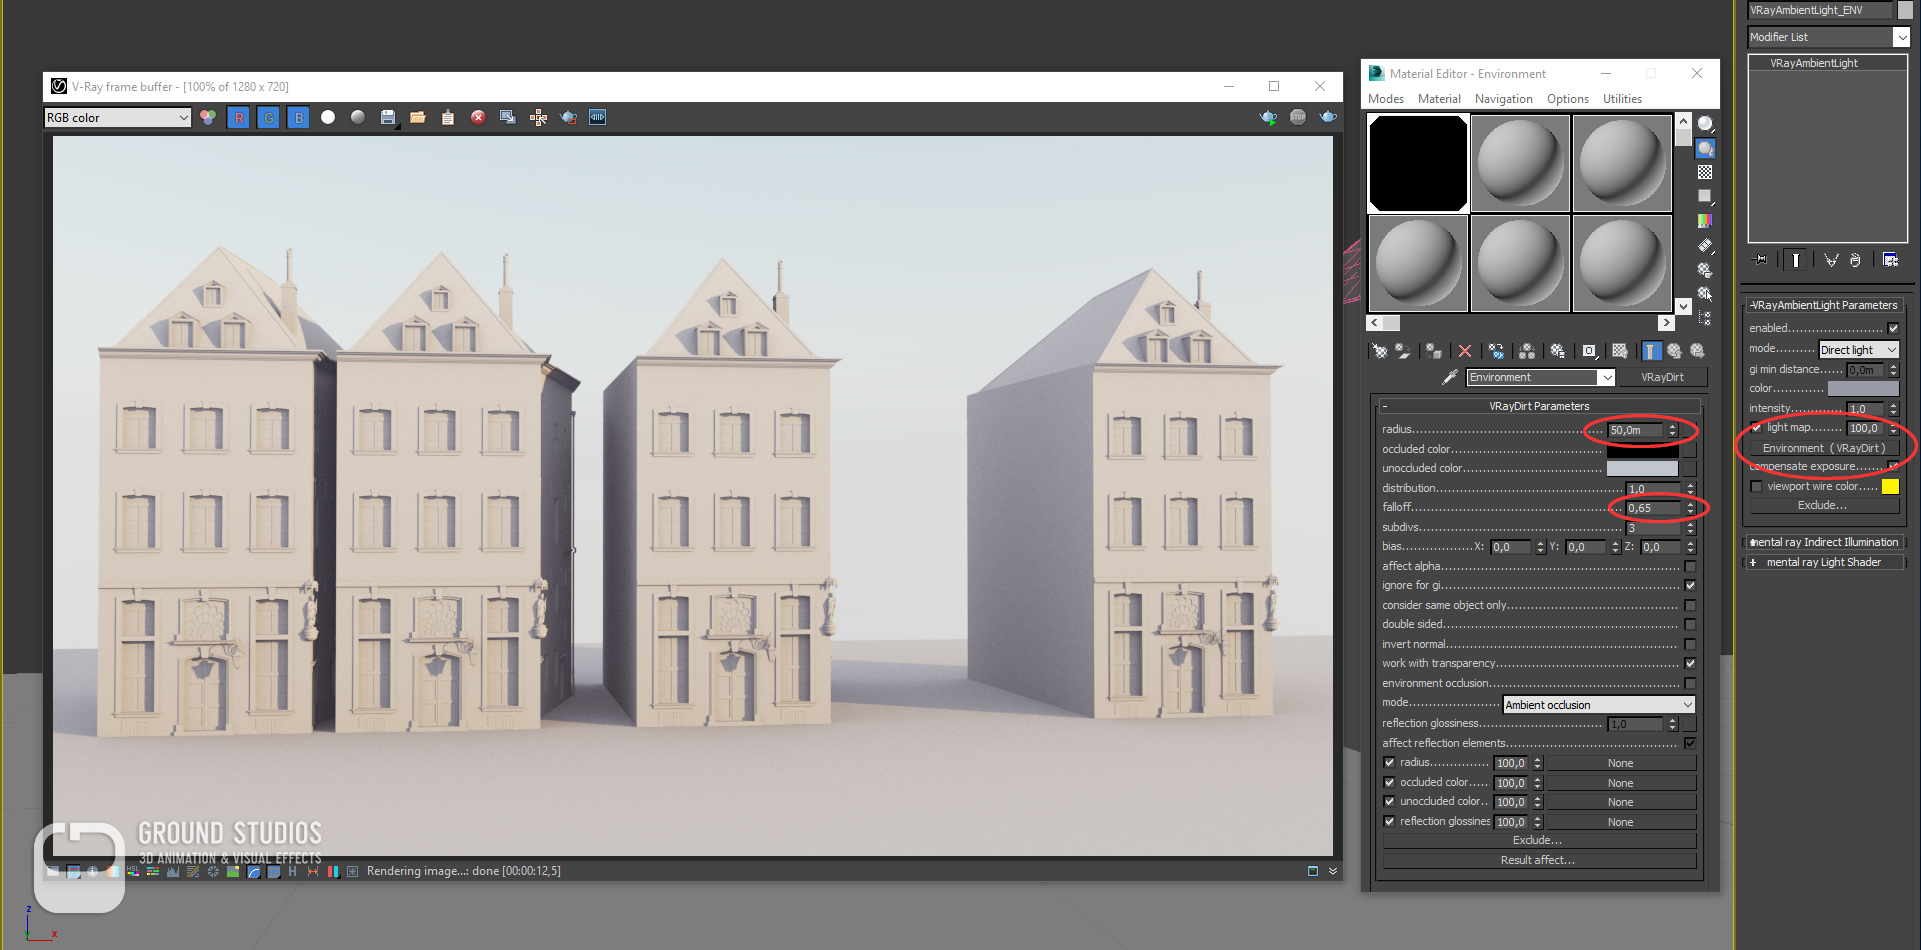
The next big bottleneck is obviously lighting and sampling, especially Global Illumination. We started with a Brute Force and Lightcache GI approach which would usually have worked quite well but we needed to achieve even shorter render times. We decided to not use GI at all and fake it with an VrayAmbientLight using a VrayDirt texture as a light map. Surprisingly, the visual difference was negligible - even in streets with high buildings on each side. The key to a more pleasing and realistic result with that technique is a high radius and a softer falloff in the AO. Apart from that, Lighting only included a VraySun, a HDRI in the background and the VrayAerialPerspective atmospheric effect for the foggy morning look and feel.
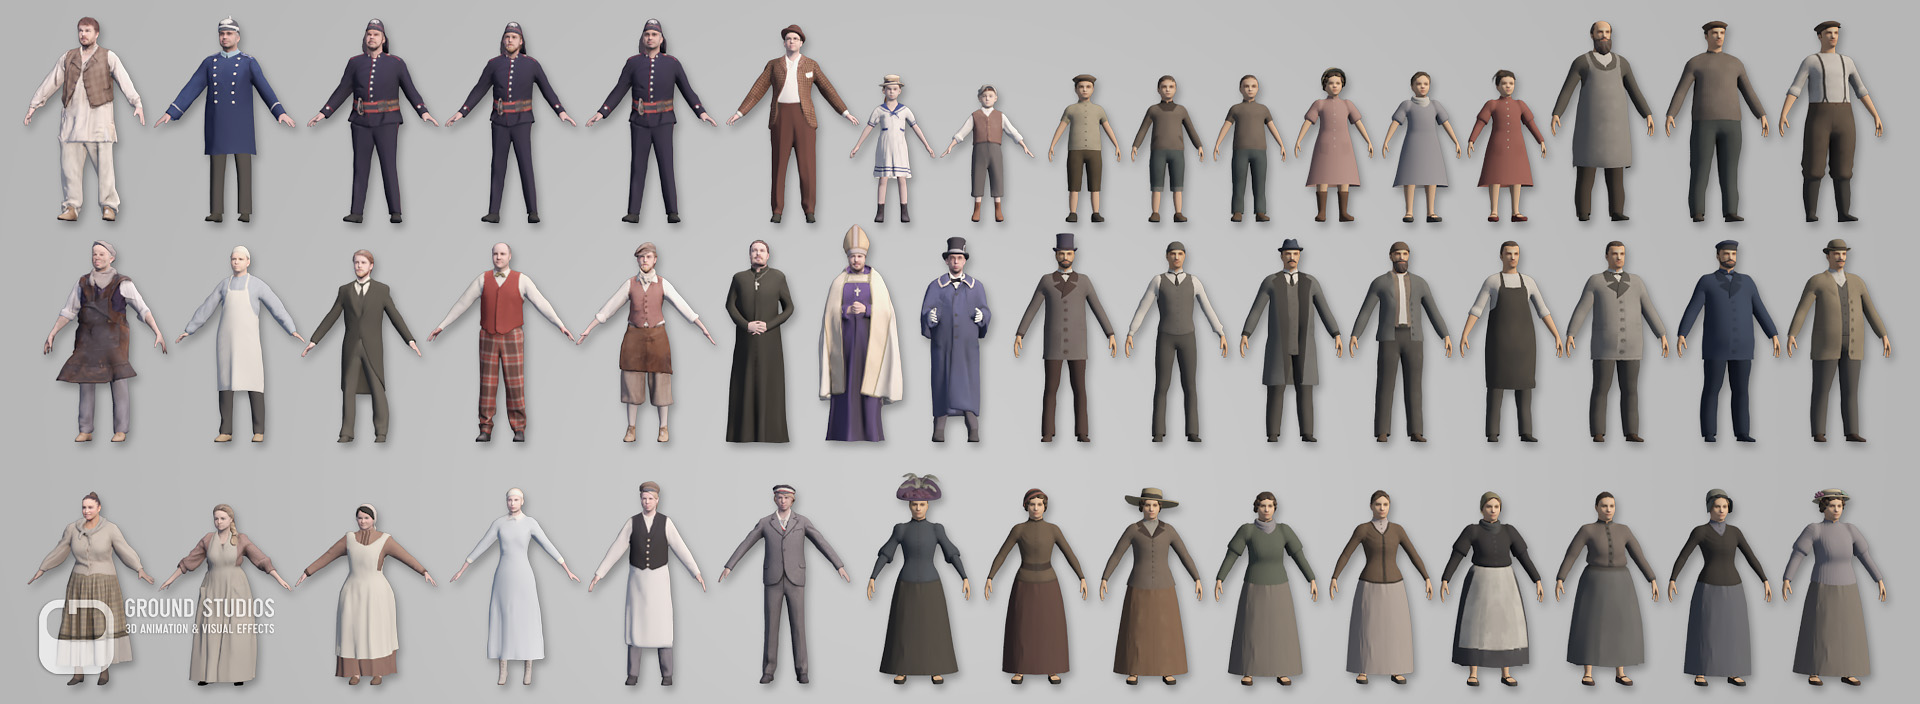
After a long research and screening of hundreds of historical photos, a list of significant clothing has been set up. Rented from a german television set, all these costumes were captured via photogrammetry and were optimized for semi lowpoly and lowpoly use. In the following picture you can see some examples.
The animations were separated into three parts:
- 1. crowd animation, which had to be automated
- 2. special character animation, derived from a directed screenplay
- 3. real time ingame animation for the tram driver
However, with the Version 2.6.0, there was no way to offset the animations for those sections separately. In order to get an animated crowd at the last minute of the ride, a full simulation from the first to the last frame had to be done, no matter if the crowd is visible or hidden behind walls. This led to a huge amount of unnecessary cache data and extremely long simulation times.
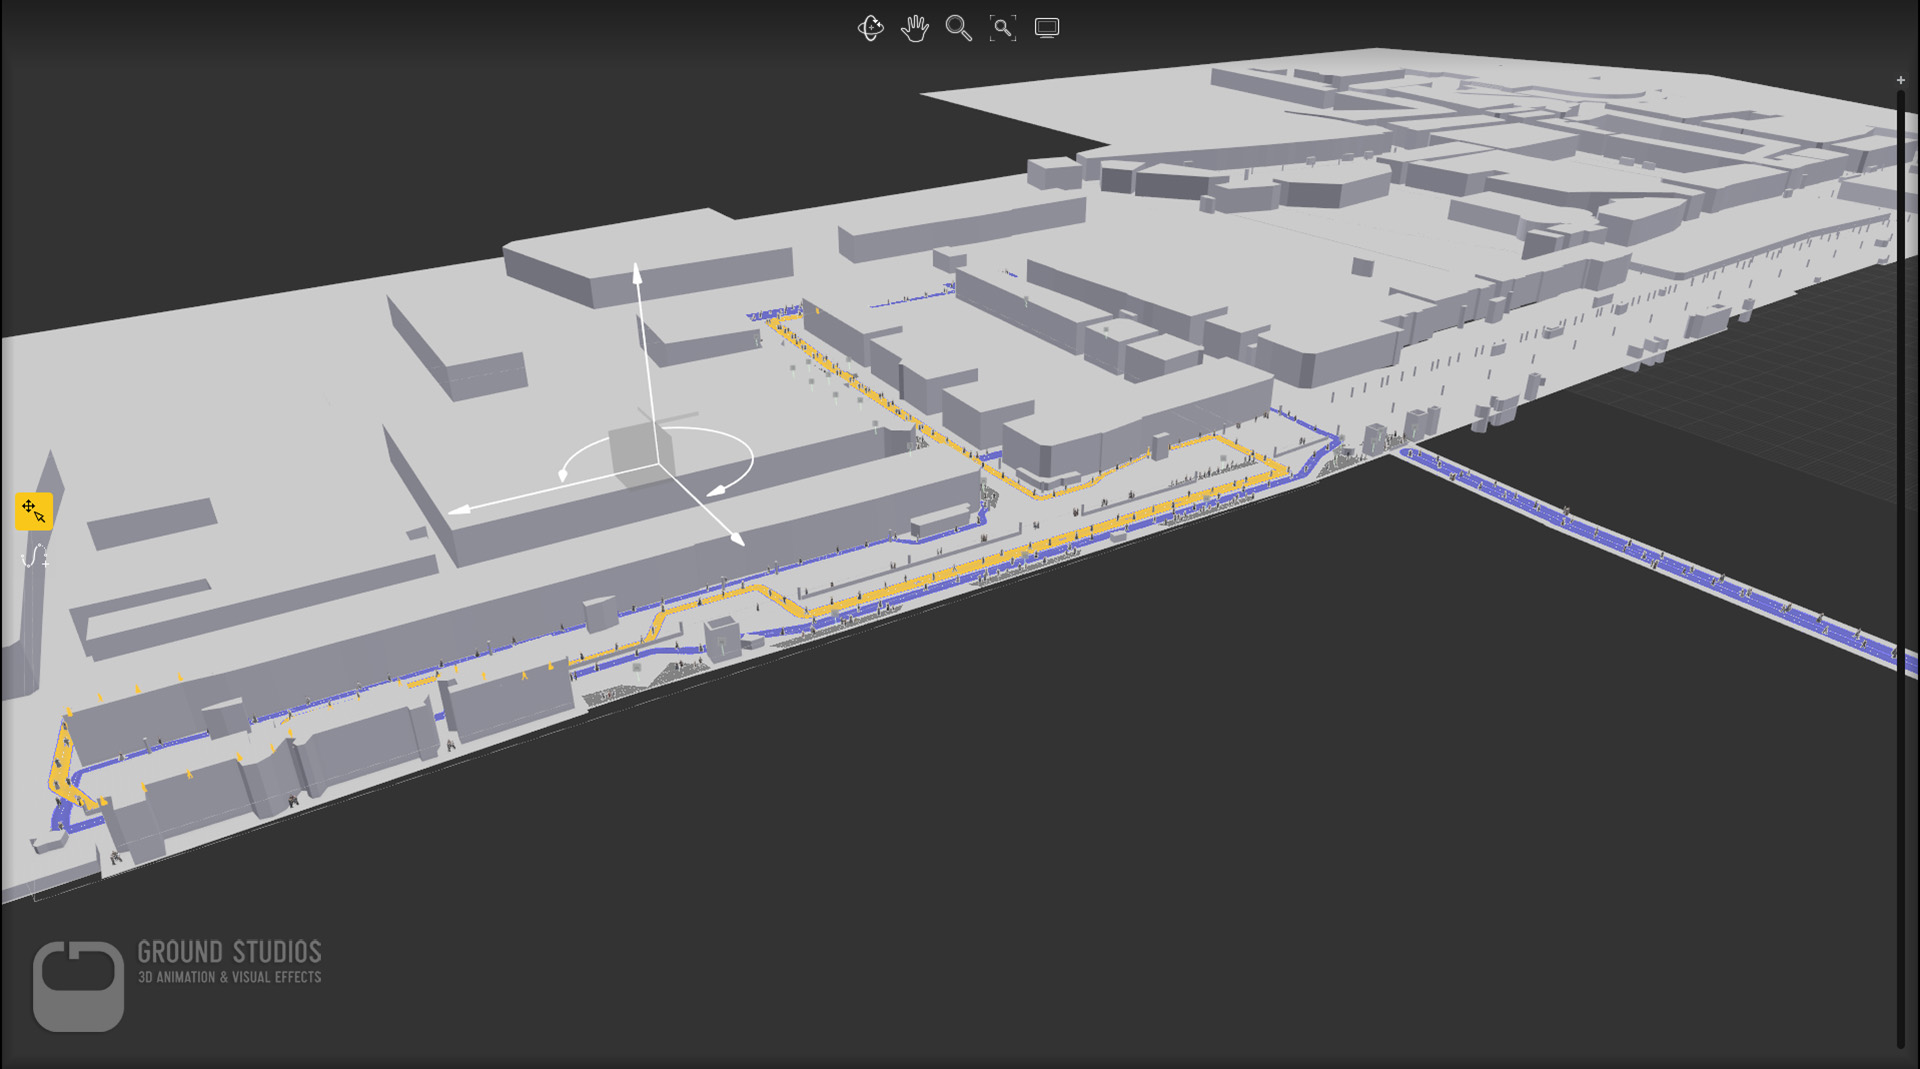
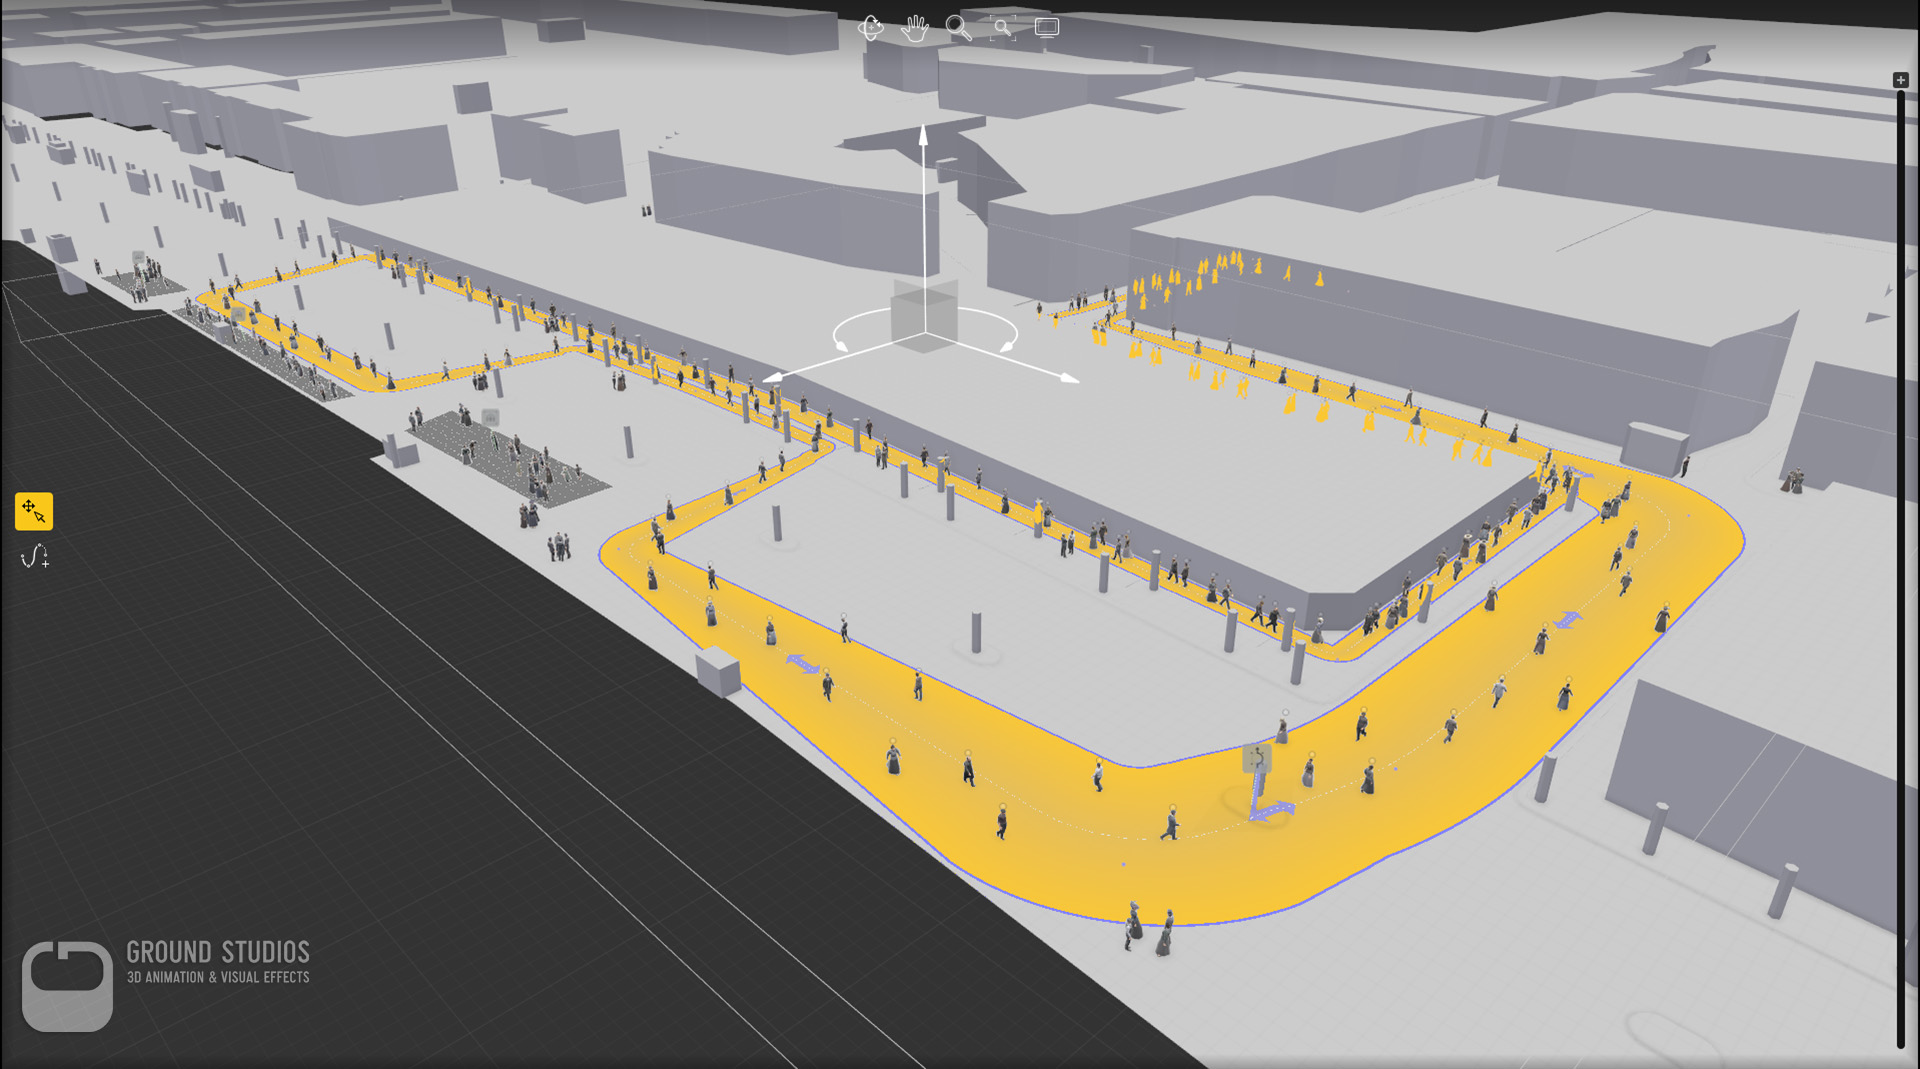
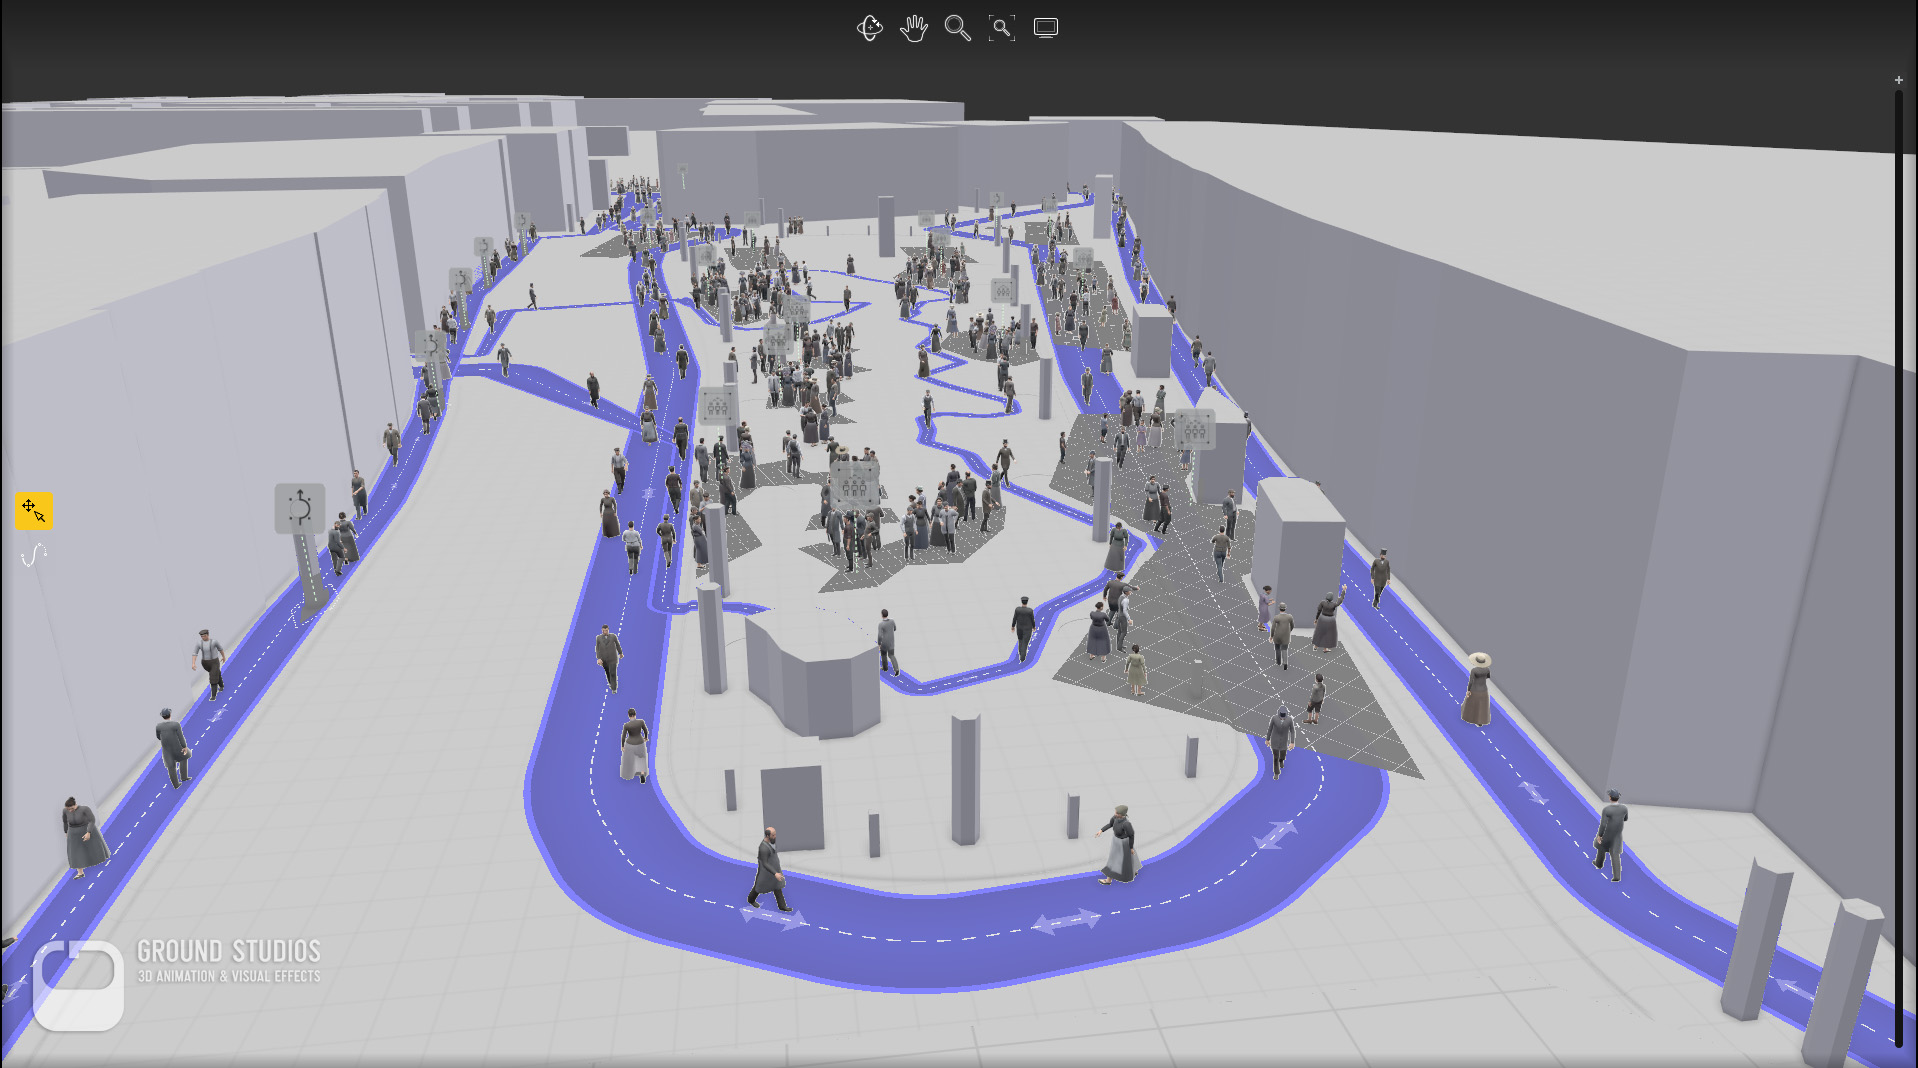
The AXYZ Design support was always a big help. We explained the situation and got quick feedback: the guys invited us for a skype call (beat that, Autodesk!).We knew exactly what we needed to get Anima working in our scene file, so the Anima team added a function to the max plugin. Now, we were able to offset the sim start time for every section independently. In Anima, you draw lines, which become walkways for the actors. After populating all the paths you hit the play button and let the crowd animation simulate. While playing, the software takes care that actors avoid each other, “socialize”, slow down if someone is in the way, or even get deleted when collisions can’t be avoided.
In extremely long shots the actors tend to clump up, because shorter actors like kids are slower than taller actors. It mostly ends up in groups, walking in single line with a child or woman in the lead. Looked funny but not realistic. The solution from the AXYZ team reduced the simulation time to about 6000 frames per section and killed two birds with one stone: reduced clumping and reduced cachesize. Awesome! We can’t thank Diego Gadler and his team enough!
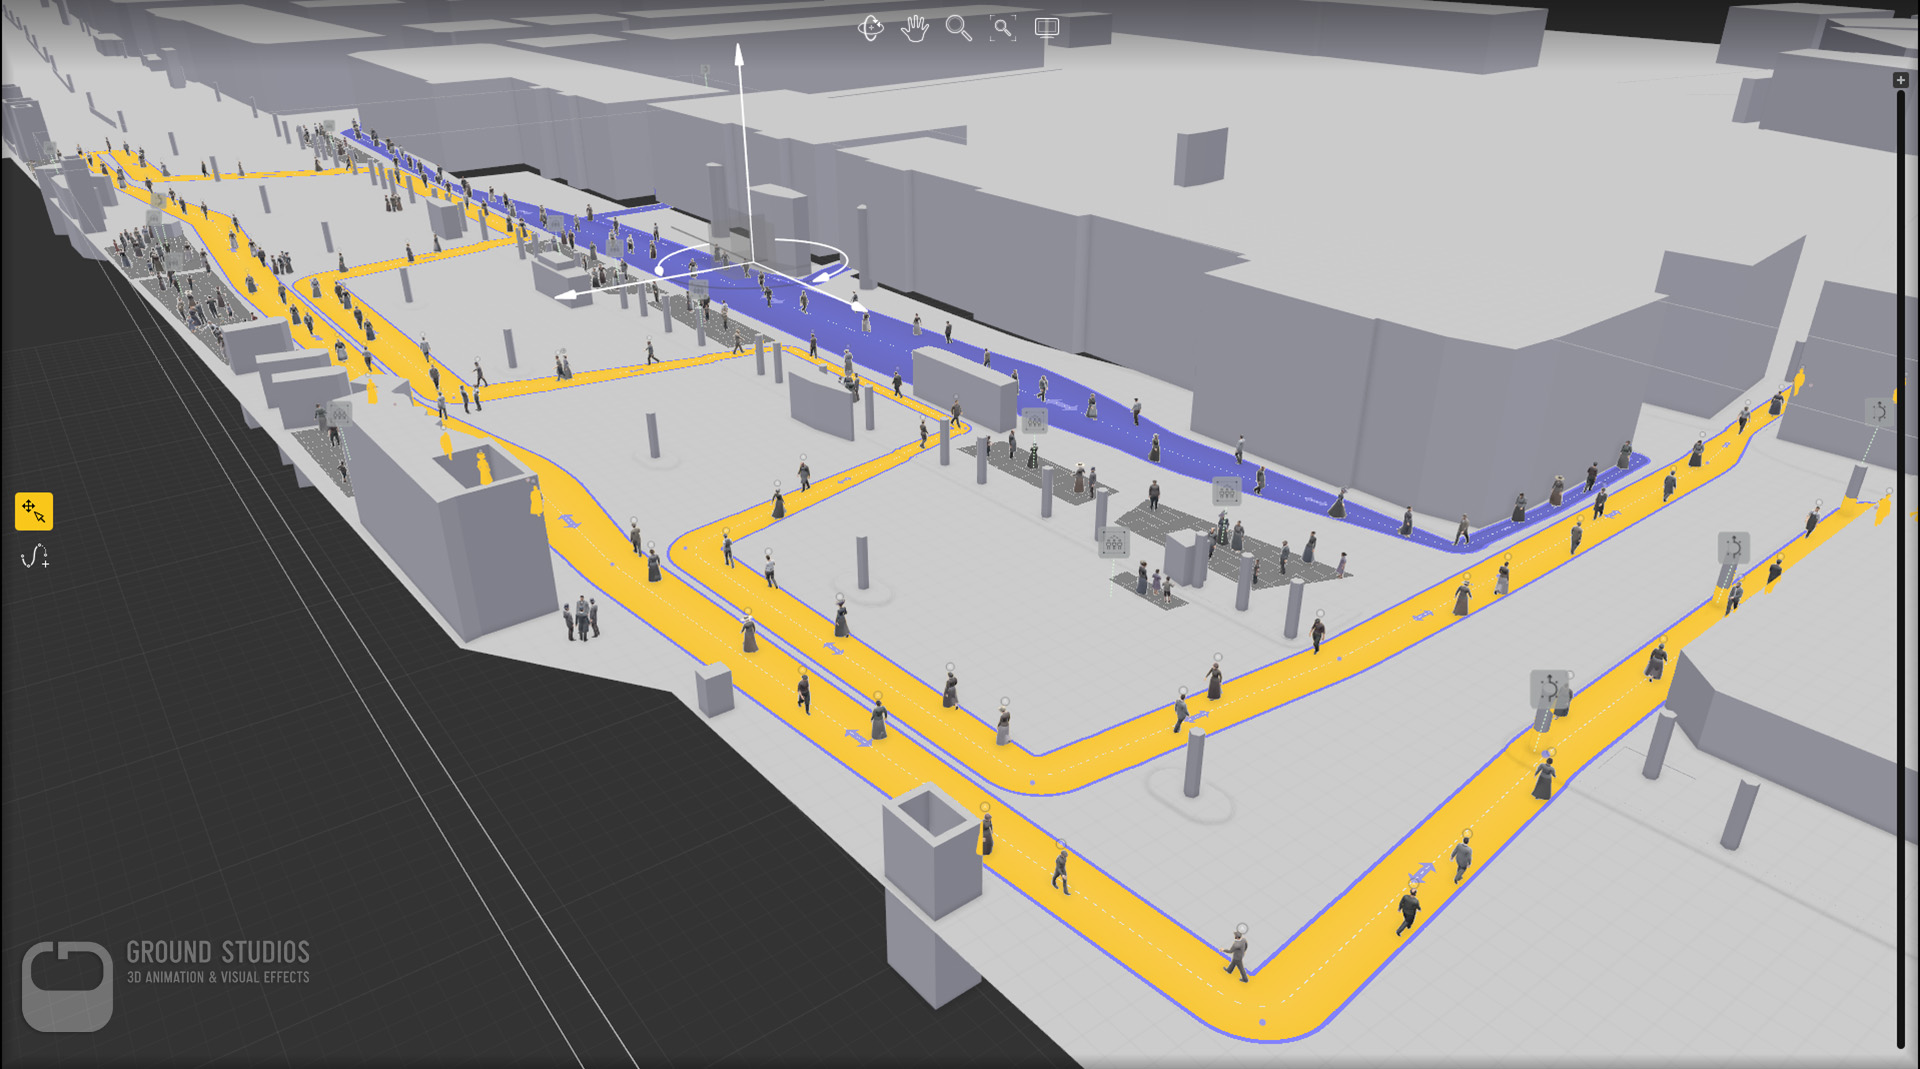
We then imported the Anima project into max and ran a little script that checked for intersections with our vehicles and special animations. Anima itself can’t handle moving obstacles yet, but we had to avoid having actors go right through carriages or the tram. Those actors were then removed by the script.
Special Animations / Motion Capture / Ingame Animations
To bring even more life into the scene, we added some special animations. Which were captured in our in-house motion capture studio.
To get the best immersion with correct stereo and parallax effect, the tram, the passengers and its driver were realized in-engine. But this is a bigger topic for another time. We leave that with a short clip:
Post/Compositing/Encoding
Compositing was pretty straight forward. We usually render everything in 16 bit float exrs and add a couple of render elements for little adjustments in post. However, 20.000 Frames in 4k resolution fill up disk space pretty fast. So we decided to only render the elements we absolutely needed. In our case the beauty pass, a denoised version and some masks. We also rendered an additional pass for all smoke elements and added them on top.
A more interesting aspect of the comp may be our approach to first convert the linear data into log and then craft our own conversion curve to bring back the values into a visually pleasing range. This way we have complete control and avoid the typical tone mapping issues of bringing down the highlights but washing out the rest of the image.

Who we are
GROUND STUDIOS is a versatile 3D production studio, creating visual effects for TV and cinema, visualizations for industry and architecture, as well as animation for commercials and video games. We work with 3ds max as our main 3D application, supplemented by V-Ray, Substance, Anima, Forest Pack and Railclone. For post-production we use Fusion and After Effects.
We are working in very close collaboration with our partner companies “Humanoid” for motion capture and 360 Video production, “AS-Music” for music and sound effects, as well as “Agency for Virtual Reality” (A4VR) for conceptional design and real time implementation. This cooperation makes us extremely effective and competitive within the growing number of VR production companies.
For more information go to:
http://www.ground-studios.com/
https://www.timeride.de